When you purchase through links on our site, we may earn an affiliate commission. Here’s how it works.
The Complete Guide to WebRTC (What It Is, How It Works, How Safe It Is, and How to Handle Leaks)
WebRTC used to be a term you only heard in programming circles years ago. But, nowadays, you find it everywhere online - social media, blogs, and news articles.
But what is it exactly, and why are VPN users so obsessed with it? We’re going to cover all you need to know in this comprehensive guide, so stick around!
What Is WebRTC?
WebRTC stands for Web Real-Time Communication, and it’s an open-source project that enables real-time media communications between browsers and devices.
The WebRTC project got its start in 2011 as a means to allow RTC (Real-Time Communication) apps to function in browsers, IoT (Internet of Things) devices, and mobile platforms.
At the time, only Flash and other plugins could offer RTC. While the latency was low, it was still noticeable. Compared to them (and other streaming protocols), WebRTC offered near real-time speeds (basically, very low, barely noticeable latency).
WebRTC was officially adopted in 2013 when it helped run a cross-browser video call between Chrome and Firefox.
What Is WebRTC Used for?
Websites use it to enable voice and video communications on web pages. And they can offer that functionality without requiring web visitors to install any plugins. Here are the most common use cases:
- P2P video calls
- P2P messaging
- Content sharing
- P2P audio communication
The P2P (peer-to-peer) part means two browsers don’t need a server to communicate with each other anymore.
Some examples of apps that use WebRTC include Google Hangouts, Facebook Messenger, and Discord.
How Does WebRTC Work?
The whole process is a bit complex, but we’ll try to make it as easy to understand as possible by splitting it into different parts.
Keep in mind that, on your end, as a simple user, none of this stuff will be noticeable. WebRTC comes built into pretty much all browsers, and you can use it without having to set anything up.
So, let’s get started:
WebRTC APIs
At its core, WebRTC is just a media engine with JavaScript APIs. Those APIs all play unique roles in how WebRTC works:
- GetUserMedia - The API offers users a way to access microphones and cameras on a device with JavaScript.
- PeerConnection - A vital API that allows users to communicate with each other without needing a server as an intermediary (beyond using it to signal each other). Basically, each user will take media from the GetUserMedia API and insert it into the peer connection, thus creating a video or audio feed.
- DataChannel - This allows WebRTC to support bi-directional transfers for any kind of data. And it can do that directly between peers. It combines UDP (User Datagram Protocol) streams with parts of SCTP (Stream Control Transmission Protocol) to offer both stability and good speeds.
Establishing Connections
Three things are necessary to set up and run a WebRTC connection:
1. Signaling
If two peers want to communicate, they first need to exchange metadata to coordinate communications (like video calls, for example). They normally do this with the help of a web server.
Overall, signaling helps two peers find out about each other’s capabilities and learn each other’s network addresses (not to be confused with IP addresses).
See More: What is an IP Address? – A Beginner’s Guide to IP Addresses + How to Find Yours!
2. NAT Traversal
NAT stands for Network Address Translation, and it allows single IP address communication. Basically, it lets a network use a set of addresses for internal communications and a different set for external traffic. Unfortunately, that can make setting up RTC connections difficult.
And that’s where NAT traversal comes into play since it fixes the problems associated with IP translation. Here are the main specifications WebRTC uses to overcome those challenges:
- ICE (Interactive Connectivity Establishment) - The technique’s main purpose is analyzing all the ways two computers can talk to each other and finding the most efficient option. To do that, it uses the STUN and TURN protocols.
- STUN (Session Traversal Utilities for NAT) - This is a NAT traversal method that makes requests to a STUN server to allow WebRTC clients to find out what their own public IP addresses are. Once they do, they share that information with each other to start communicating and relaying media.
- TURN (Traversal Using Relays around NAT) - If a firewall stops communications between peers, ICE can’t use STUN anymore. Instead, it will use a TURN server to help WebRTC clients relay media between them. TURN is more “expensive” in terms of operating costs, and it has a higher negative impact on quality, so ICE will always try using STUN first.
Those explanations might still seem confusing for some of you, so here are two basic examples of how STUN and TURN protocols work:
- STUN - Computer A and computer B have direct connections to each other. They can only relay media between them if they know each other’s IP addresses. To do that, they send requests (“Who am I?”) to a STUN server through their routers. The server will return the requested information (“You are [IP Address]”). Next, the computers share the IP addresses with each other and start communicating.
- TURN - Computer A and computer B can’t establish a direct connection due to firewall interference. So, they send requests to a TURN server to learn about the routers on each other’s network. Next, they’ll use the routers and server to relay the media between them.
3. Compression & Decompression
Alright, so the peers are ready to share data between them. But wait - they can’t send it in its normal format. Raw audio and video files are simply too large. If two peers would try to send them, the connections would be very slow or just drop.
The data needs to be compressed in order to make the transfer efficient. Also, once a device receives the media over a peer connection, it has to decompress it.
A codec gets the job done, and WebRTC uses five codecs:
- Three for audio files:
- PCMU (G711u) - 8,000 Hz with a single mono channel.
- PCMA (G.711a) - 8,000 Hz with a single mono channel.
- Opus - 48,000 Hz with two stereo channels.
- Two for video files - VP8 and H.264/AVC (Constrained Baseline Profile Level 1.2).
We’ll very likely see comprehensive support - like V9, for example, which delivers better quality at the cost of needing more processing power. In fact, V9 already works with WebRTC on Chrome, but this combination hasn’t been adopted on other browsers yet.
How Secure Is WebRTC?
Pretty secure. It’s usually considered the safest voice and video calling technology to date. Here’s why:
- WebRTC offers end-to-end encryption for peer communication. Even the signaling is encrypted through TLS (Transport Layer Security) sessions or QUIC (Quick UDP Internet Connections).
- Apps don’t get direct access to your microphone and camera. WebRTC clearly specifies you need to give your consent for that to happen. Similarly, all browsers ask for your permission before initiating screen sharing.
- WebRTC is open-source, meaning it’s fully transparent.
WebRTC takes advantage of browser security (especially their frequent, automatic updates) since it’s built into them.
Really, the only security problem with WebRTC happens when you use a VPN. Why? Because there’s a pretty good chance that your connection will suffer a WebRTC leak.
Related: VPNs Can Leak Real IPs And Make Users Traceable
What Is a WebRTC Leak?
It happens when your IP address leaks out of the VPN tunnel. Since you’re using a VPN to hide it, that’s obviously a problem.
WebRTC leaks can happen because the ICE-STUN combination takes precedence over the VPN tunnel. Simply put, they return your real IP address in JavaScript, so any website could see it. Worst of all, plugins like Ghostery or AdBlockPlus can’t prevent these leaks since STUN requests are made outside the XMLHttpRequest procedure.
If you’re having trouble seeing how that is such a huge problem, just picture this - an advertiser could set up a STUN server with a wildcard domain to track you online. Also, a website you’re trying to unblock (like Netflix or Hulu) could use WebRTC to find your real IP address, and restrict your access.
Allegedly, an update will be coming to WebRTC in the future (mDNS - Multicast DNS), which will solve this problem. But right now, you’re still likely to experience a WebRTC leak.
How to Test for a WebRTC Leak
Most people recommend using ipleak.net from AirVPN. While it’s a good testing tool, we wouldn’t say you should use it for WebRTC leaks. It’s more comprehensive, so it’s better suited for when you want to test a VPN connection for multiple types of leaks.
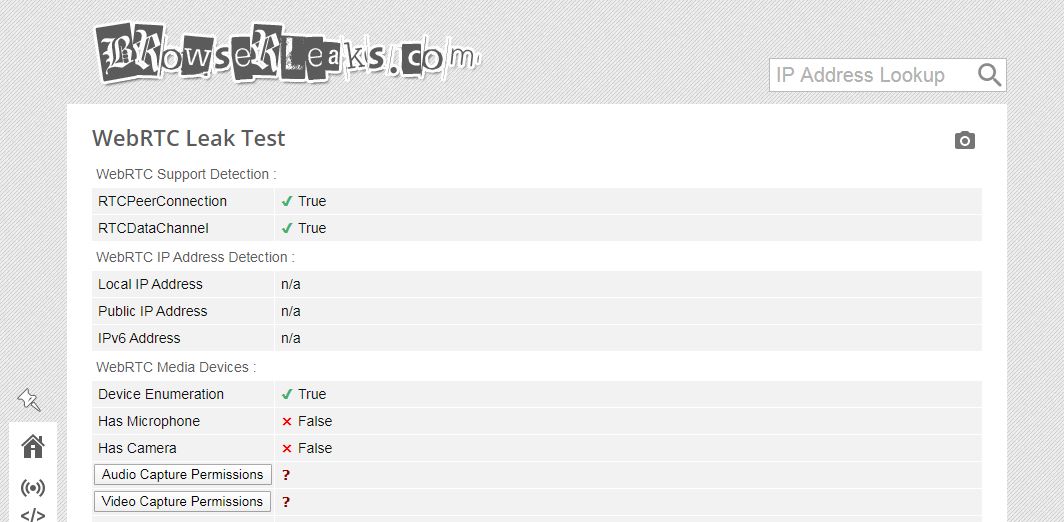
Instead, you should use the WebRTC Leak Test from BrowserLeaks.com. It’s easy to understand, and it immediately tells you if you’re dealing with a WebRTC leak or not.
To run a test, use BrowserLeaks’ testing tool without a VPN. Take a screenshot of your IP address, and then run the same test while connected to the VPN. If your original IP address shows up, you’ve got a leak.
We also ran a test to show you what you’ll want to see. We used an Austrian VPN server from Ivacy, while our real location was in Romania.
As you can see, no IP address shows up. If we were to experience a WebRTC leak, the test should have displayed our real IP address and geolocation.
Oh, and if you see the VPN server’s IP address in the results, don’t worry. It’s okay as long as your real IP address isn’t visible.
How to Prevent a WebRTC Leak
Look that up online, and most articles and people will tell you to disable WebRTC on your browser. While you can do that, there are other easier things you can try first:
Use Extensions
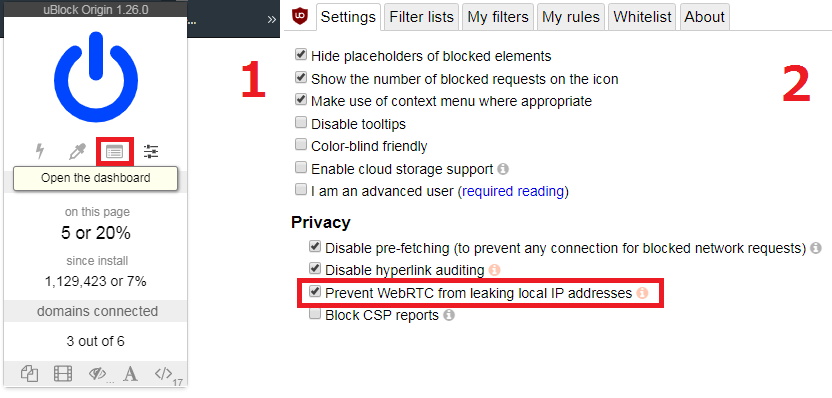
The one we recommend the most is uBlock Origin. It’s open-source and very efficient at preventing WebRTC leaks - as well as blocking trackers, annoying ads, and malicious scripts. It also works on Chromium browsers, Firefox, Microsoft Edge, and Safari.
To configure uBlock Origin to prevent these leaks, you need to head to the dashboard, and enable this option: “Prevent WebRTC from leaking local IP addresses.”
Other extensions you can use include:
- WebRTC Leak Prevent (Chrome)
- WebRTC Leak Shield (Chrome and Firefox)
- Disable WebRTC (Firefox)
- WebRTC Control (Chrome, Firefox, and Opera)
If you use WebRTC Leak Prevent, you’ll need to take additional steps on Opera. After it’s installed, it will take you to a web page with advanced options. Next to “IP handling policy,” click on the drop-down menu and select “Disable non-proxied UDP (force proxy).” Then, just hit “Apply settings.”
Use a VPN With WebRTC Leak Protection
One of the best ways to prevent these leaks when running a VPN connection is to use a service that blocks them. A VPN could offer such protection through its browser extension or firewall rules.
Here are some quality VPNs that offer WebRTC leak protection:
- ExpressVPN - Offers extensions that prevent leaks on Firefox and Chrome. They also have a dedicated team of engineers who continuously test for new WebRTC leaks and patch them.
- NordVPN - Their clients block leaks, and they also offer browser extensions that do the same thing (Chrome and Firefox).
- Perfect Privacy - They configured their clients to use firewall rules to prevent WebRTC leaks.
- PureVPN - They have built-in leak protection on their extensions (Chrome and Firefox), mobile apps, and desktop clients that comes enabled by default.
We tested all these services for WebRTC leaks (and other leaks too) and didn’t find any.
How to Disable WebRTC on Different Browsers
If none of the previous tips worked for you, or if you just want to be truly sure you won’t suffer WebRTC leaks when using a VPN, you can disable it.
Just keep in mind that by doing that, your browser will likely no longer support WebRTC functionality. Also, for these tutorials, we’ll be assuming you all use the latest browser versions.
With that out of the way, here’s how to do it on the most popular browsers:
Firefox (Desktop & Mobile)
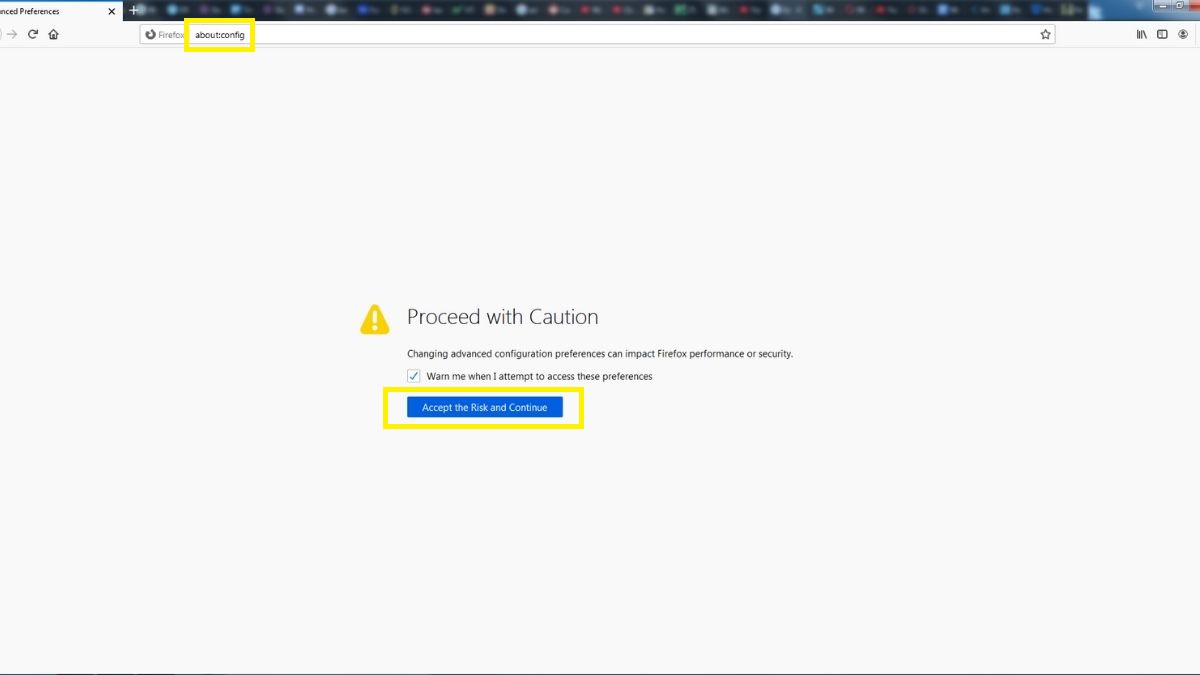
Disabling WebRTC on Firefox is pretty simple. Just run the browser, and type “about:config” in the URL bar. Hit enter, and click “Accept the Risk and Continue” when you get the warning message.
Next, type "media.peerconnection.enabled" in the search bar. Double-click on it to change the value to “false.”
And you’re done.
Chrome (Android)
Open up the Chrome app, and type this in the URL bar: “chrome://flags/#disable-webrtc”
Next, just scroll down until you find “WebRTC STUN origin header.” Alternatively, type that into the search bar to find it faster. When you locate it, hit “Disable” under it. Feel free to disable other WebRTC-related options. Relaunch Chrome for the new settings to take effect.
Unfortunately, not everyone can do this on their Android device. On some versions of the OS or Chrome, the “WebRTC STUN origin header” option isn’t available. In our case, it didn’t show up.
Sure, other WebRTC options are there, and you can disable them, but that likely won’t be enough to prevent leaks.
If you really want to be safe, we recommend avoiding Chrome and installing Firefox instead. You can disable WebRTC on it by following the same instructions we gave for Firefox above.
Safari
Safari is pretty secure by default (though it’s not completely perfect for your privacy), but it can still expose you to WebRTC leaks. So here’s how to disable it on macOS and iOS:
macOS
The latest version of Safari actually fixed the leak issue by getting rid of the problematic legacy WebRTC API. It now uses a feature called "WebRTC mDNS ICE candidates" to prevent them. Follow this link to learn more about what it is and how it works.
If you happen to use an older version of the browser, try this to disable WebRTC:
- Open Safari and head to Safari > Preferences.
- Click on the Advanced tab.
- Look for this box at the bottom “Show Develop menu in menu bar,” and tick it.
- Close the Preferences tab, and go to Develop > Experimental Features.
- Find the “Remove Legacy WebRTC API” option and tick it.
iOS
Doing this on iOS is a bit tricky. Here’s the thing - you can disable WebRTC on the Safari mobile app, but only on iOS 11 or earlier versions.
On iOS 12 and 13, the option to do it isn’t there anymore. Apple likely fixed the leak problem like they did on macOS. But if you want to be safe, you should use NordVPN or ExpressVPN’s iOS app to further block WebRTC leaks.
If you have an older version, here’s what you can do:
- Open the Settings app.
- Scroll down and go to Safari > Advanced > Experimental Features.
- Look for “Remove Legacy WebRTC API” and tap the switch next to it. When it’s green, it means WebRTC is disabled.
Brave (Desktop)
While Brave offers decent privacy, it’s still based on Chromium. So it’s vulnerable to WebRTC leaks.
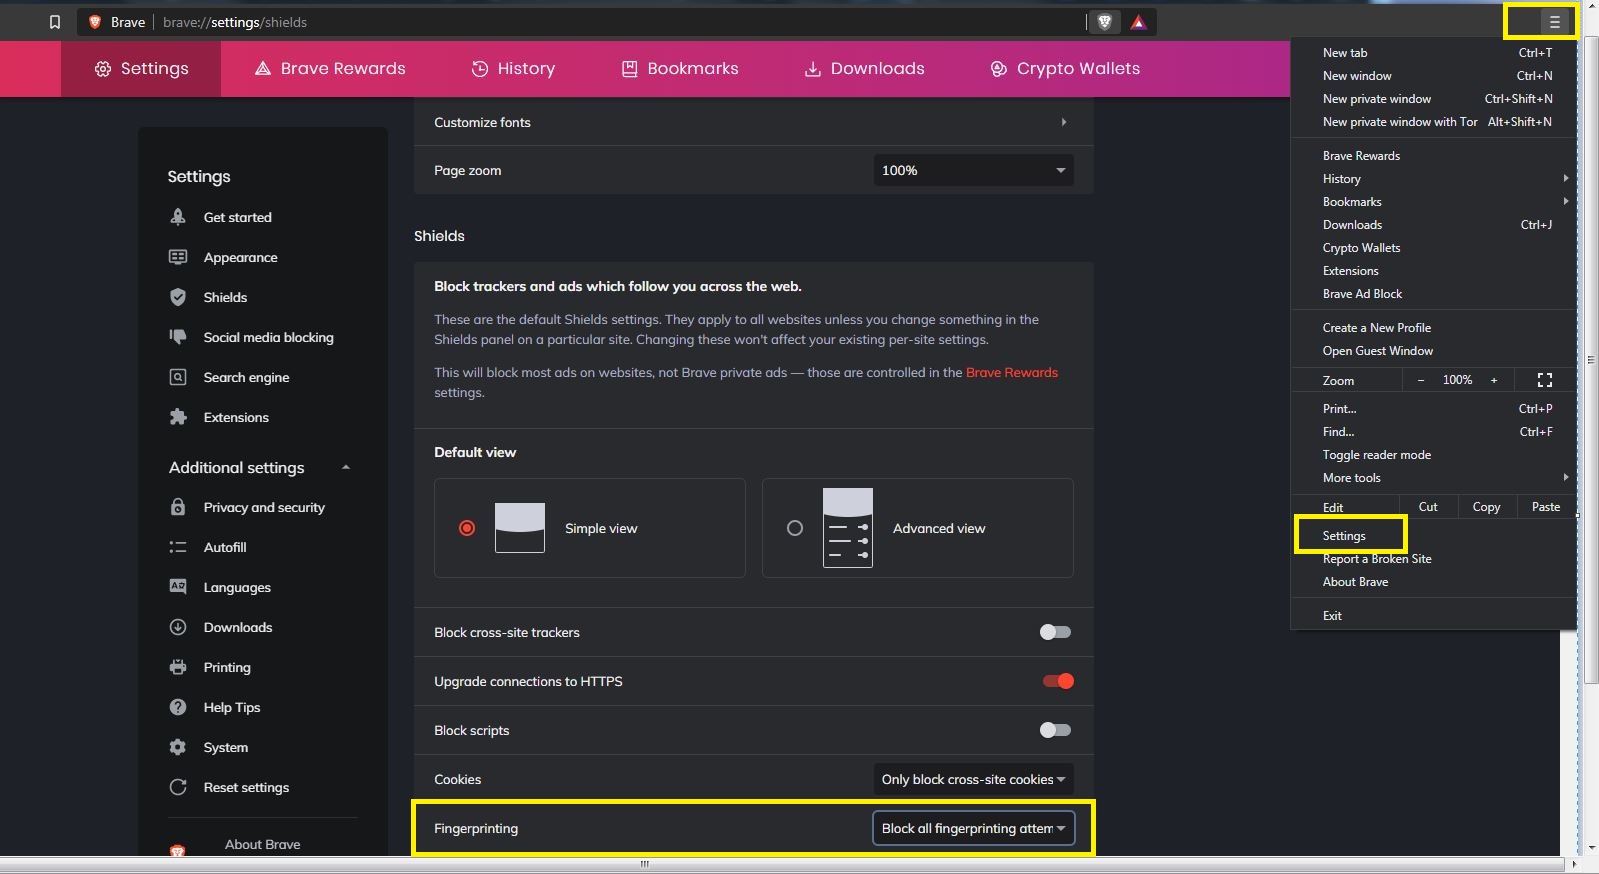
There are two things you need to do to get rid of WebRTC. First, open the menu, click “Settings,” and scroll until you find the “Fingerprinting” option under the “Shields” tab. Set it to “Block all fingerprinting attempts.”
Next, scroll down until you reach the “Privacy and security” tab. Set the second option (“WebRTC IP Handling Policy”) to “Disable non-proxied UDP.”
And that’s all you need to do.
Opera (Desktop)
Most people say you need to use the WebRTC Leak Prevent extension to prevent leaks on Opera.
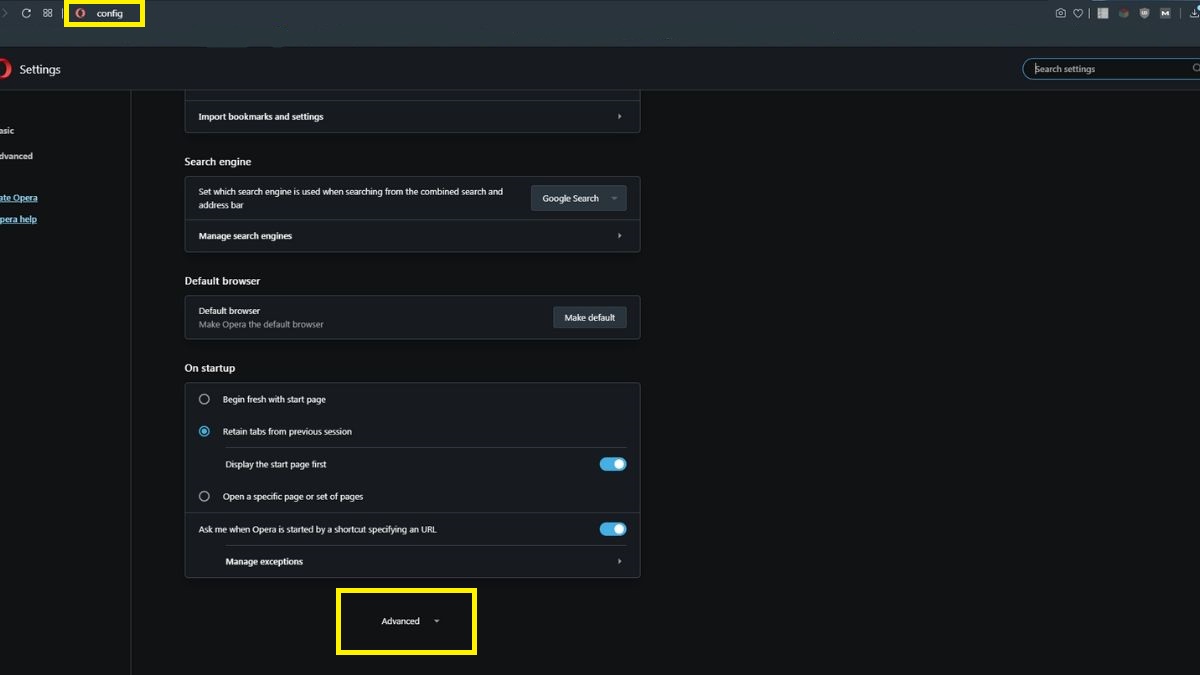
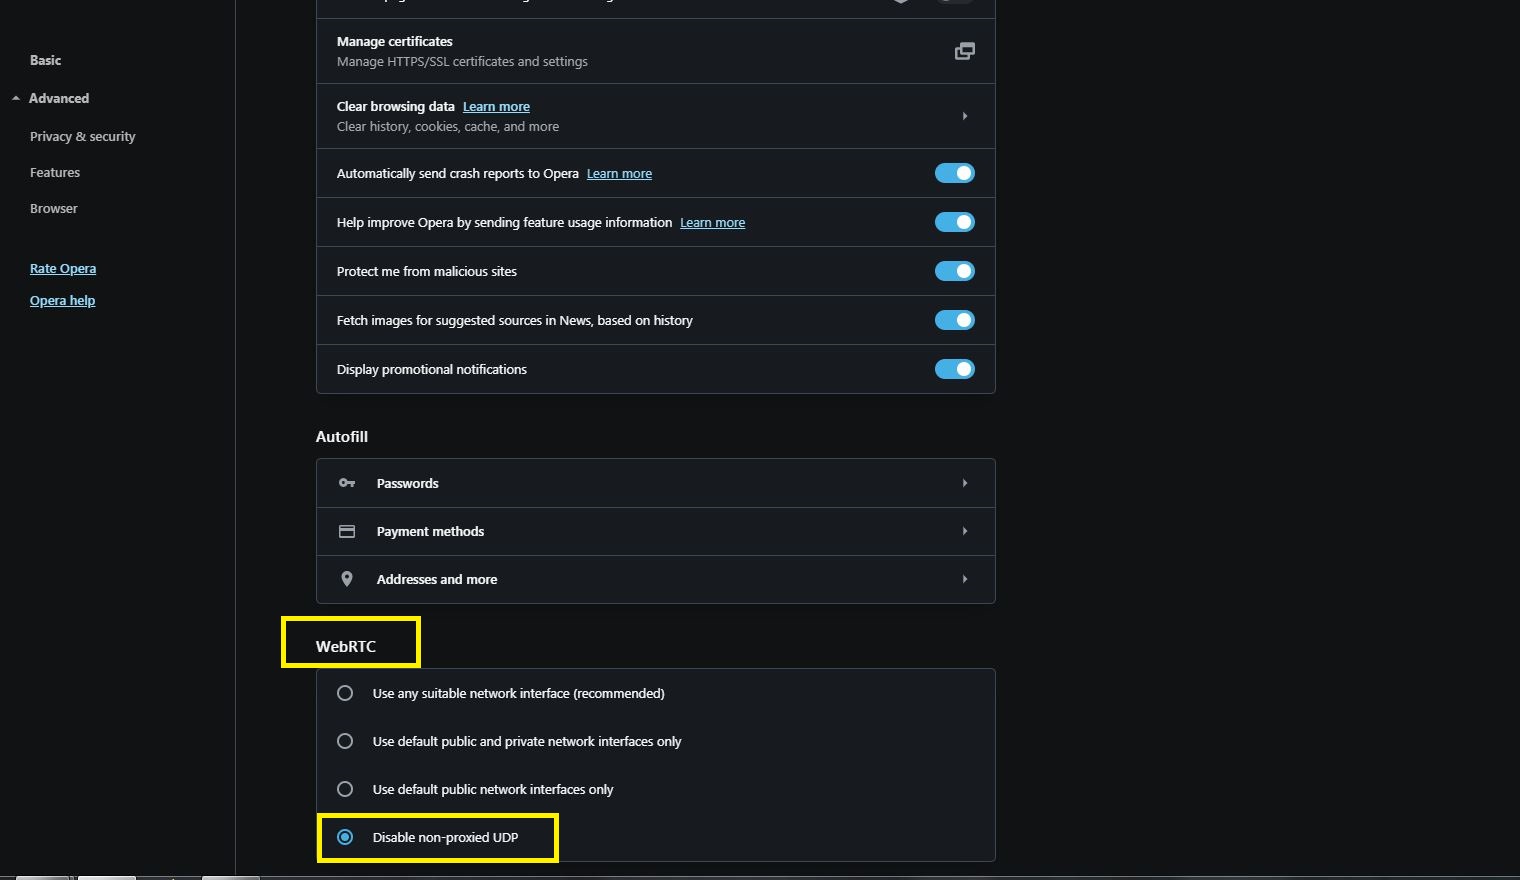
However, in the latest version at least, you can actually disable WebRTC manually. To start off, type “about:config” in the URL bar, and scroll down until you find “Advanced.” Click on it to expand the options.
Now, scroll down until you reach the “WebRTC” section, and select the “Disable non-proxied UDP” option.
This is basically what the WebRTC Leak Prevent extension does. If this process seems like too much hassle, you can definitely use it instead.
Vivaldi (Desktop)
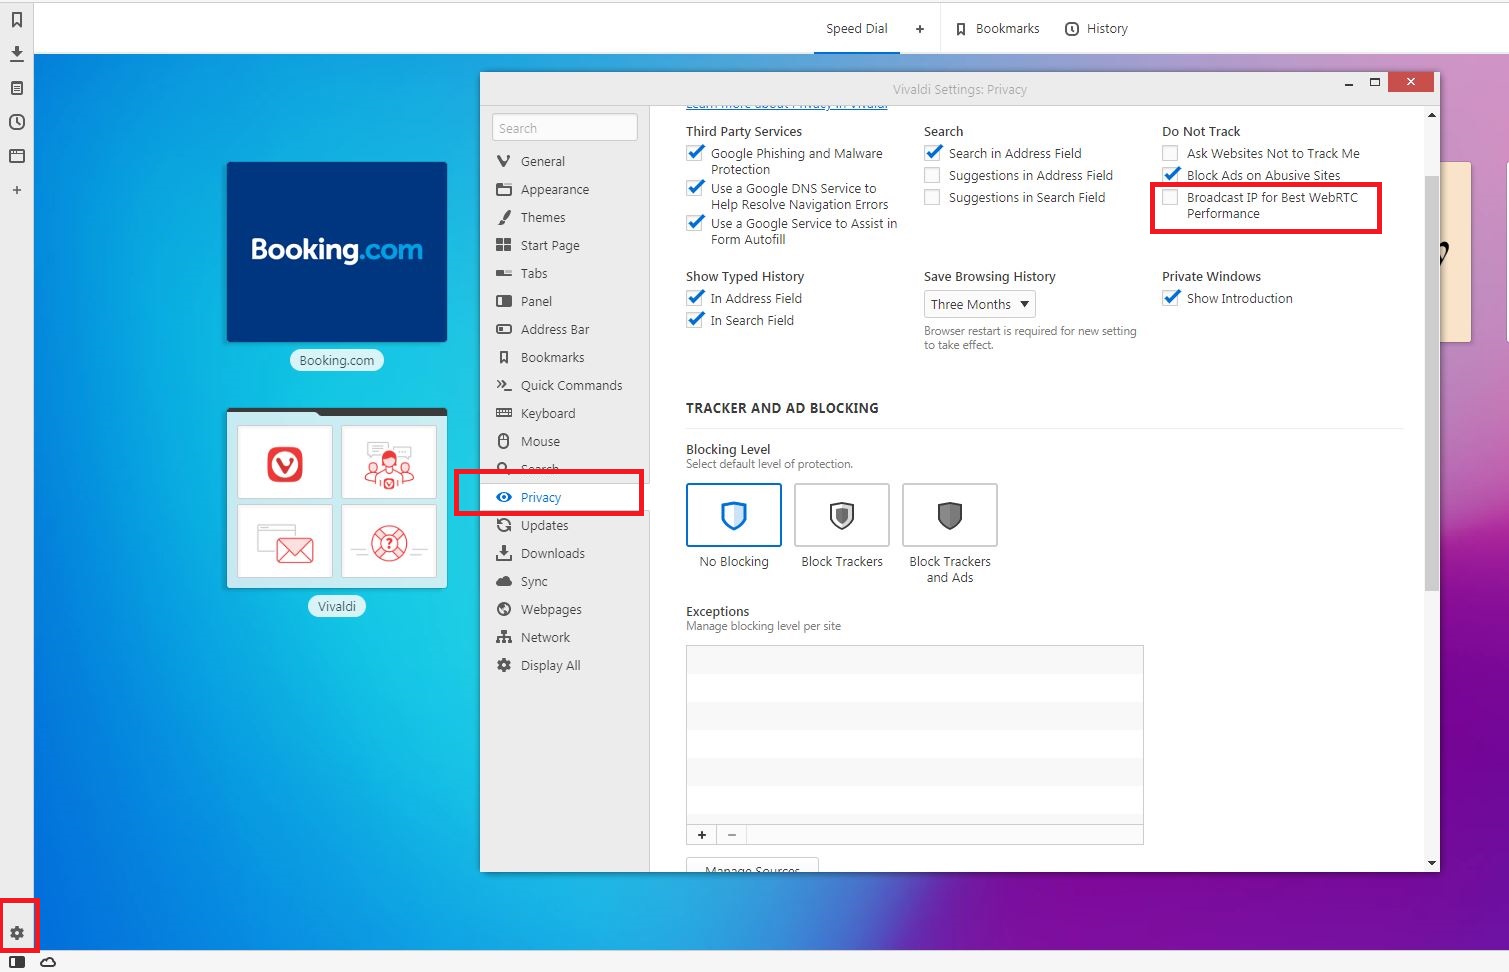
You can use the extensions we mentioned above, but you can also disable WebRTC manually. Just hit the Settings icon in the lower right corner, and go to the “Privacy” tab. On the right, you’ll see this option “Broadcast IP for Best WebRTC Performance.” Untick it to get rid of WebRTC leaks.
What About Chrome (Desktop), Yandex, and Microsoft Edge?
Things are a bit trickier here. We had to include these browsers in a separate section because you can't actually disable WebRTC in them - you can only block potential IP leaks. And it'd feel disingenuous of us to have a title saying "here's how to disable WebRTC" only to later say "actually you can't do that on these browsers."
With that out of the way, here's what you need to do on:
Chrome (Desktop)
You can only block websites’ attempts at getting your real IP address through WebRTC with extensions on the desktop version of Chrome.
The easiest one to use is obviously uBlock Origin. Other options include WebRTC Leak Prevent or WebRTC Control.
WebRTC Network Limiter is also an option if you want to configure how WebRTC gets blocked. To force it to use your VPN’s IP address only, you need to pick the “Use only my default public IP address” option.
Yandex (Desktop)
Only extensions can help you block WebRTC leaks - like the WebRTC Control extension. To add it, head to Extensions and click the “Yandex Browser extension catalog.” Look up the extension by its name, and add it to the browser.
To activate it, click on its icon. If it’s blue, it’s blocking WebRTC leak attempts.
Microsoft Edge (Desktop)
The best you can do is hide your local IP address over WebRTC connections. You can’t hide your public IP address, though.
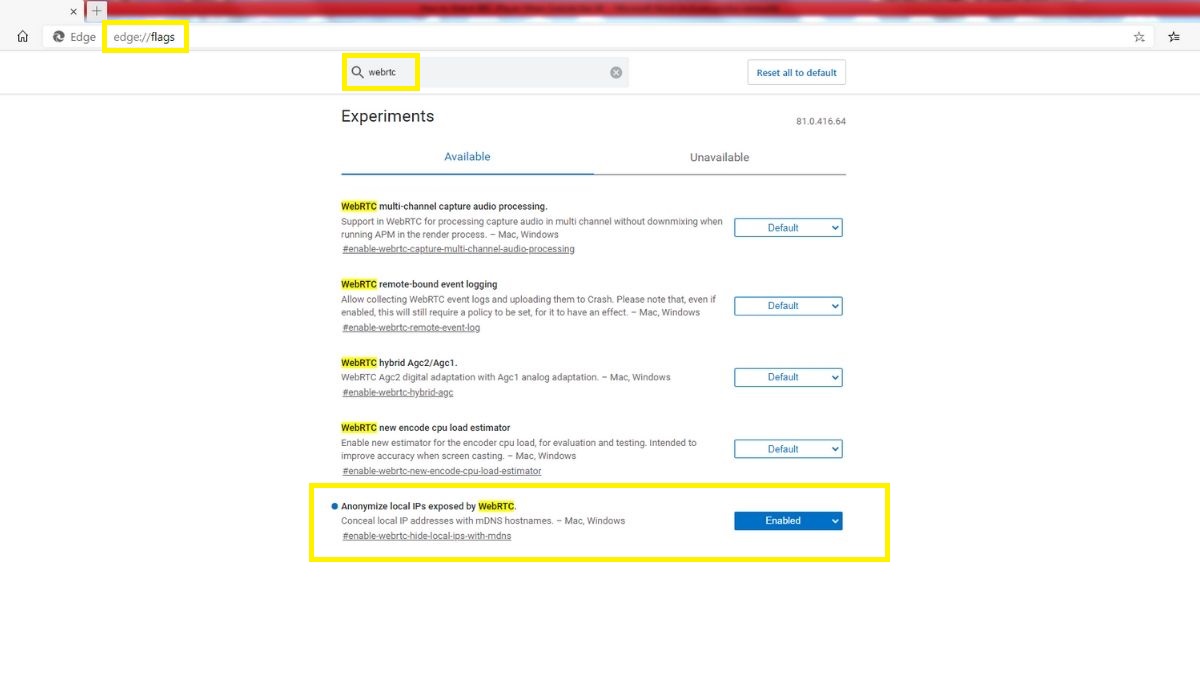
To do that, type “edge://flags/”in the URL bar and hit enter. Then, type"webrtc"in the search bar, and switch “Anonymize local IPs exposed by WebRTC”to Enabled.
If you insist on using Microsoft Edge, you’ll need to use a VPN that blocks WebRTC leaks, too - like NordVPN or ExpressVPN. And maybe use uBlock Origin also.
Conclusion
WebRTC definitely has its uses, and it’s here to stay. It’s one of the most efficient and secure ways for browsers to communicate with each other through peer-to-peer connections, after all.
Unfortunately, if you use a VPN, you can suffer a WebRTC leak that exposes your real IP address. That issue might get patched in the future through mDNS (like it did on Safari), but until then, you should use an extension and/or a VPN that prevents these leaks. Or you can just disable WebRTC on your browser if it lets you.
Know any other ways you can prevent these kinds of leaks? Or any additional information about WebRTC you’d like to see in this article? Let us know in the comments or on social media.


