When you purchase through links on our site, we may earn an affiliate commission. Here’s how it works.
How to Transfer Data From an Old iPhone to a New iPhone After the Initial Setup
The first time you power on an iPhone, you'll face several options for transferring data from your old phone. However, if you decide to skip those steps, restoring your data might be somewhat tricky later on. Still, there's nothing to worry about, as you have several options in front of you. So, let's talk about how to transfer data from an old iPhone to a new iPhone – after the initial setup.
3 Methods to Transfer Data Between Old & New iPhones – Even After the Initial Setup!
We will start with the most effortless method of the bunch, relying on third-party software. As backup options, we’ll use Apple’s own methods (which are a bit time-consuming, so keep that in mind).
Method #1: Use a Third-Party Application to Transfer Data From an Old to a New iPhones
You’ll find many applications online promising to sync or transfer data between smartphones. However, make sure to be very picky about letting third-party software handle your personal information. With that said, make sure to go through the following steps.
- Our strong recommendation is to go with Wondershare’s Dr. Fone. Use the provided link to download and install the software. It comes free of charge, and you can use it on Windows and macOS. Then, launch Dr. Fone.
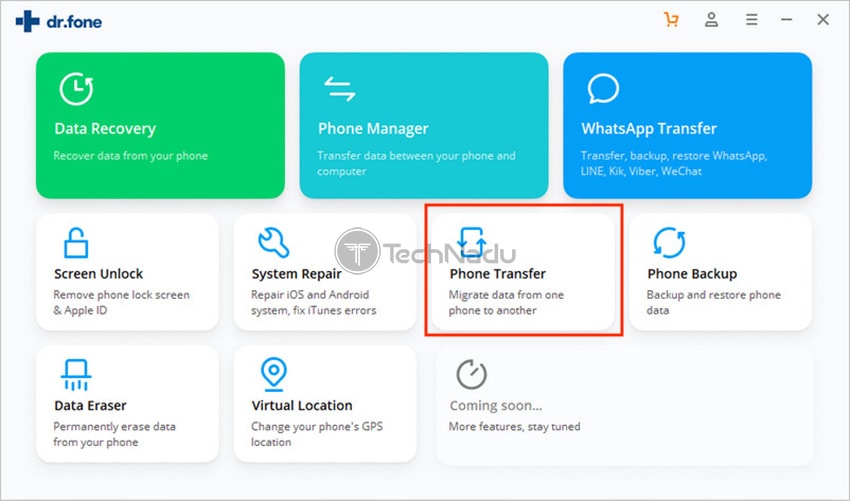
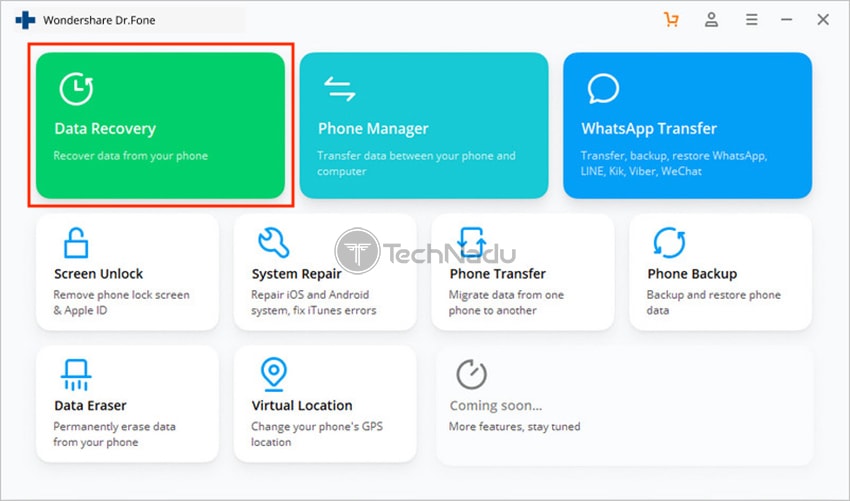
- At this moment, you should be looking at Dr. Fone’s grid-style home screen. Go ahead and click on 'Phone Transfer.' Wait until this module is downloaded (it shouldn’t take more than ten seconds) and click again to open it.
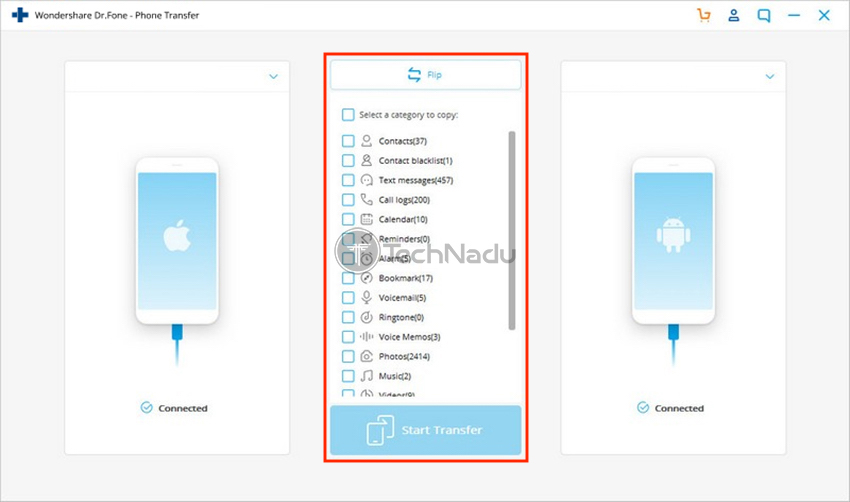
- Now, you need to connect both your old and new iPhones to your computer (using USB cables). Wait until both of those devices are registered by Dr. Fone, which you should see via its interface. You need to pay attention to which phone is marked as the 'Source Phone' and which one is the 'Target Phone.' Feel free to change their positions using the 'Flip' button (in the upper central portion of Dr. Fone’s interface).
- Now, feel free to select any data categories you’d like to transfer between your old and new phones. These categories are listed in the central portion of Dr. Fone’s interface. Once you’re ready, click on the 'Start Transfer' button.
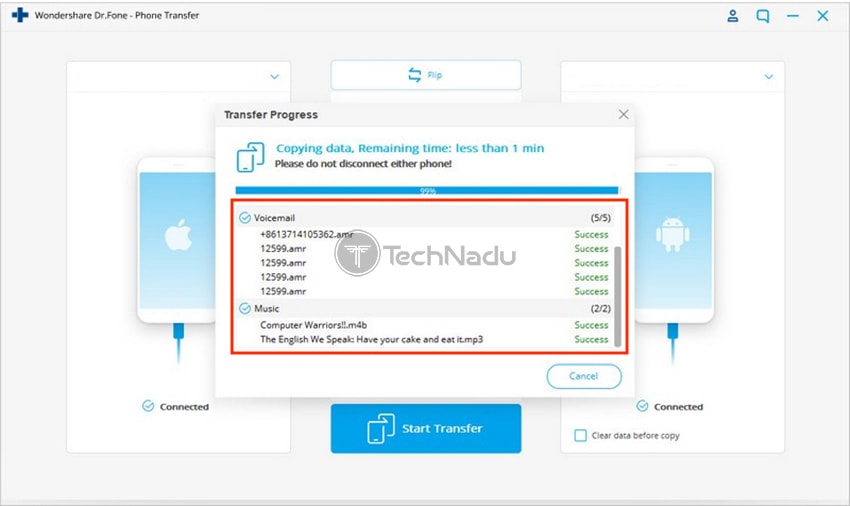
- The application will now transfer data between your phones. Depending on how many data categories you’ve picked, this procedure can take some time. You’ll see when it’s done, which is when you can disconnect your phones. That’s it!
Method #2: Use iCloud to Backup (Your Old iPhone) & Then Restore Your New Phone
Next, we'll show you how to transfer data between your old and new iPhones (after doing the initial setup) via iCloud. For this method to work, you need both of your iPhones nearby. First, you need to backup your old phone and then use that data to restore it to your phone.
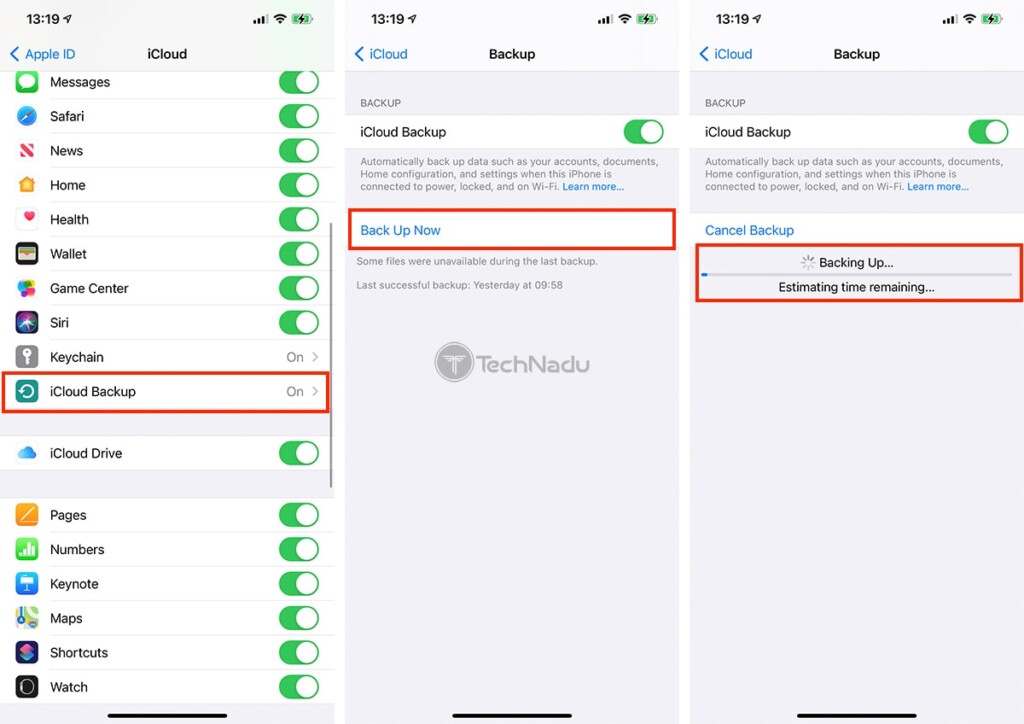
- We'll start by asking you to use your old iPhone. Hopefully, it's still active, and you haven't erased it yet. If that's the case, navigate to Settings > [your name] > iCloud.
- Then, scroll down and tap on 'iCloud Backup.' After a few moments, the 'Back Up Now' button will appear, and you need to use it. This will prompt your old iPhone to create a new backup file, which you’ll use to restore to your new phone.
- Now, here’s how to restore that data to your new iPhone. Once again, we’ll ask you to use Dr. Fone by Wondershare. Download and install the application, and then open it. You’ll need to click on 'Data Recovery' this time, so wait until this module downloads.
- At this moment, you should connect your (new) iPhone to your computer. If iTunes opens, feel free to close that application. Then, Dr. Fone will recognize your phone, giving you three options on the left-hand side. You can go with 'Recover from iCloud Synced Files.'
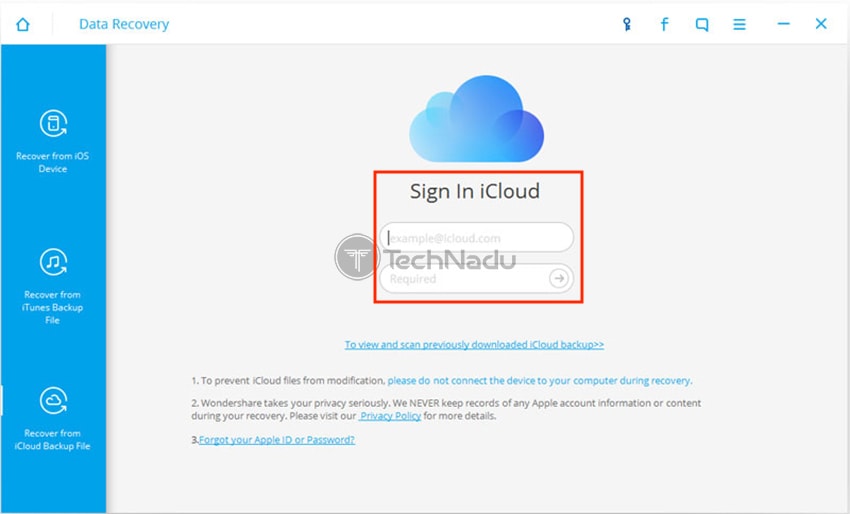
- The application will now ask for your Apple ID and password. Once you supply the required information, Dr. Fone will list all your iCloud-stored backups. Make sure to pick the backup file you’ve created just recently and click on 'Download.'
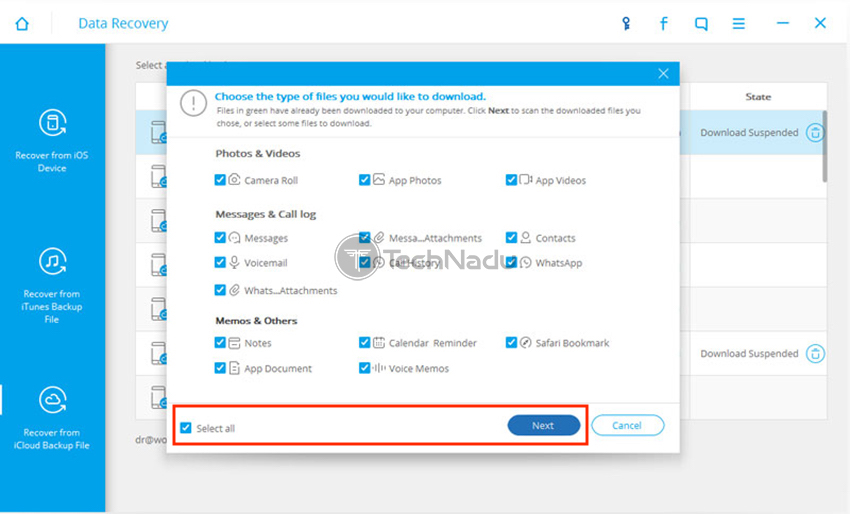
- A pop-up will now appear, asking you to choose the type of files you’d like to download. You can pick from photos and videos, messages and call logs, memos, and more. If you wish to transfer everything, click on 'Select All.' Then, click on 'Next.'
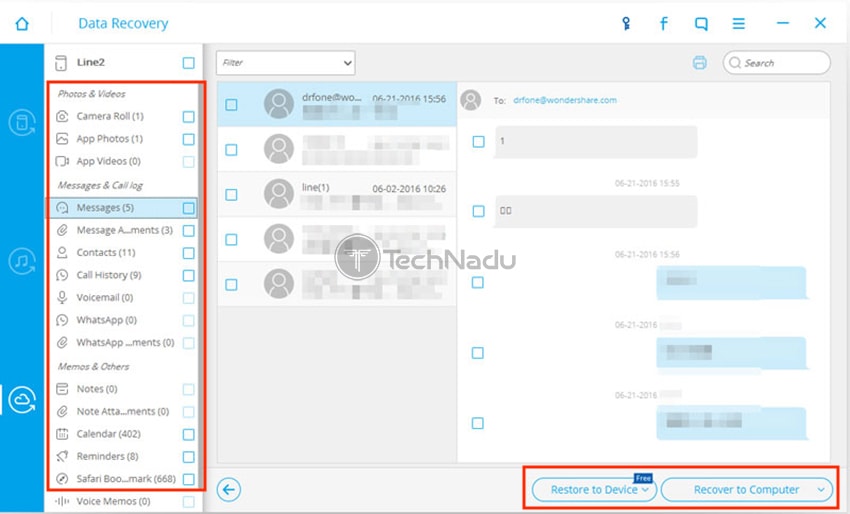
- Your chosen backup file will now download. Once Dr. Fone extracts its contents, you will get to preview different types of files. Once you pick everything you'd like to transfer, click on 'Restore to Device' (in the bottom-right corner). Then, make sure to select your new iPhone. That's it – as Dr. Fone will now finish the procedure on its own.
Method #3: Use iTunes to Transfer Data Between Your Old and New iPhones
Lastly, we will advise you to use iTunes. First, you will use this application to back up your old iPhone and then restore that file to your new phone. Here's how that is done.
- If you’re using Windows, make sure to have the latest version of iTunes. And if you use a Mac, know that iTunes is now built-into macOS (it’s part of Finder). However, you should update macOS to the latest available version (Apple > System Preferences > Software Update).
- Then, connect your old iPhone to your computer using a USB cable. Open iTunes and wait a couple of moments until your iPhone is registered. If this is the first time you’re doing that, you’ll need to tap on 'Trust' on your iPhone (to authorize this connection).
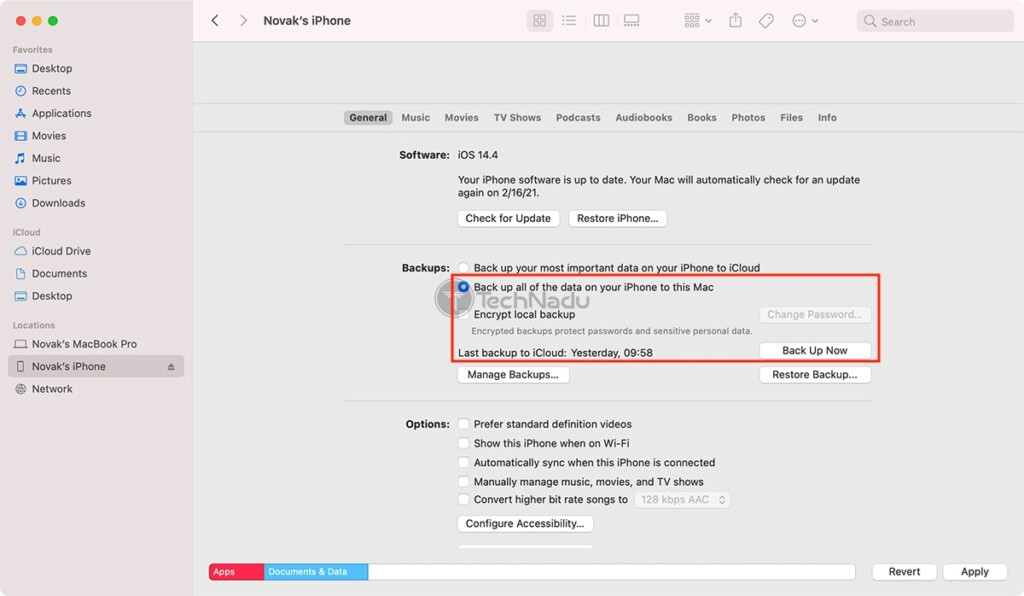
- Now, make sure to click on 'Back up all of the data on your iPhone to this Mac' (or an applicable option on Windows). If you want to back up your sensitive data (like Health & Activity data), select 'Encrypt local backup' and set up your password. Once ready, click on 'Back Up Now.' You will see how this process is going at the top of your screen, so be patient and wait until your old iPhone's data is safely backed up. Feel free to disconnect your old iPhone from your computer.
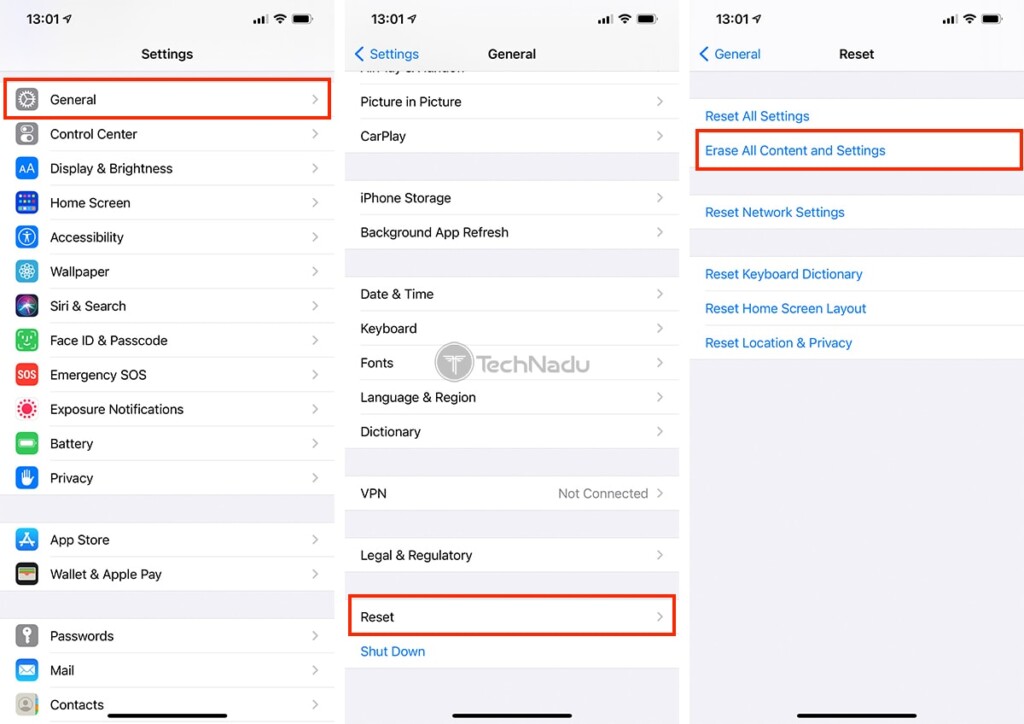
- Here's a piece of important information. To proceed, your new iPhone must be on the 'Hello' screen. That means that you must reset it to factory settings (Settings > General > Reset > Erase All Content & Settings). Keep in mind that any data you might have will be wiped, so make sure to save that data manually.
- Once you reset your iPhone, go through the initial setup again. Once you get to the 'Apps & Data' screen, you will see several options to restore your iPhone. You need to go with 'Restore from iTunes Backup.'
- At this moment, connect your new iPhone to your computer using a USB cable. Then, launch iTunes and make sure that your new phone is recognized and activated. To restore your phone, click on 'Restore Backup.'
- You will now get to pick a restore point, so choose the latest available one. And if you've decided to encrypt your backup, you'll need to enter your password. That's it – iTunes will now restore your backup, transferring all your data from your old to your new iPhone. Finally, complete the rest of the setup steps on your iPhone.
Those would be the three methods of how to transfer data from an old iPhone to a new iPhone – after the initial setup. If you have any questions for us, don’t hesitate to post a comment below. And finally – thank you for reading!

