
When you purchase through links on our site, we may earn an affiliate commission. Here’s how it works.
How to Set Up VPN on D-Link Router in 2025
Most D-Link routers support L2TP and PPTP VPN protocols, which are outdated and no longer offered by most VPNs (especially the top-rated ones). So, to use a modern VPN on a D-Link router, you need to install special software on your router called DD-WRT. This process is called “flashing” your router, and it lets your route work with newer VPNs.
Flashing allows your router to work with modern VPN protocols like OpenVPN. However, it’s a technical process and typically voids your router’s warranty. That’s why we strongly recommend following DD-WRT’s official setup guide. Also, note that flashing DD-WRT is only possible on two D-Link models for now: the DIR-885L and DIR-895L. If you have one of these, you can go ahead and set up a VPN using OpenVPN. Just make sure your VPN provider supports it. If you have one of the supported models at hand, let's show you how to setup a VPN on a DLink router.
How to Setup a VPN on D-Link Routers
Setting up a VPN on a D-Link router takes a bit of extra work than installing a VPN on any other router. Most models don’t support modern VPNs by default, so you’ll need to install special software first (as discussed above). Once you are done with that, next, just follow these steps, and you are good to go:
1. Get a VPN that supports DD-WRT routers (we recommend NordVPN).
2. After subscribing, access your router's DD-WRT admin panel.
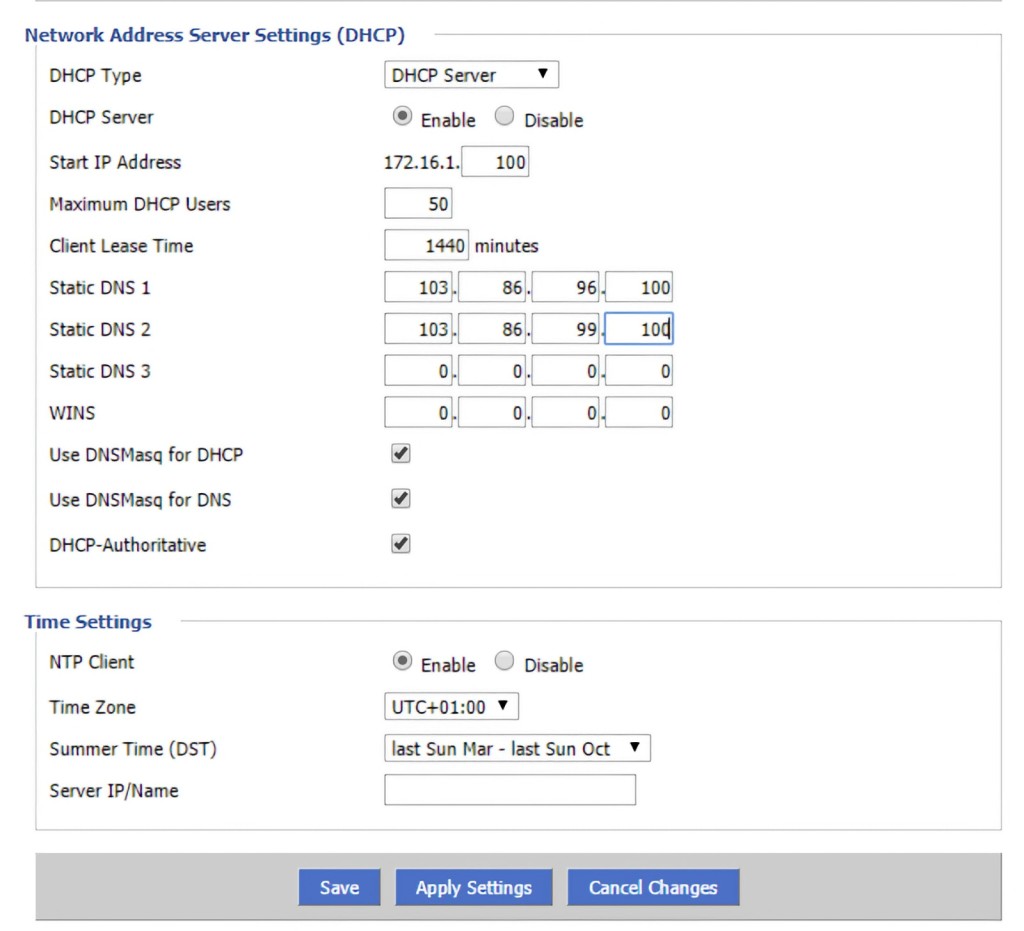
3. Navigate to Setup > Basic Setup > Network Address Server Settings (DHCP), input the information found just below, and then click 'Save' and 'Apply Settings.'
- Static DNS 1: 103.86.96.100
- Static DNS 2: 103.86.99.100
- Static DNS 3: 0.0.0.0
- Use DNSMasq for DHCP: Checked
- Use DNSMasq for DNS: Checked
- DHCP-Authoritative: Checked

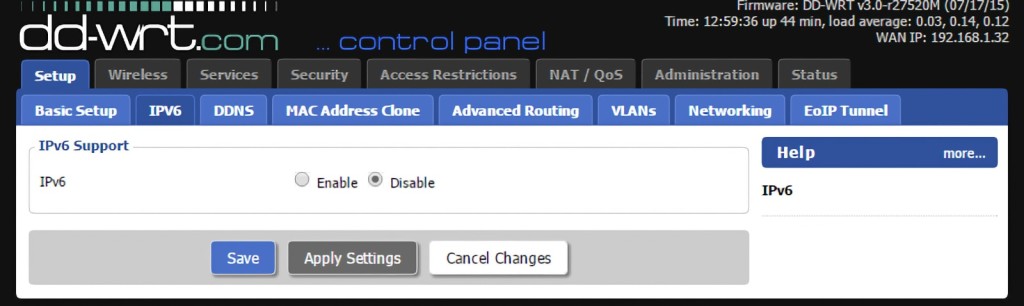
4. Navigate to Setup > IPv6 and pick 'Disable,' followed by 'Save' and 'Apply Settings.'
5. Navigate to Service > VPN > OpenVPN Client > Start OpenVPN Client > Enable. You'll now see a long list of fields, so fill them out based on the following information:
- Server IP/Name: Go to this page on NordVPN's website, pick a server, and then copy the server's address back to DD-WRT (in the following format: us936.nordvpn.com). While there, click 'Show Available Protocol' and download the server's OpenVPN files.
- Port: 1194 for UDP / 443 for TCP
- Tunnel Device: TUN
- Tunnel Protocol: UDP (or TCP)
- Encryption Cipher: AES-256-CBC
- Hash Algorithm: SHA-512
- User Pass Authentication: Enable
- Username / Password: You can find these on NordVPN's website. Click 'Log In' on NordVPN's home page and then go to NordVPN > Set Up NordVPN Manually.
- First Data Cipher: Not set
- Second Data Cipher: Not set
- Third Data Cipher: Not set
6. Next, click 'Enable' next to 'Advanced Options,' and use the following information:
- TLS Cipher: None
- LZO Compression: Disable
- NAT: Enable
7. In the 'Additional Config' box, you can copy/paste the following code:
remote-cert-tls server
remote-random
nobind
tun-mtu 1500
tun-mtu-extra 32
mssfix 1450
persist-key
persist-tun
ping-timer-rem
reneg-sec 0
#log /tmp/vpn.log
#Delete `#` in the line below if your router does not have credentials fields
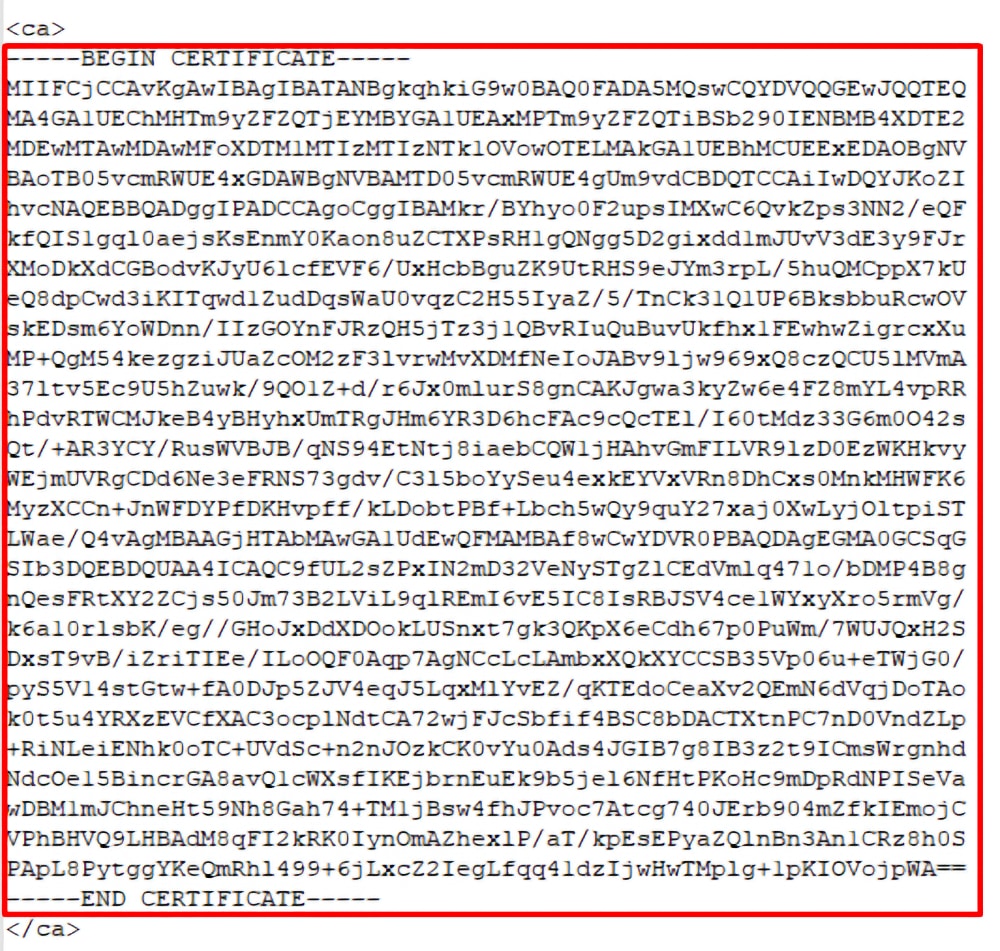
#auth-user-pass /tmp/openvpncl/user.conf8. Find the OpenVPN files you downloaded earlier from NordVPN's website. First, open the OVPN configuration file (named xxx_nordvpn_com_udp_ovpn) and copy the <ca> part to the 'CA Cert' field.
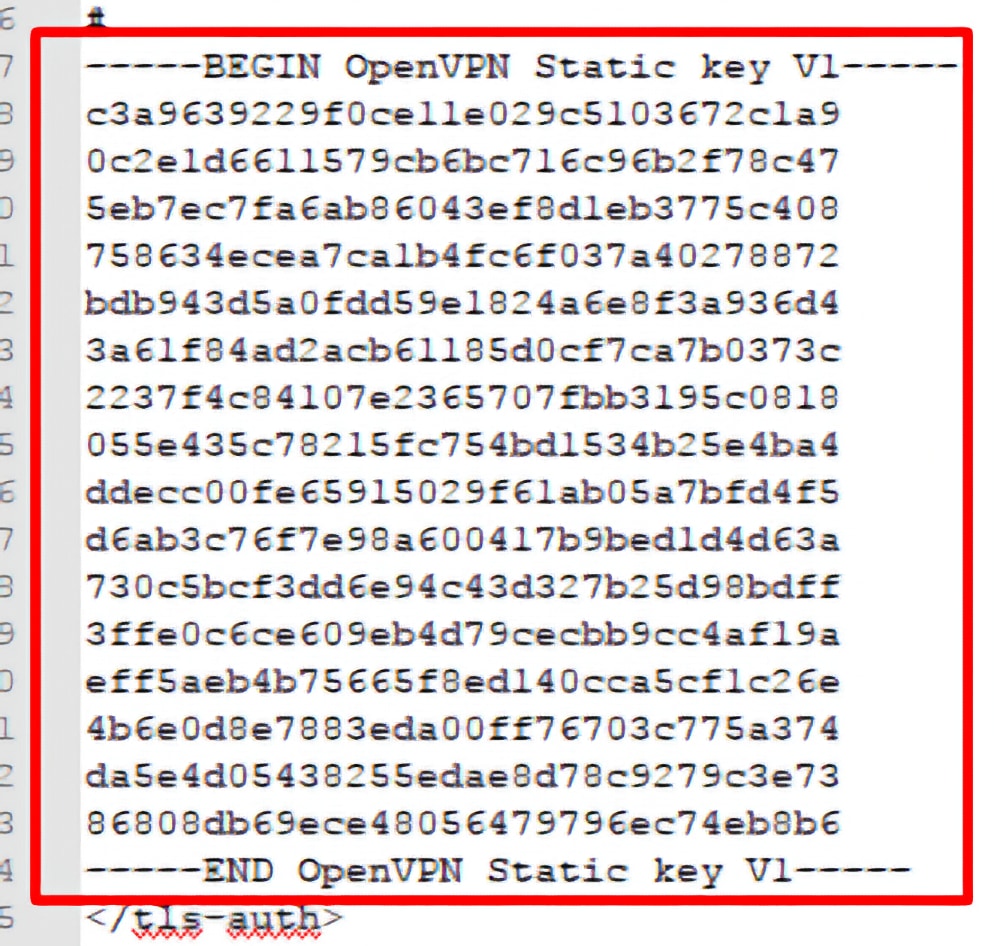
9. Next, copy the <ts-auth> part into the 'TLS Auth Key' field. Then, click 'Save' and 'Apply Settings.'
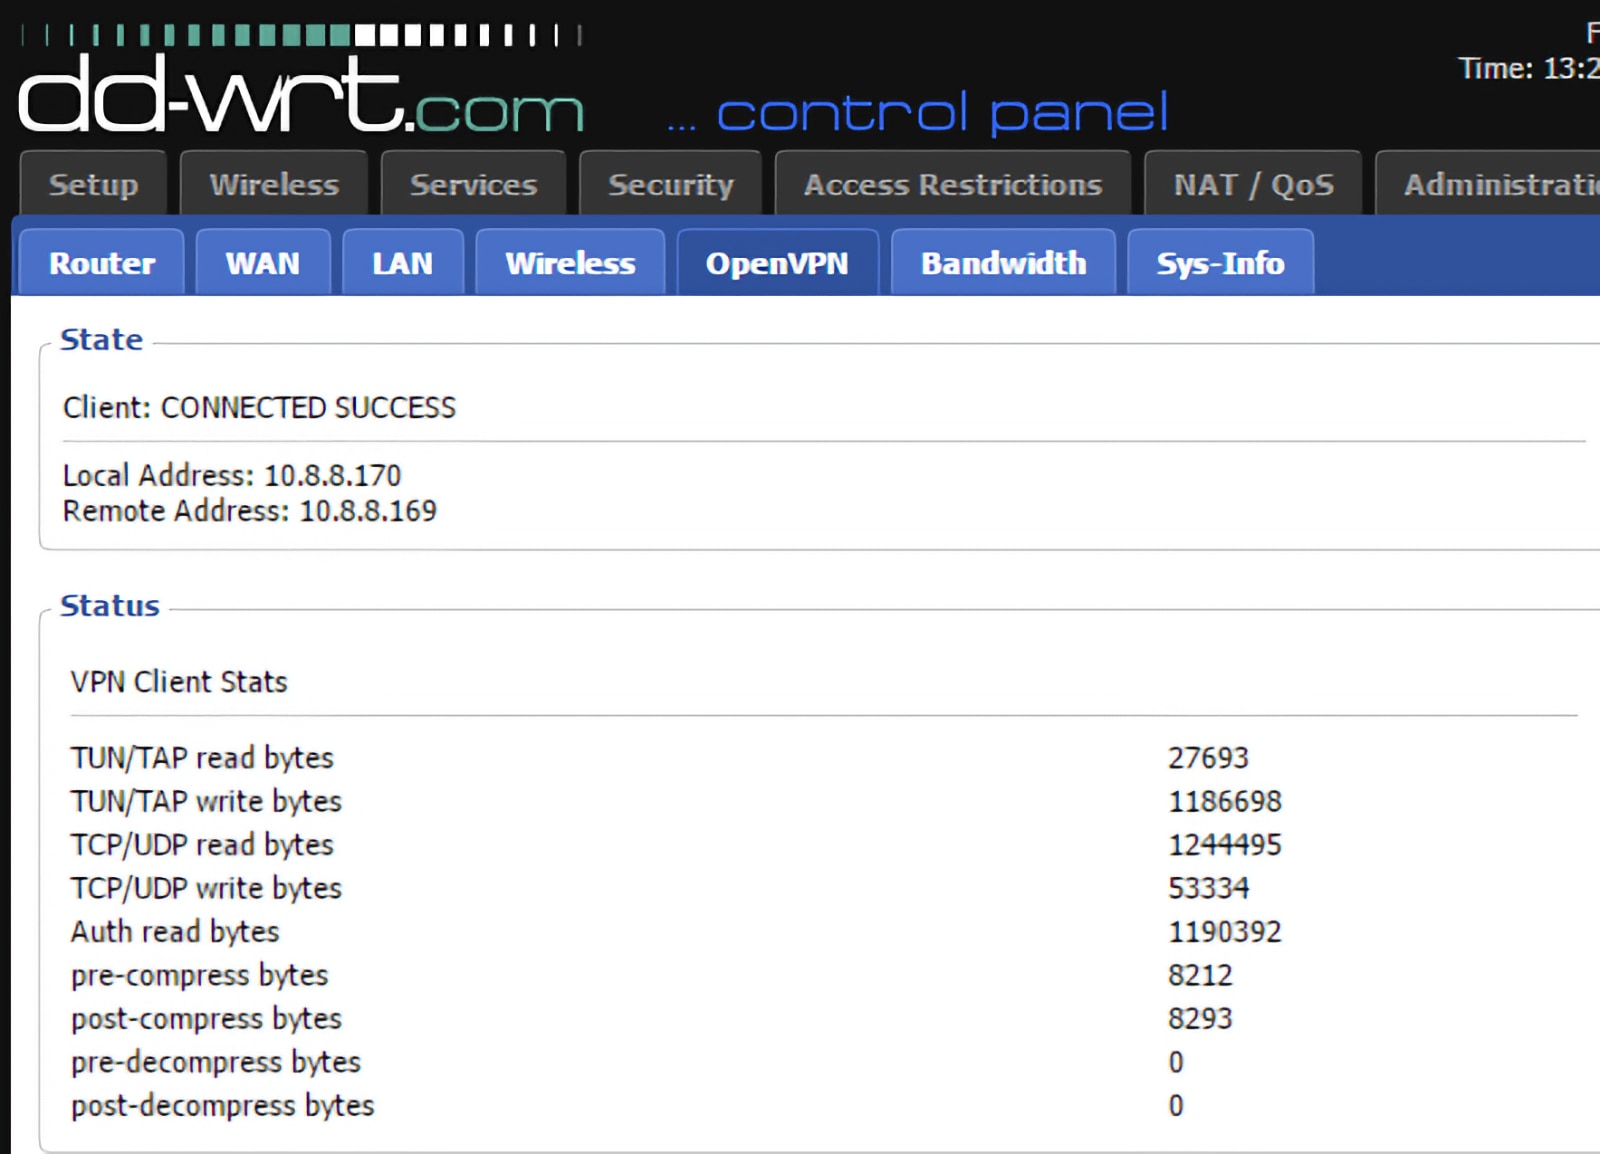
10. Return to Status > OpenVPN and look for the 'State' field, where it should say 'Client: Connected Success,' meaning your VPN session is active.

11. To create a kill switch, go to Administration > Commands and copy-paste the code below. Then, click 'Save Firewall' and go to Administration > Management > Reboot Router.
WAN_IF=`nvram get wan_iface`
iptables -I FORWARD -i br0 -o $WAN_IF -j REJECT --reject-with icmp-host-prohibited
iptables -I FORWARD -i br0 -p tcp -o $WAN_IF -j REJECT --reject-with tcp-reset
iptables -I FORWARD -i br0 -p udp -o $WAN_IF -j REJECT --reject-with udp-resetFinal Thoughts
Since D-Link routers mostly support outdated VPN protocols, you're left with limited options for what you can do. As this guide showed you, the only way to set up a VPN on a D-Link router is to have a model compatible with DD-WRT, which gives you access to OpenVPN. Even though it's not the fastest protocol, it's perhaps the most secure one, so you won't make any drastic compromises.
That said, ensure you use a quality VPN to keep your D-Link network at its best. The main requirement is support for OpenVPN, but it also needs to be fast, offer plenty of protocols, and feature a no-logs policy. We'll remind you that we highly recommend NordVPN in this case. And, if you wish to set up your VPN on other devices as well, head over to our central guide on how to set up a VPN.
That's all you need to know on how to setup a VPN on a DLink router. Use the comments section below if you have any questions. Finally, thank you for reading!
Related