When you purchase through links on our site, we may earn an affiliate commission. Here’s how it works.
How to Set Up a VPN on Linux in 2025
In comparison to other operating systems, Linux appears to be a more privacy-friendly option out of the box. However, you still need a VPN if you wish to prevent tracking and safeguard your privacy. That's why we'll show you how to set up a VPN on Linux in several ways.
There are many ways to install a Linux VPN, but it all comes down to 3 methods. You can use a VPN app (a command-line-based app in most cases) supplied by your VPN service, stick to Ubuntu’s Network Manager, or rely on Linux's Terminal to set up an OpenVPN connection.
If you wish to automate your VPN protection, we recommend using a native app, the easiest way to go. Ubuntu's Network Manager also does a great job of simplifying the process of installing a VPN on Linux. Lastly, the method involving the Terminal is best-suited for more advanced users.
Ready to learn how to install any VPN on Linux? If you are, keep reading!
How to Set Up a VPN on Linux
Finally, here are the 3 best ways to set up a VPN on your Linux machine:
- Method #1: Use a Native Linux VPN Application
- Method #2: Set up a Linux VPN via Terminal (OpenVPN)
- Method #3: Configure a Linux VPN via Ubuntu Network Manager
Method #1: Use a Native Linux VPN Application
You need a VPN that provides a Linux application to go through this method. Various types of apps exist, but you'll most likely get to use a command-line-based app. Here's exactly what you need to do:
1. Subscribe to a VPN that offers a native Linux app. We recommend ExpressVPN. (You can try it risk-free for 30 days.)
2. After you subscribe, return to the home page of ExpressVPN's website.
3. Select "My Account" and provide your credentials to access your online dashboard.
4. Pick "Linux" on the right-hand side in the "Set Up Your Devices" section.
5. Pick your version of Linux and hit the "Download" button.
6. Locate the ExpressVPN installation file and right-click on it.
7. Select Open with Another Application > Software Install > Select.
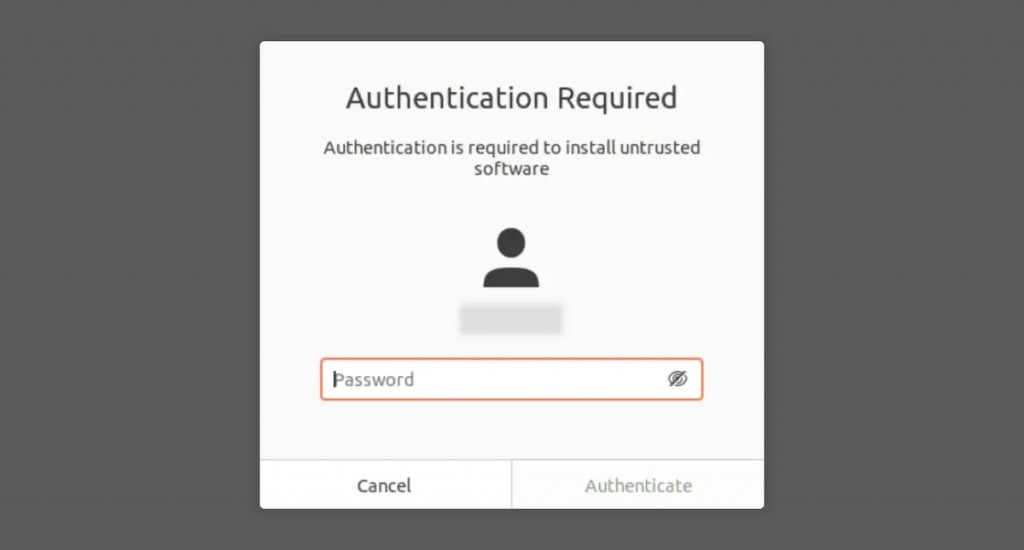
8. Use the "Install" button and authenticate your Linux account.
9. Once the installation is done, open a Terminal window and type in "expressvpn."
10. Then, use the command you'll see below.
cd ~/Downloads/11. Based on whether you use Ubuntu, Fedora, or Arch Linux, run one of the commands below:
DEBIAN / UBUNTU / MINT: sudo dpkg -i [installer filename]FEDORA: sudo dnf install [installer filename]ARCH: sudo pacman -U [installer filename]12. Then, activate the VPN app using the appropriate command, as shown below.
expressvpn activate13. Enter your ExpressVPN activation code (from your online dashboard on the VPN's site).
14. Decide if you'd like to share anonymized diagnostic reports by pressing Y (YES) or N (NO).
15. That's it! You've now successfully installed ExpressVPN on your Linux machine.
16. To start using ExpressVPN, you need to open a new Terminal window.
17. To connect to the nearest server, use the "expressvpn connect" command.
expressvpn connect18. To check all ExpressVPN locations, use the "expressvpn list all" command.
expressvpn list all19. Once ready to disconnect, use the "expressvpn disconnect" command.
expressvpn disconnect20. To check other ExpressVPN commands, type in "man expressvpn."
man expressvpnThere's also a way to use ExpressVPN via a graphical user interface (GUI) on Linux. If you want to make that happen, install ExpressVPN's extension for Chrome or Firefox - AFTER you install the VPN app on Linux (as explained above).
To learn more, here's how to install ExpressVPN on Chrome and Firefox. We'll again remind you that you have to install ExpressVPN's Linux app first.
Method #2: Set up a Linux VPN via Terminal (OpenVPN)
This method requires you to use a VPN that supports the OpenVPN protocol. Furthermore, your chosen VPN should provide you with OVPN files, which are needed to set up new connections manually on Linux. Here are the steps you need to take:
1. Get a VPN that gives you access to its OVPN files, like ExpressVPN.
2. After you subscribe, go back to ExpressVPN's home page. Click "My Account."
3. Access your ExpressVPN online dashboard using your credentials.
4. Select "Set Up Other Devices." Then, pick "Manual Configuration."
5. Make sure to pick "OpenVPN" on the right-hand side.
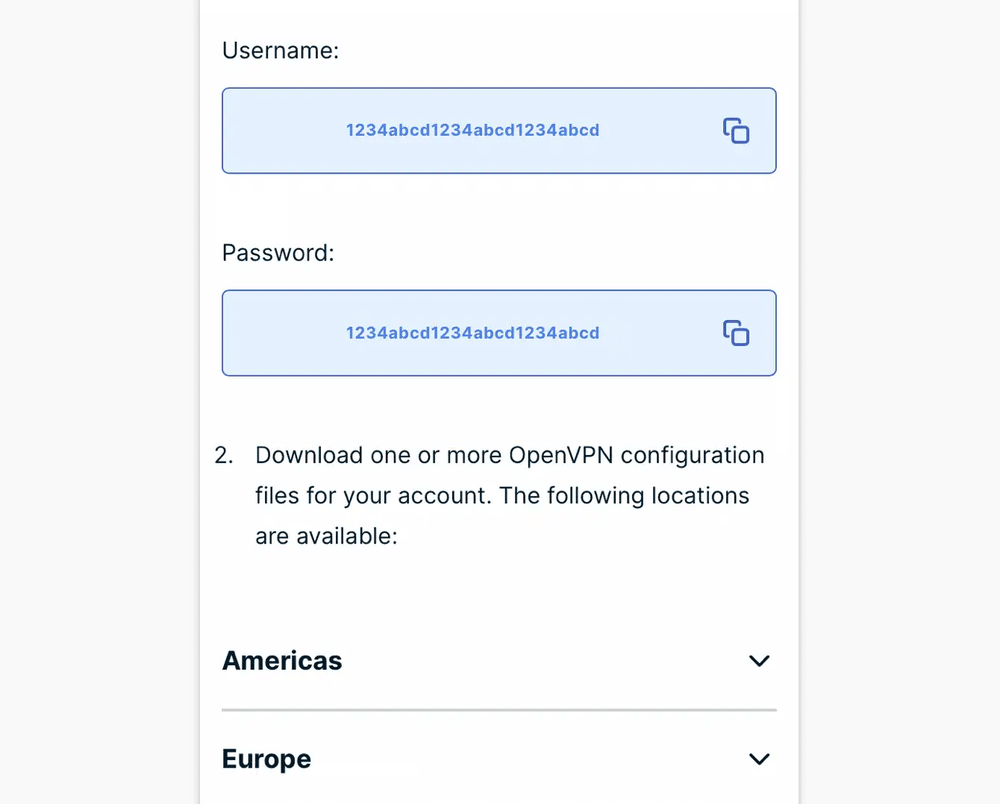
6. You'll need now see your OpenVPN username and password. Make a note of those.
7. Just below, select any location (server) you want and download its OVPN file.
8. You now need to continue based on if you use Ubuntu, Debian, or Fedora. Check below.
Steps for Ubuntu
9. Launch a new Terminal window.
10. Input the command you can see just below.
$ sudo apt install openvpn openvpn-systemd-resolved11. To launch OpenVPN, you need to point to your OVPN file, like so:
$ sudo openvpn --config /[path to file]/my_expressvpn_[server location].ovpn --script-security 2 --up /etc/openvpn/update-systemd-resolved --down /etc/openvpn/update-systemd-resolved --dhcp-option 'DOMAIN-ROUTE .' --down-pre12. Provide your OpenVPN username and password.
13. It should say "Initialization Sequence Completed" once your session becomes active.
14. To keep your connection active, leave the Terminal window running in the background.
Steps for Debian
9. Launch a new Terminal window.
10. Go with the following command:
$ sudo apt install openvpn resolvconf11. Enter your password. Confirm with "Y" to continue.
12. Use the following command to launch OpenVPN:
$ sudo openvpn --config /[path to file]/my_expressvpn_[server location].ovpn --script-security 2 --up /etc/openvpn/update-resolv-conf --down /etc/openvpn/update-resolv-conf13. Provide your OpenVPN username and password.
14. Terminal will now say, "Initialization Sequence Completed."
15. As long as the Terminal window is open, your VPN connection will remain active.
Steps for Fedora
9. Launch a new Terminal window and input the command you see below.
$ sudo dnf install openvpn10. Use the series of commands found below to configure your DNS:
$ sudo cp /usr/share/doc/openvpn/contrib/pull-resolv-conf/client.{up,down} /etc/openvpn/$ sudo chmod +x /etc/openvpn/client.{up,down}$ sudo sed -i -e 's|bresolvconfb|ignore-&|' /etc/openvpn/client.{up,down}11. Then, launch OpenVPN on your Fedora Linux machine using the following command:
$ sudo openvpn --config /[path to file]/my_expressvpn_[server location].ovpn --script-security 2 --up /etc/openvpn/client.up --down /etc/openvpn/client.down12. Provide your OpenVPN username and password.
13. You should see the following message: "Initialization Sequence Completed."
14. Keep your VPN session active by keeping the Terminal window open.
Method #3: Configure a Linux VPN via Ubuntu Network Manager
Ubuntu’s Network Manager is a utility for controlling your Web connectivity. As such, it supports installing and managing VPN connections. However, you'll need a VPN that allows you to set up OpenVPN connections manually. So, here’s how to set up a VPN on Linux via Network Manager.
1. Pick a VPN that supports OpenVPN connections on Linux, such as ExpressVPN.
2. Once you subscribe, return to ExpressVPN's home page. Click "My Account."
3. Provide your credentials and access your ExpressVPN online dashboard.
4. Using the top-placed banned, click "Set Up Other Devices."
5. Pick "Manual Configuration" and select the "OpenVPN" tab.
6. Note your OpenVPN username and password.
7. Then, pick a server and download its OpenVPN configuration file.
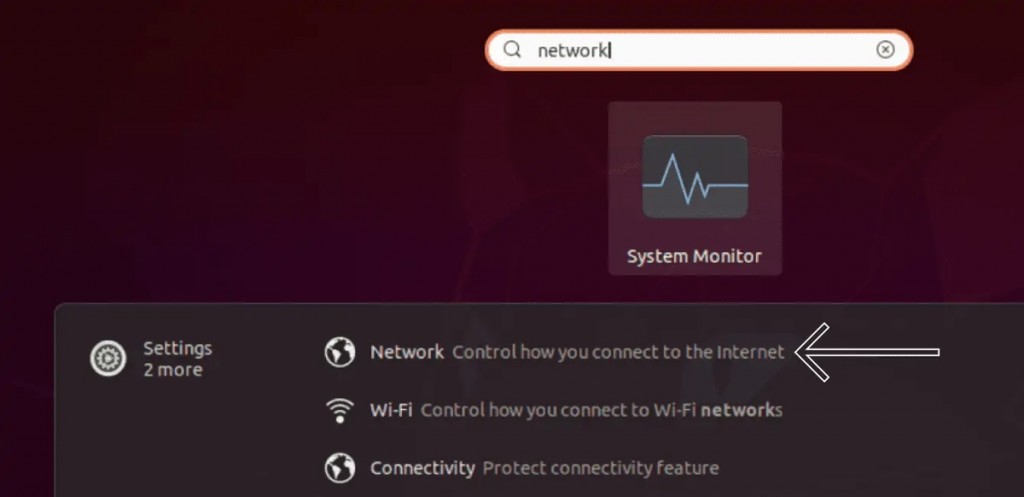
8. On your Ubuntu machine, navigate to Settings > Network.
9. Click on the "+" sign next to "VPN." Then, pick "Import From File."
10. Select the recently downloaded OpenVPN file and hit "Open."
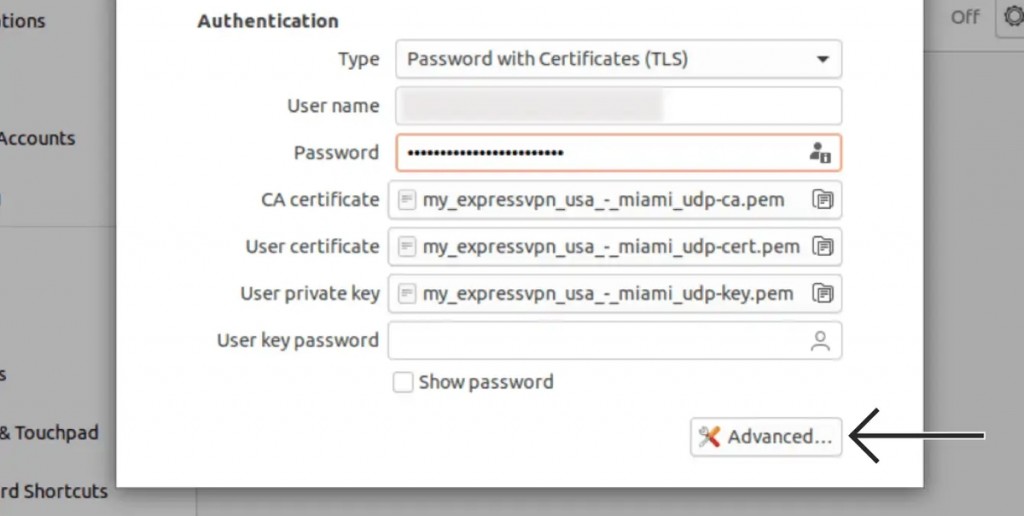
11. Fill out the fields under "Authentication" in the following way:
- Type: Select "Password with Certificates (TLS)."
- User Name: Input your OpenVPN username (not your ExpressVPN username).
- Password: Input your OpenVPN password (not your ExpressVPN password).
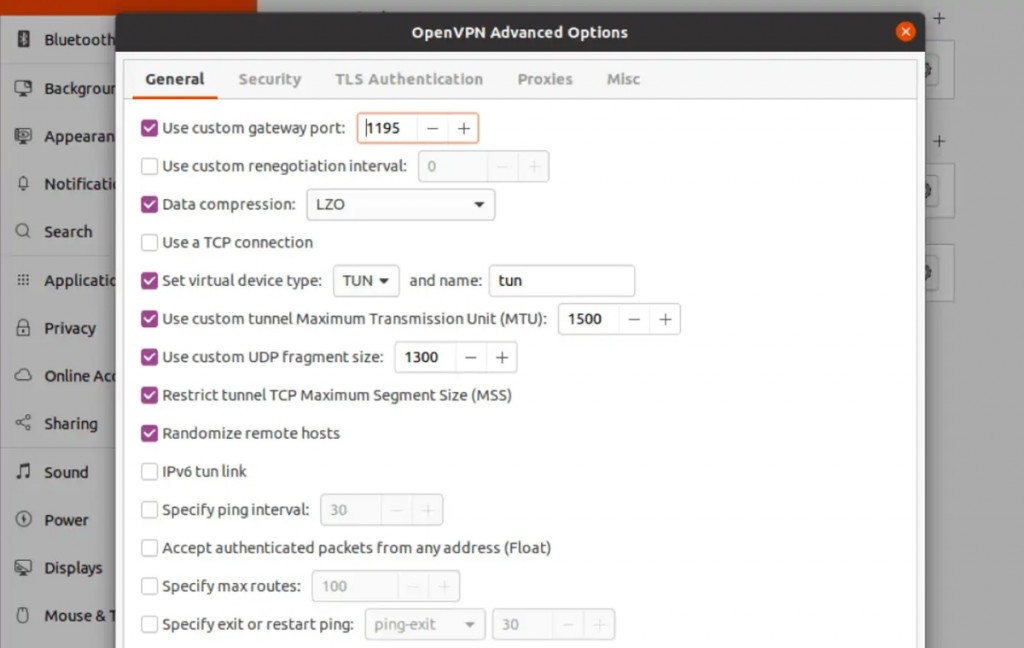
12. Click on "Advanced," visible in the bottom-right corner.
13. Fill out the fields in the "General" tab in the following way:
- Use Custom Gateway Port: Check this box and enter "1195."
- Data Compression: Check this box and pick "LZO."
- Use Custom Tunnel Maximum Transmission Unit (MTU): Select, then enter "1500."
- Use Custom UDP Fragment Size: Select, then enter "1300."
- Restrict Tunel TCP Maximum Segment Size (MSS): Select this box.
- Randomize Remote Hosts: Select this box.
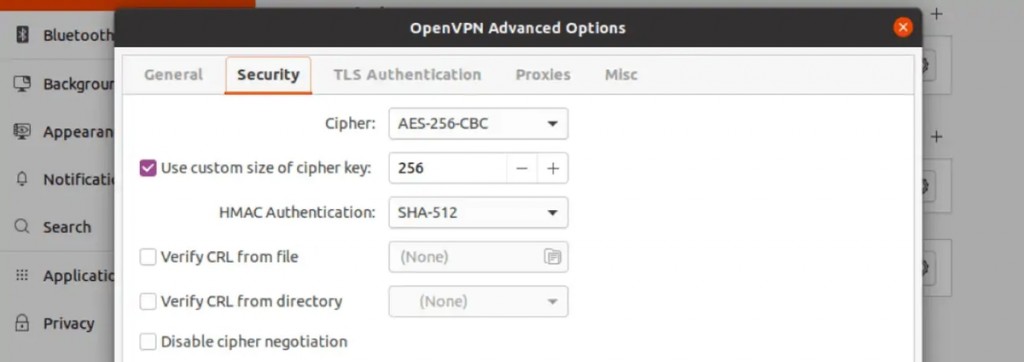
14. Next, click the "Security" tab. Select the following options:
- Cipher: Pick "AES-256-CBC."
- HMAC Authentication: Select "SHA-512."
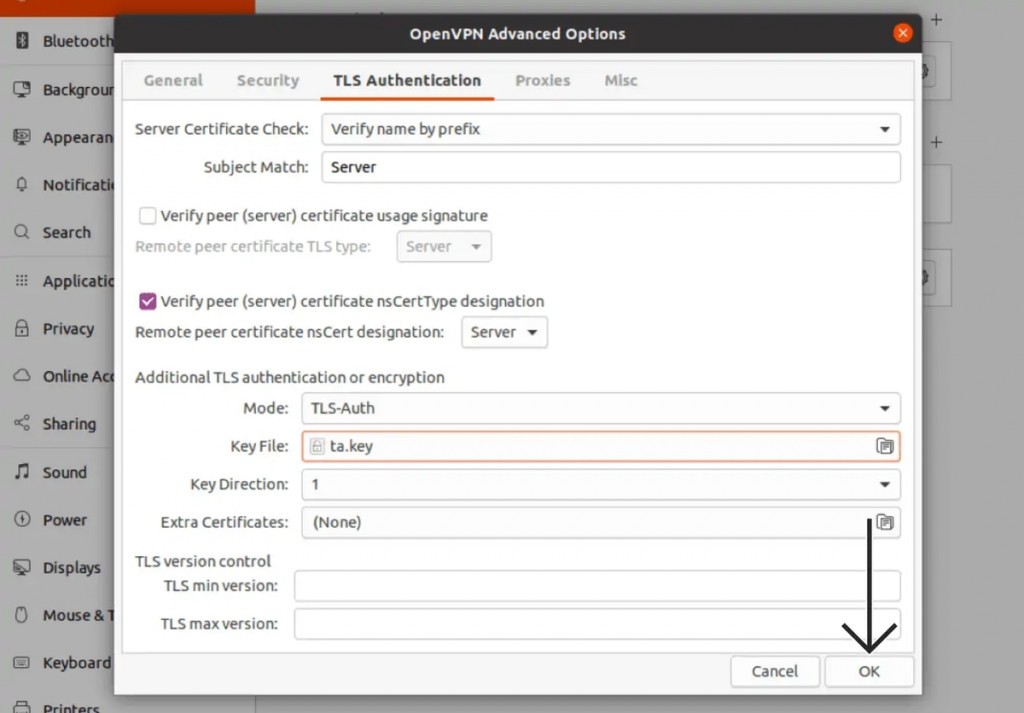
15. Select the "TLS Authentication" tab. Enter the following details:
- Key File: Locate the "ta.key" file you downloaded earlier (from the VPN's site).
- Key Direction: Select "1."
16. Finally, click "OK" to create your VPN connection.
17. To connect, use the toggle on the right side of your newly created VPN connection.
18. Once you connect, your Linux machine will indicate that your VPN session is active.
19. To disconnect, go to Settings > Network and disable your active VPN session.
20. You can also add more servers following the instructions found above.
Final Thoughts
You don't have to be an IT expert to use Linux, as this guide hopefully shows. So, when it comes to setting up a VPN on Linux, you have various options in front of you. However, no matter what path you choose, you'll first need to sign up for the best VPN for Linux you can find.
Based on many years of testing VPNs, we believe that ExpressVPN should be your pick. It's by far the most capable VPN available. And also, it comes without any risks whatsoever. With that said, feel free to try ExpressVPN risk-free for 30 days.
Ultimately, we'll recommend our central guide on setting up a VPN. Use the provided link to learn how to get started with VPNs on even more devices.
You've reached the end of our guide on how to set up a VPN on Linux. If you have any questions, let us know via the comments section below. Thank you for reading!


