How to Install Kodi on iPhone or iPad in 2025
Sadly, Apple doesn't allow Kodi to appear in the iOS App Store. However, this doesn't stop Kodi's developers from offering a workaround. In fact, Kodi for iOS receives frequent updates, fighting for its dominance across the home theater software category. So, the question is: how to install Kodi on iPhone or iPad? Is that even possible?
The answer is - yes, it's possible to run Kodi on iOS and iPadOS. And also, we'd like to highlight the fact that you don't need to have a jailbroken device. Instead, we will focus on two solutions that are perfectly safe for your iPhone and iPad.
Requirements for Running Kodi on iPhone & iPad
To run the latest available version of Kodi, your iPhone should run iOS 9.0 or newer. And in terms of iPads, your tablet must use iPadOS 13.1 or above. These are the official requirements as per Kodi's development team, and they tell us that Kodi can run even on some dated Apple-made devices.
How to Install Kodi on Your iPhone or iPad
Before you start having fun with Kodi, let's teach you how to install this Kodi application on your iPhone and iPad. There are two methods available, as you can see just below.
- Method #1: Install Kodi on iPhone & iPad via Cydia Impactor (Windows, macOS, Linux)
- Method #2: Install Kodi on iPhone & iPad via Xcode (macOS)
Method #1: Install Kodi on iPhone & iPad via Cydia Impactor
First, we will talk about a method that applies to Windows, macOS, and Linux - as Cydia Impactor can be downloaded and used on all those devices. Also, you need to have iTunes installed on your computer and have it paired with your iOS device. And finally, you need to have an Apple ID or a paid Apple Developer ID.
Once you’ve met all of the requirements, you’re ready to proceed. Here's how to install Kodi on iPhone or iPad using Cydia Impactor.
- First, you need to launch Cydia Impactor on your computer.
- Connect your iPhone or iPad to your computer. If iTunes launches, close it.
- Now, download Kodi for iOS to your computer from its official website.
- You'll download is a DEB file - and we need an IPA file. Here's how to convert DEB into IPA files.
- Now, drag and drop Kodi’s file onto the Cydia Impactor window. This is also where you’ll see a drop-down list of iOS devices. Make sure to pick your device using this list.
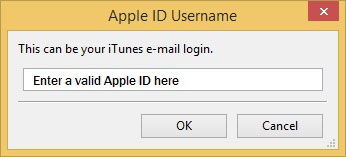
- The application will ask for your Apple ID, needed for Kodi to be successfully installed. Feel free to use your Apple ID and Cydia Impactor will let you know if everything’s okay.
- As you’ll see, the process of 'sideloading' doesn’t take long. You’ll be notified once everything is done, which is when you should see this app’s icon on your phone or tablet.
Method #2: Install Kodi on iPhone & iPad via Apple's Xcode
Now, let's talk about how to install Kodi on iPhone or iPad - if you have a Mac computer as well. Here are all the applications that you need to have installed.
- iTunes (you probably have this application already installed).
- Xcode (you can use the Mac App Store to download this application, free of charge).
- iOS App Signer – this is a freebie app.
- The latest version of Kodi for your iPhone or iPad.
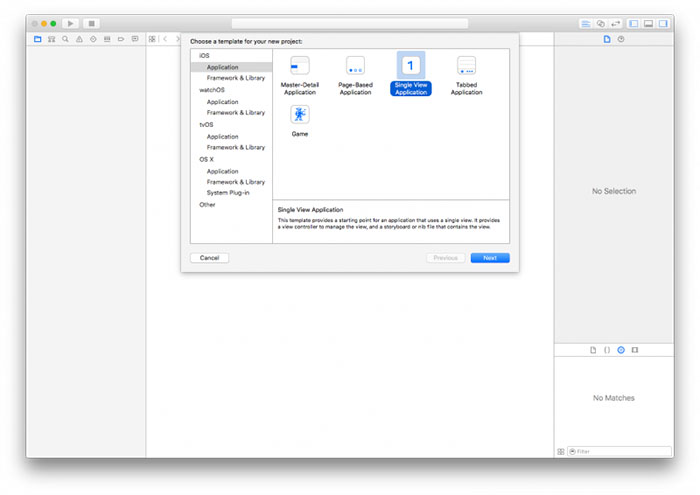
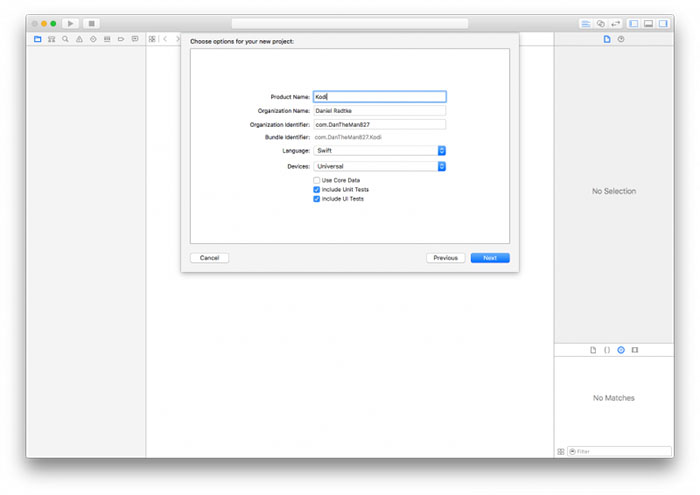
Launch Xcode on your Mac and follow the guide carefully. We have also provided a set of screenshots to help you navigate through this process more easily.
- First, plug in your iOS device (iPhone, iPad, or iPod Touch) and open Xcode on your Mac.
- Now select 'Create a new Xcode project.' In the pop-up window, you’ll see different options. On the left-positioned side of this window, pick 'Application.' On the right side, pick 'Single View Application.' Now click on the button that says 'Next.'
- You will be greeted with a dialog box. Now, fill out the fields like 'Product Name' and 'Organization Identifier.' Name your application 'Kodi,' and fill out other fields as you like. You’ll also be asked whether you want to create the app for iPhone or iPad, but you can pick 'Universal.' Hit 'Next' when ready to proceed.
- Now, pick a location for a new GitHub repository. You can save it on your desktop. Click 'Create.'
- You’ll be asked if Xcode can access your contacts. Feel free to deny this request.
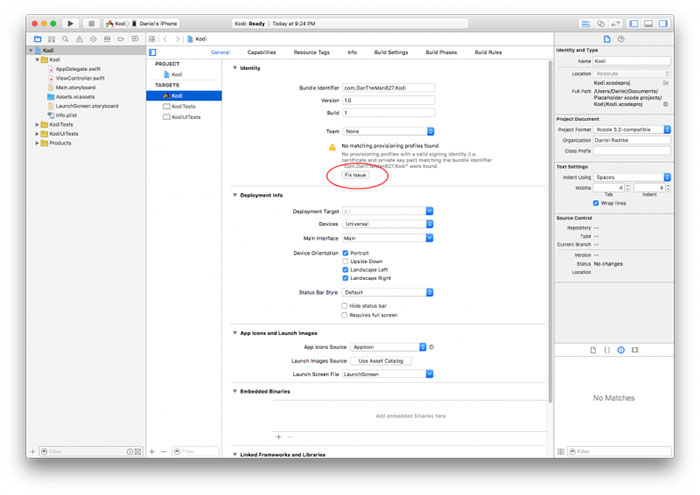
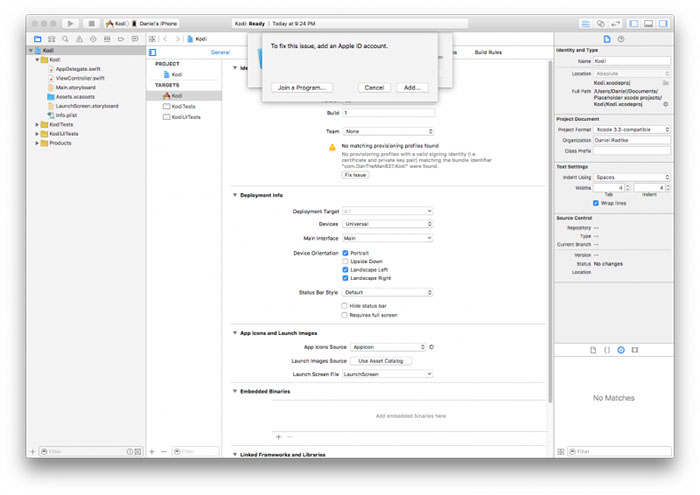
- You should be greeted with a fairly complex view of Xcode. Somewhere in the middle portion, you will see a message that reads: 'No code signing identities found.' Click on 'Fix Issue' just below the message. This is where you’ll be asked for your Apple ID. Fill out your credentials and sign in.
- Once you return to Xcode’s main screen, another error will appear. It will say 'To fix this issue, select a Development Team to use for provisioning.' By default, there will be only one team that you can select, so you can proceed. After a couple of seconds, Xcode will successfully fix these errors.
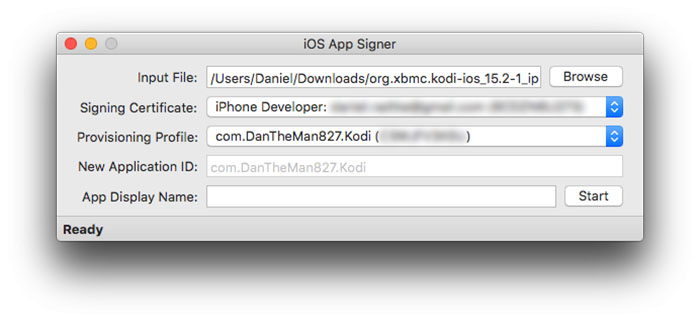
- What you need to do now is to open the iOS App Signer application. Once you open it, you will see a list of different fields. The first one is called 'Input File.' This is where you need to locate the Kodi IPA file.
- Fields like 'Signing Certificate' and 'Provisioning Profile' should already be filled out since we have done that a moment ago using Xcode. If not, you use the drop-down menu and pick the ones you picked in Xcode.
- Finally, there’s the 'App Display Name' field. This is where you can name your app 'Kodi.' After installing Kodi on iOS, this name will appear underneath the app’s icon.
- Once you’ve set up everything within iOS App Signer, hit 'Start.' The application will now unpack the data and save your newly generated Kodi iOS app. You’ll be notified when the process is completed.
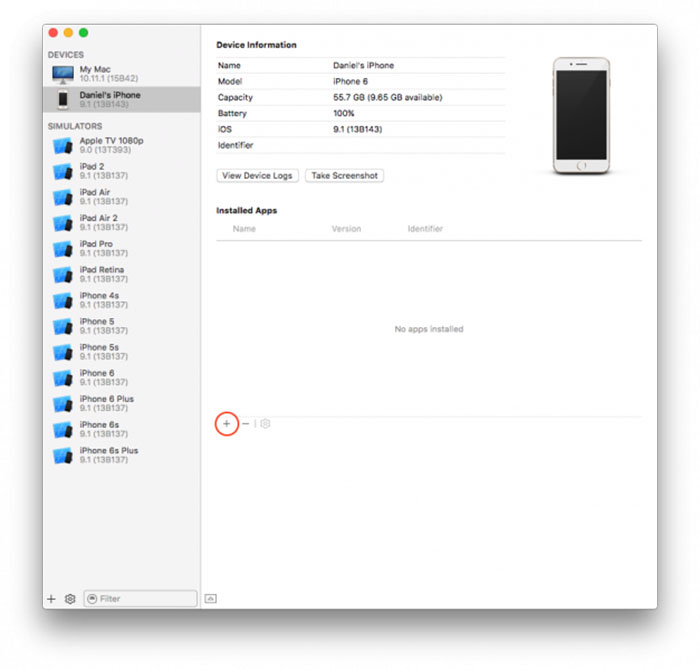
- Return to Xcode and select Window > Devices from the system menu (top portion of the screen). Find your device in the left-positioned sidebar. In the main portion of the window, you’ll see a bunch of different details about your device. Scroll down until you see a small plus sign. Click on it.
- Navigate to the newly generated Kodi iOS app on your computer and hit 'Open.' After a couple of seconds, the process will be done. Kodi should now be listed in the section named 'Installed Apps.'
- That’s all when it comes to Xcode and your computer. Feel free to disconnect the device and remove any cables. Also, there is one additional step that is done on your iOS device.
- We need to instruct iOS to 'trust' this application so we can open and use it. Navigate to Settings > General > Device Management. This is where you can verify Kodi under the 'Developer App' section. Tap on the Apple ID account you used in Xcode. Click on the option that allows you to "trust" the apps associated with this account. Kodi should be listed in the lower portion of the screen.
That’s how you install Kodi on iOS! You can go back to your iPhone's home screen, where Kodi will be waiting. Tap on it to launch the app.
Want to Learn More About Using Kodi?
With Kodi running on your iOS device, it's time to learn how to use this amazing app. For this purpose, we've collected a set of our popular guides, so take a look.
- Enable 'Unknown Sources' on Kodi
- Get the Best Kodi Addons
- Get the Best Kodi Skins
- Change Skins on Kodi
- Create a Library in Kodi
- Import Videos to Kodi
- Add Music to Kodi
- Add Photos to Kodi
- Set Up Kodi Profiles
- Add Subtitles to Kodi
That would be all on how to install Kodi on iPhone or iPad. If you have any questions for us, don't hesitate to use the comments section below. And lastly, thanks for reading!

