How to Use Night Mode on iPhone 13, Mini, Pro, and Pro Max
Thanks to a combination of technologies and incredibly capable processing, this year's iPhone generation brings unparalleled camera specs. More specifically, you're going to love what your phone brings if you're into low-light photography. With that said, you need to know how to use Night mode on your iPhone 13, created to really push your phone's camera sensors and lenses in low-light conditions. So, here's all you need to know.
How to Use Night Mode on iPhone 13
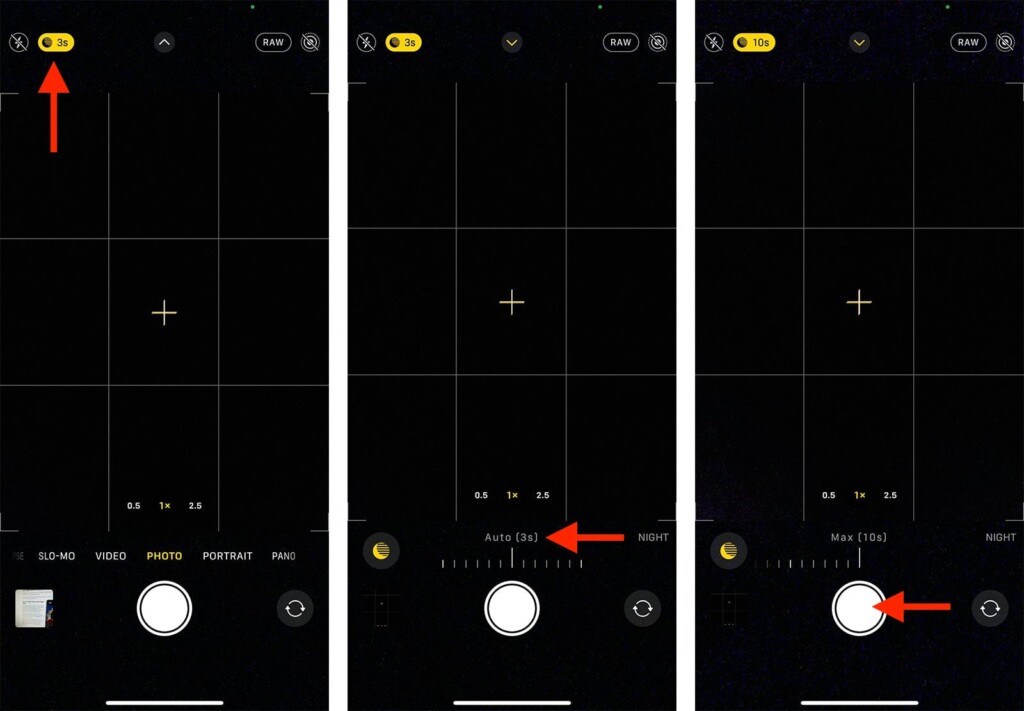
When shooting low-light photos, Night mode kicks in automatically. Still, you can also adjust it manually, leading to great results. So, make sure to follow these steps.
1. First, make sure you're in a low-light environment.
2. Launch the Camera app on your iPhone.
3. Now, look for the Night mode icon in the top-left corner of your phone's screen.
4. Make sure the icon is yellow, which means that Night mode has been enabled.
5. If you wish to fine-tune your camera, tap on the Night mode icon.
6. At the moment, you'll get to set a duration in seconds.
7. Increase the exposure length as per your preference (up to 30 seconds in total).
8. Finally, press the 'Shutter' button and let your iPhone take the photo.
9. Check your photo by tapping on its preview in the bottom-left corner.
10. If needed, edit the photo by tapping on 'Edit.' That's it!
The above-explained steps are all there's to know about Night mode on your iPhone 13. Still, you can optimize how you take low-light photos, where even minor adjustments can lead to great results. So, make sure to keep on reading.
How Do I Take Good Night Photos With My iPhone 13?
We'll dive deeper into the previously explained steps by uncovering different aspects of iPhone 13's Night mode. So, here are some tips that'll help you take excellent night photos.
- Adjust the Capture Time: When you activate Night mode, your phone will find the best possible exposure length (in seconds). However, you can adjust that manually. Still, know if you start adding additional time, your photos will be brighter (as more light will be "collected"). That leads us to the following tip, found just below.
- Stabilize Your iPhone: Increasing the exposure length is crucial when taking night photos. There’s only one problem with doing that. Just like any other camera, extra exposure time makes the shutter speed slower. In other words, to get a clear image, your iPhone will need to be still. So, when you start "adding extra time" to Night mode, we highly recommend using a tripod.
- Use Your iPhone’s Flash: We admit that iPhone’s Night mode is pretty powerful. However, that doesn’t mean you should use it all the time. What we're saying is that you should experiment with the flash, especially when shooting smaller scenes. To learn more, here's how to control your iPhone’s camera flash.
That would be all on how to use Night mode on your iPhone 13. If you have any questions for us, let us know via the comments section below. And finally, thank you for reading!

