When you purchase through links on our site, we may earn an affiliate commission. Here’s how it works.
How to Enable VPN Split Tunneling in Windows 10
Need a quick boost of speed in a multiplayer game or video call, but still want to keep the VPN on for torrenting or Netflix on a side screen? Well, split tunneling lets you "whitelist" which apps use or don't use the VPN connection, leaving your ISP's servers to do the grunt work. Today, we'll be looking at how to enable VPN split tunneling in Windows 10.
Here are four different methods to do so, although the easiest one remains to get a commercial split-tunneling VPN. We'll cover that option later in the article as well.
Before we move on, make sure you know how to set up a VPN on Windows. This is because the first two methods involve a manually created VPN connection.
Method #1: Using Network Settings
One way to enable VPN split tunneling in Windows 10 is to disable the "Use default gateway on remote network" option on your manually created VPN connection. Here's how to do so.
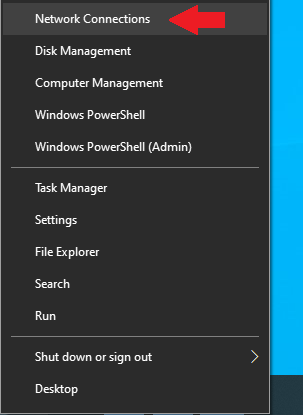
Step 1: Right-click the Start button then click on Network Connections.
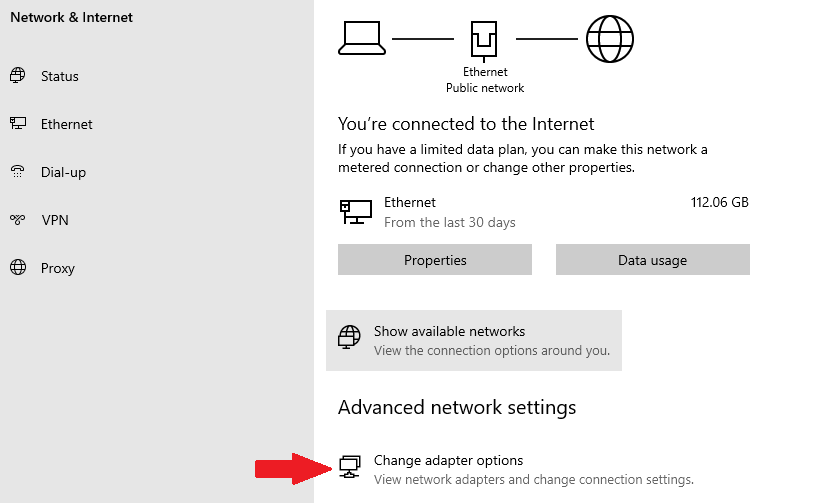
Step 2: Under Advanced network settings, click the Change adapter options button.
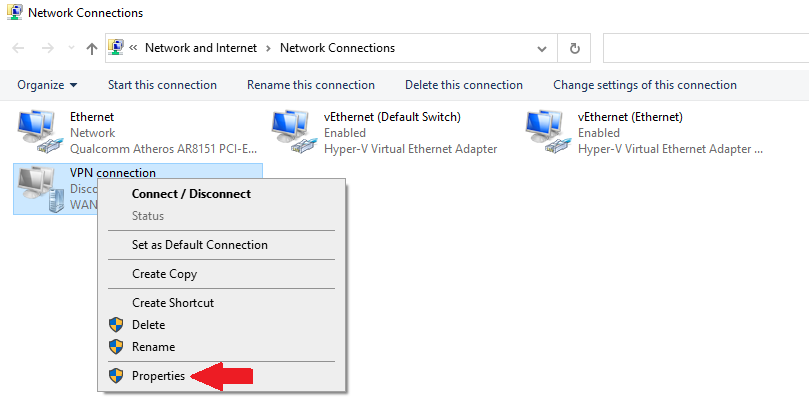
Step 3: Locate your VPN connection (in our case, the cleverly named "VPN connection"). Right-click on it and click Properties.
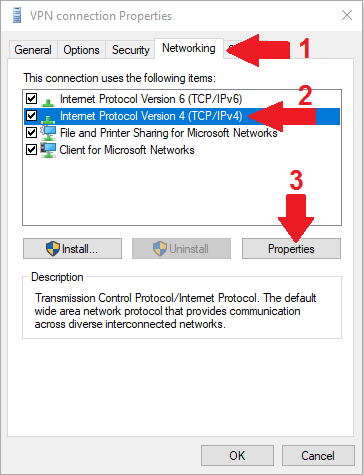
Step 4: Click on the Networking tab, then select Internet Protocol Version 4 (TCP/IPv4), and click on Properties.
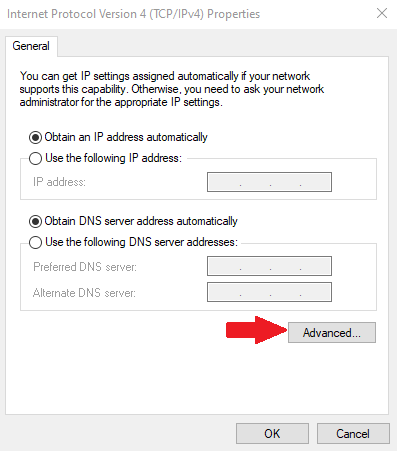
Step 5: In the Internet Protocol Version 4 (TCP/IPv4) Properties menu, click on "Advanced...".
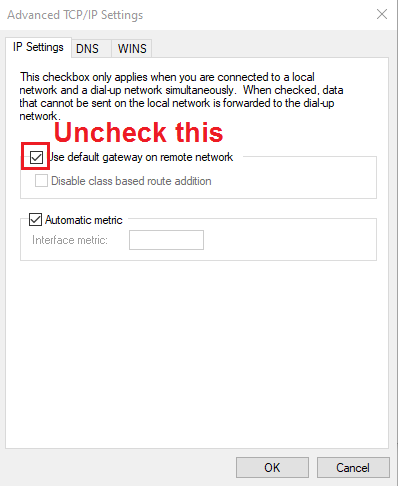
Step 6: In the IP Settings tab, untick the box that says "Use default gateway on remote network".
And that's how to enable VPN split tunneling in Windows 10 using the settings on your virtual network adapter. Now all you need to do is restart your VPN connection.
Method #2: Using PowerShell
This next method basically does the same thing, but you don't need to navigate through so many menus.
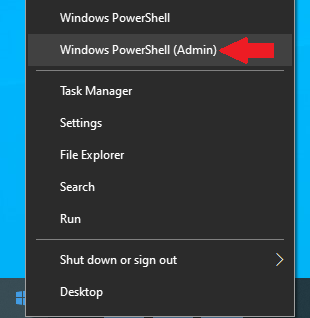
Step 1: Once again, right-click on the Start button and click on Windows PowerShell (Admin).
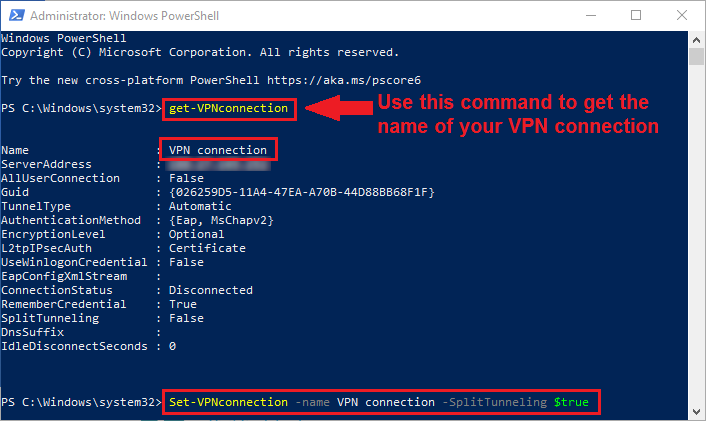
Step 2: Copy and paste this line of code into PowerShell. Change "VPNConnectionName" to whatever you named your connection (ours is literally just called "VPN connection").
Set-VPNconnection -name VPNConnectionName -SplitTunneling $trueNote that you can use the command Get-VPNconnection to get the name of the connection, as well as some additional info. Saves you time instead of navigating all the way to the network adapter settings.
Method #3: Get a VPN with Split Tunneling
If you're wondering how to enable VPN split tunneling in Windows 10 without any sort of complications or manual VPN settings, this is the way to go. We'll be using ExpressVPN to showcase the quick process, though it should be fairly similar to other providers.
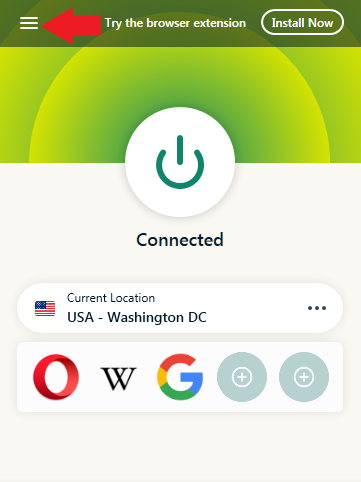
Step 1: First, launch ExpressVPN (log in if necessary). Click on the Menu button in the top left corner of the app (three vertical lines).
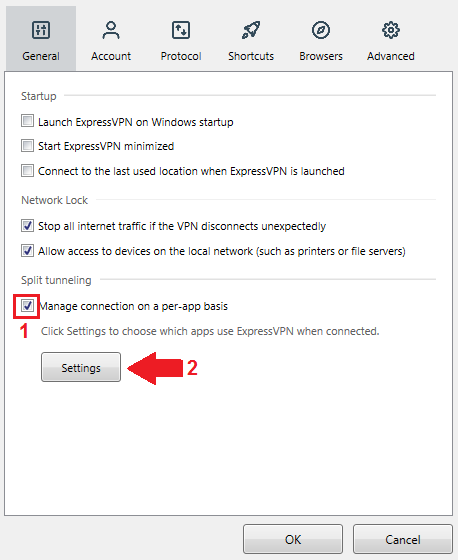
Step 2: In the General tab, tick the checkbox that says "Manage connections on a per-app basis". Then click on Settings.
Now, there are two ways you can use split tunneling in ExpressVPN. We'll separate the two under Step 3A and 3B.
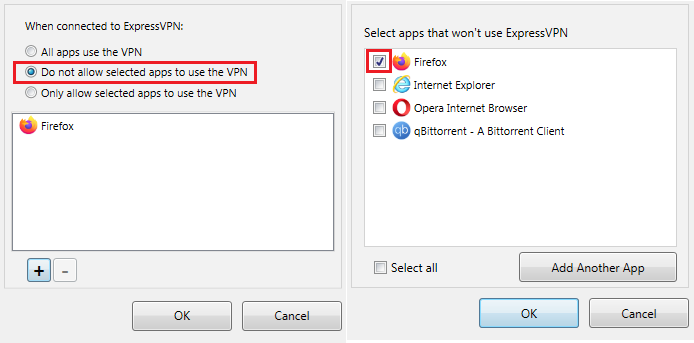
Step 3A: First, you can disallow apps from using the VPN.
This is useful in case you want to use a different browser to watch Netflix locally, or make a video call that requires faster network speeds than with an active VPN connection. Just a couple of examples, but you get the idea.
Anyway, click on "Do not allow selected apps to use the VPN". Then click on the plus sign (+) to add apps that won't use ExpressVPN. Use the "Add another app" option if your choice is not on the list, and head to the folder where it's installed.
Step 3B: Use the "Only allow selected apps to use the VPN" option if you want to use your ISP's servers for the rest of your traffic. Useful in case you have stuff running in the background, and want to use VPN to stream content from abroad in a separate browser.
Step 4: Click OK to apply your settings, no matter which option you picked. Restart your VPN and the apps you've selected to ensure everything works properly.
Method #4: Through Router Firmware Settings
Want to share a VPN connection with devices that don't natively support it (such as a smart TV or game console)? Then take a look at our guide on how to set up VPN on your router, provided you have a compatible router to work with.
Enabling VPN split tunneling on a router will allow you to:
- Route traffic from specific devices through the VPN tunnel (policy-based routing)
- Tunnel traffic to specific destination IP addresses (IP routing)
- Tunnel traffic from individual apps or port numbers (say, port numbers for multiplayer games)
Note that the process of installing and setting up VPN split tunneling on your router can be tricky. We only recommend this process to advanced users.
Final Thoughts
As you can see, there are several ways to split your traffic and use VPN tunneling only where necessary. If you have a manual VPN setup on Windows 10, PowerShell and your network adapter settings are your friends. Alternatively, you can use a compatible VPN router and use interfaces like DD-WRT to change tunneling policies by device, IP, app, or port.
Of course, the easiest way is to just skip all the complicated setup and enable split tunneling on a third-party VPN. You can easily exclude individual apps from the VPN tunnel, or select specific apps you want to use the VPN.

