When you purchase through links on our site, we may earn an affiliate commission. Here’s how it works.
How to Set Up and Use NordVPN on PlayStation
Sony's PlayStation does not have native support for VPN apps, which means you can't directly install NordVPN on your game console. However, there are several workarounds to make NordVPN work with consoles like PlayStation 4 and PlayStation 5. These include setting it up on a router, using its SmartDNS feature, or sharing a NordVPN connection from a Windows PC.
Among these, setting up the VPN on a router is the best method because it lets you connect unlimited devices simultaneously. This is useful if you want all the gaming benefits of a VPN, such as lower ping, protection from hackers, and more. The SmartDNS feature is only suitable for unblocking streaming apps.
This article will walk you through multiple methods to set up and use NordVPN on a PlayStation, including router setup, sharing a NordVPN connection from Windows, and using its SmartDNS. Finally, we have a round FAQ as well.
How to Set Up NordVPN on PlayStation
We'll first show you how to set up the VPN on a router, as it's the best way to get VPN features on your console. An alternative would be to share your connection from a PC, turning it into a virtual router. Lastly, we'll instruct you how to set up NordVPN's SmartDNS, which is the easiest method, but you won't get encryption that way (you'll get content unblocking, though).
Method #1: Set Up NordVPN on a Router
By setting up NordVPN on your router, you'll create a VPN network you can connect to using your console. The following method works on PS5, PS4, and PS3 consoles, as well as any other Web-connected device. Here's a step-by-step guide.
1. Sign up for NordVPN using your computer and a Web browser.
2. Follow our central guide to set up NordVPN on your router.
3. Connect your PlayStation to the Web using the VPN-enabled Wi-Fi.
4. Go to 'Settings' > 'Network' > 'Test Internet Connection' to ensure you're connected.
5. Return to your PS Home Screen and launch any game or app. That's it!
Method #2: Share NordVPN From Your Windows PC
You can turn your Windows PC into a virtual router by sharing your VPN connection if you don't have a VPN-compatible router. Remember that your PC must be turned on whenever you use your PlayStation. These are the steps you need to take:
1. Subscribe to NordVPN using your Windows PC and any Web browser.
2. Proceed to download and set up NordVPN on Windows.
3. Log into NordVPN and connect to your preferred server.
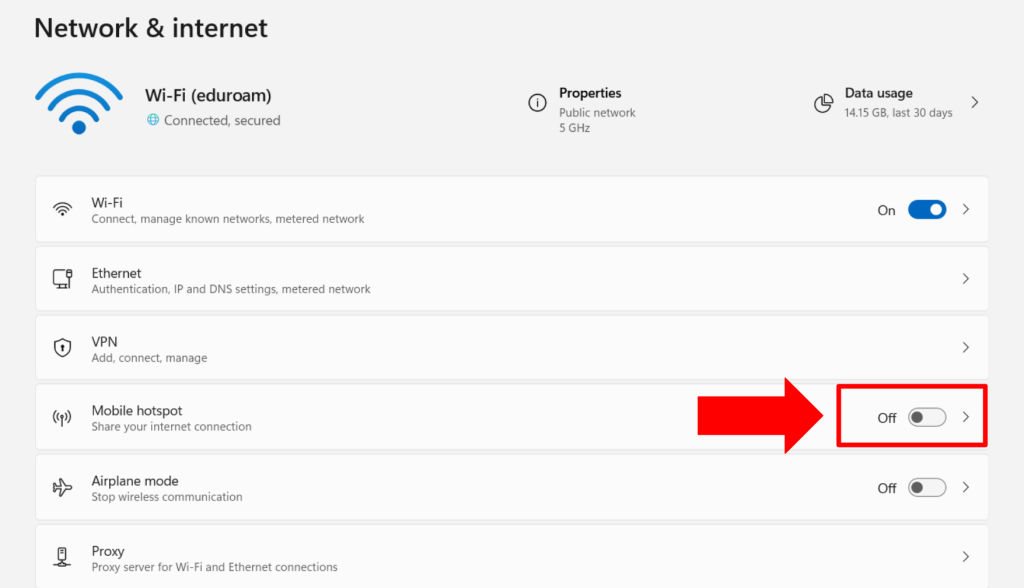
4. On your PC, go to 'Settings' > 'Network & Internet' and turn on 'Mobile Hotspot.'
5. Now click on 'Advanced Network Settings.'
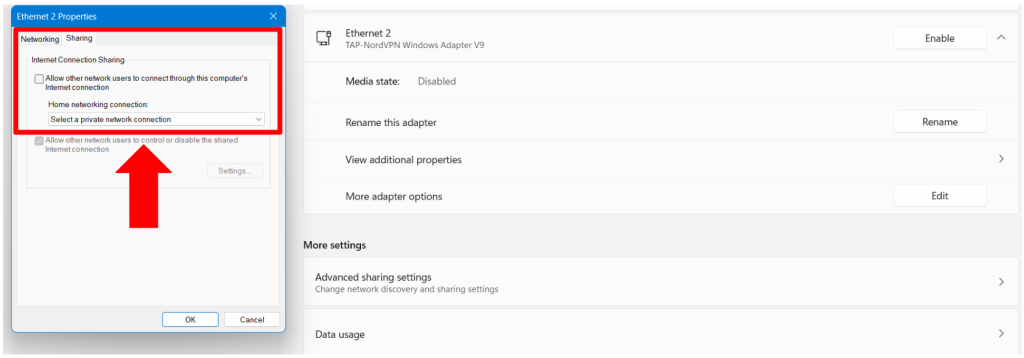
6. Tap on NordVPN's adapter and click on 'Edit.'
7. Tap on the 'Sharing' tab.
8. Check the box, 'Allow other network users to connect through this computer's internet connection.'
9. Click on the dropdown menu, select the hotspot you just created, and click on 'OK.'
10. Connect your PlayStation to the Web using the newly created Wi-Fi connection.
Method #3: Set Up NordVPN's SmartDNS on PlayStation 4
Another way to set up NordVPN on PlayStation consoles is to use its SmartDNS feature, which is useful for unblocking media streaming apps. Here's how to set it up on a PlayStation 4:
1. Get your NordVPN subscription using a computer and any Web browser.
2. Make sure your PlayStation and your computer are connected to the same network.
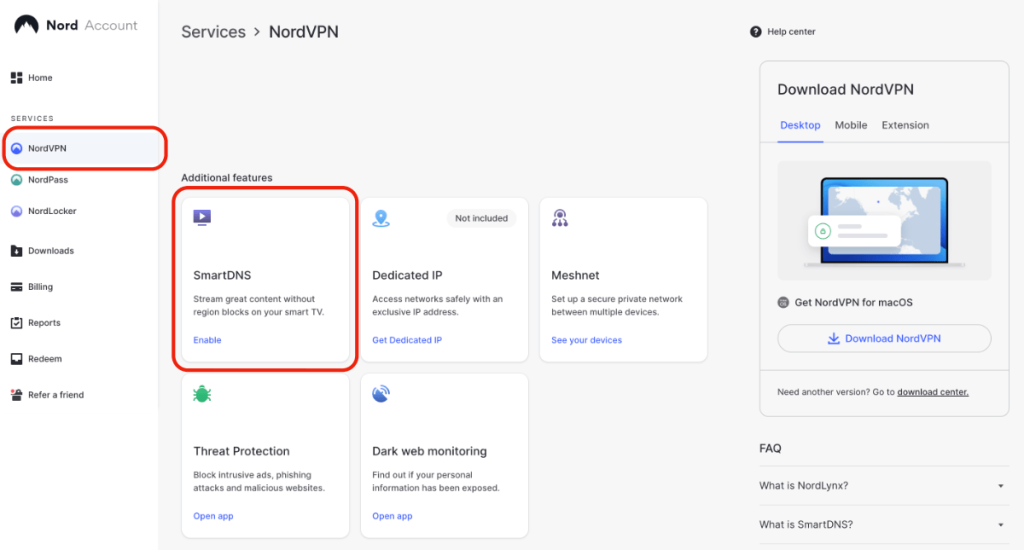
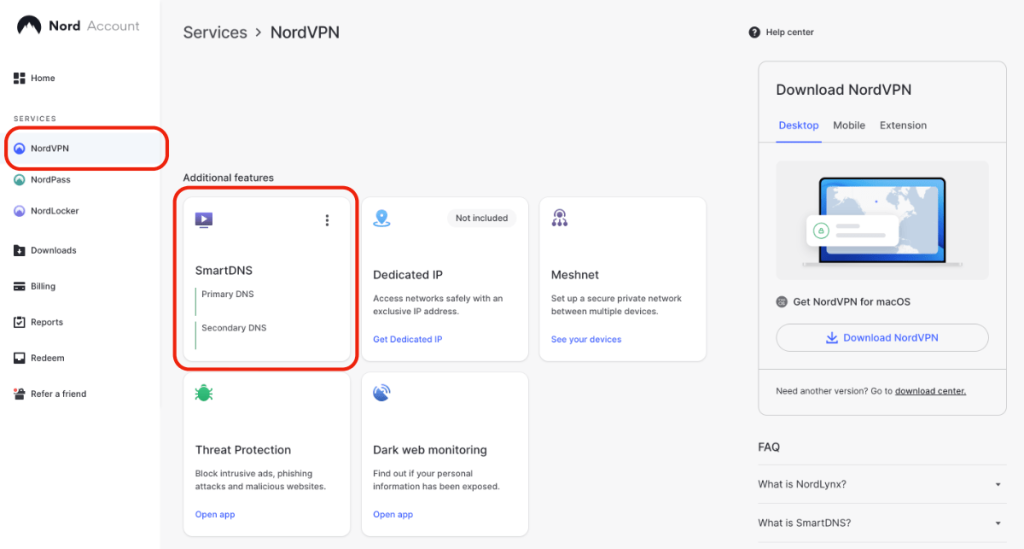
3. Access your Nord account dashboard and pick 'NordVPN' on the left (in the sidebar).
4. Click 'Enable' in the box labeled 'SmartDNS' and enter the verification code received in your email.
5. After a few minutes, SmartDNS will get enabled, and you'll see your DNS addresses.
6. On your PlayStation 4, go to 'Settings' > 'Network' > 'Set Up Internet Connection.'
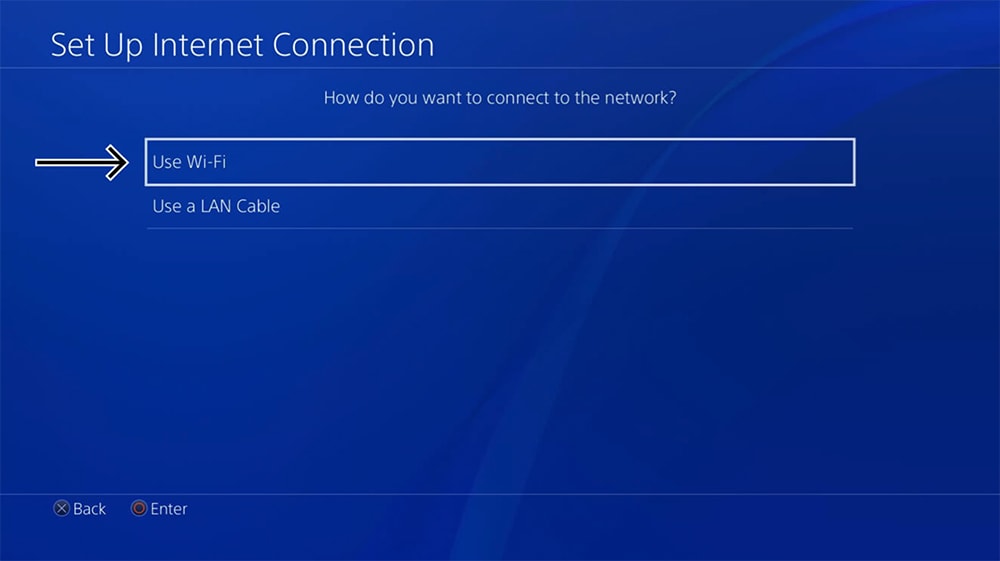
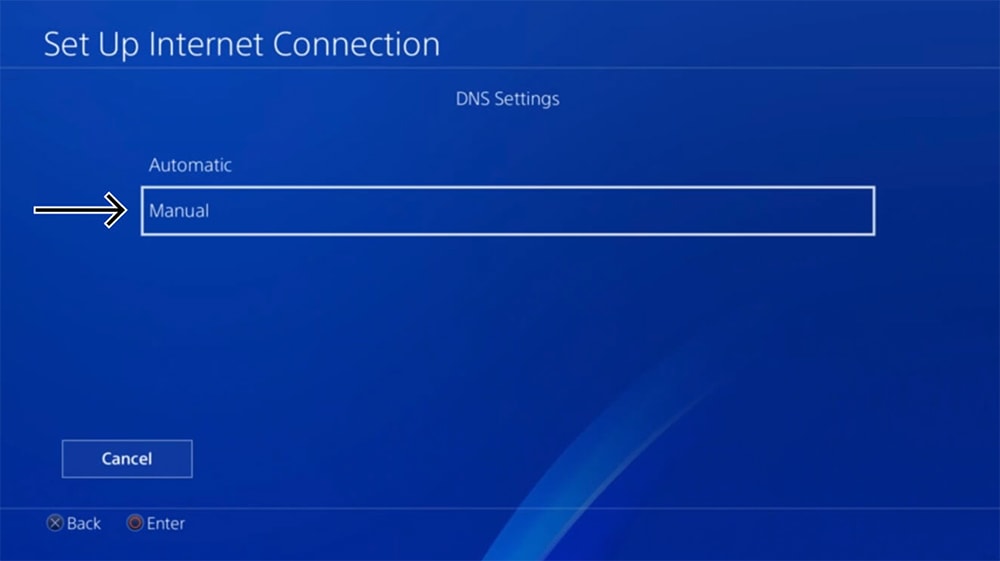
7. Pick 'Use Wi-Fi' > 'Automatic' > 'Do Not Specify' (DHCP Host Name) > 'Manual' (DNS Settings).
8. Enter your primary and secondary DNS addresses.
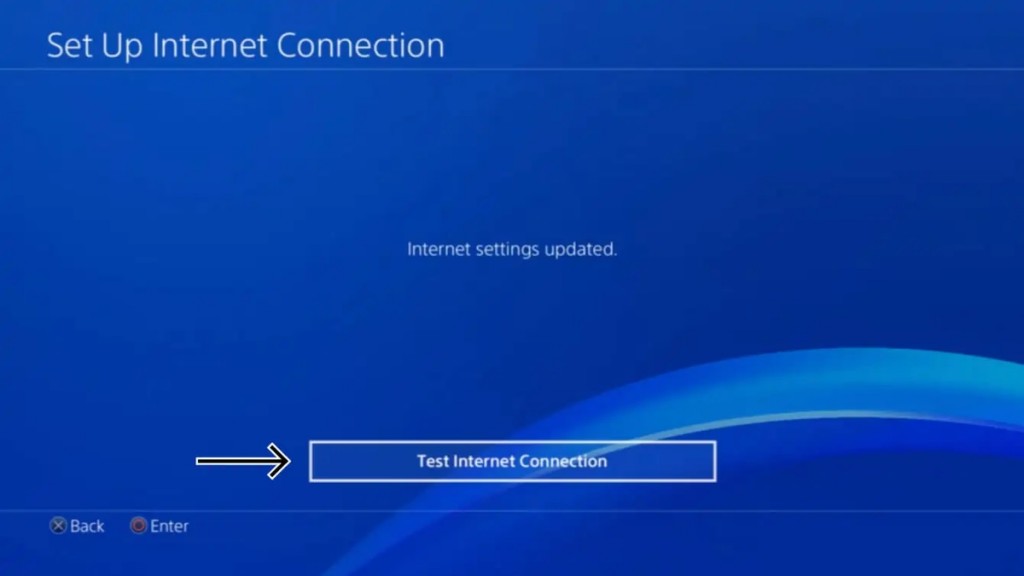
9. Next, pick 'Automatic' (MTU Settings) > 'Do Not Use' (Proxy Server) > 'Test Internet Connection.'
10. Finally, restart your PlayStation 4 for the latest changes to take effect.
Method #4: Set Up NordVPN's SmartDNS on PlayStation 5
You can set up NordVPN on a PlayStation 5 console through SmartDNS, routing your traffic through US-based servers and unblocking new streaming apps. Here's how that's done:
1. Subscribe to NordVPN using your computer.
2. Make sure your PlayStation 5 and your computer share the same Wi-Fi network.
3. Open your Nord account dashboard and choose 'NordVPN' from the left sidebar.
4. Click 'Enable' inside the 'SmartDNS' box and enter the verification code from your email.
5. SmartDNS will take a few minutes to get enabled and you'll get your DNS addresses.
6. On your PS5, go to 'Settings' > 'Network' > 'Settings' > 'Set Up Internet Connection.'
7. Pick your currently active network.
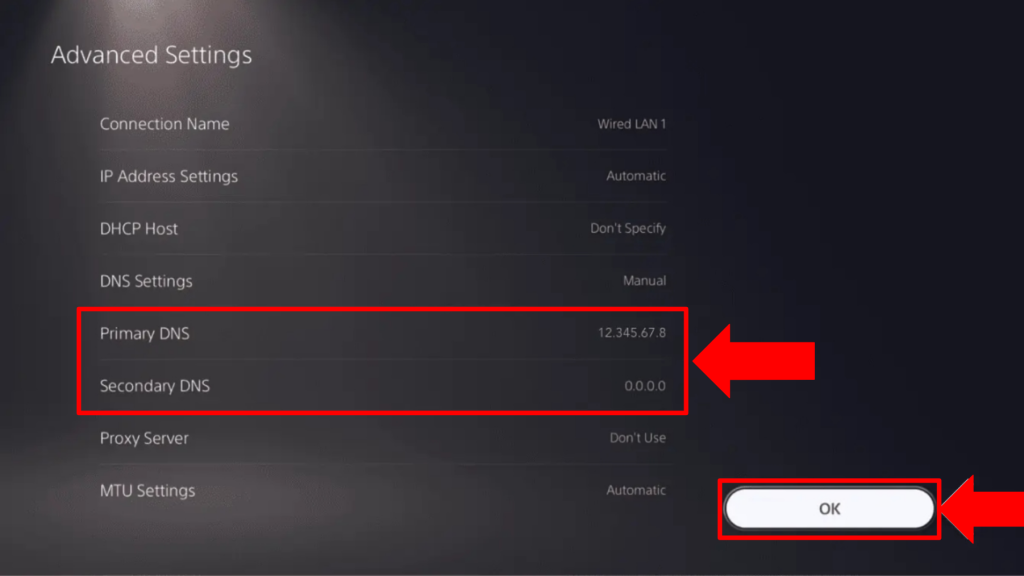
8. Click ‘Advanced Settings’ > ‘DNS Settings’ > ‘Manual.’
9. Choose 'Automatic' (IP Address Settings) > 'Don't Use' (Proxy Server) > 'Don't Specify' (DHCP Host).
10. Enter your primary and secondary DNS address.
11. Click 'OK' to save your changes and restart your PlayStation 5. That's it!
Final Thoughts
Even though PlayStation consoles don't support VPN apps natively, NordVPN has done an excellent job of providing various workarounds. The best method is to install NordVPN on a router and then connect your console to the VPN-enabled Wi-Fi network, giving you lower latency and DDoS protection. The only issue with that method is that you need a router that supports VPN connections.
Running NordVPN on your router allows you to connect your PS and other devices, such as computers, smart TVs, streaming devices, and more. The same goes for sharing a VPN connection from a PC that runs Windows. If you don't want DDoS protection and encryption, SmartDNS is a good option, but mostly for media streaming. The same applies to all of the best VPNs for PlayStation, not just NordVPN.
Since NordVPN allows up to 10 simultaneous connections, why not take full advantage of your VPN subscription? Remember that even a single unprotected device can pose a significant risk to your online privacy and security. So, consult our guide on how to set up NordVPN for more info.
That's all we've prepared in this guide. If you have any extra questions, drop us a comment through the button below. Thanks for reading!

