When you purchase through links on our site, we may earn an affiliate commission. Here’s how it works.
How to Set Up and Use ExpressVPN on pfSense
Last updated January 23, 2025

ExpressVPN runs on pfSense routers that support the OpenVPN protocol, which we'll show you how to set up just below. Aside from that, your pfSense must run software version 2.4.5 at least. So, before you can set up ExpressVPN on pfSense, make sure to update your router's software to get the best possible performance.
It's also worth mentioning that ExpressVPN is designed to run on a wide range of pfSense routers and is intended for a basic home network setup. In other words, professional-grade pfSense routers and firewalls will benefit more from a large-scale VPN solution.
How to Set Up ExpressVPN on pfSense
ExpressVPN allows you to configure OpenVPN connections with AES-256 encryption on pfSense, which is done by manually configuring the VPN's parameters. Most of the process is done while logged in to your router's web interface, so double-check that you've added the correct information in all the necessary fields, as described below. Here's what you need to do:
1. Subscribe to ExpressVPN using your computer and any Web browser.
2. Click 'My Account' using the top-placed main menu on the ExpressVPN site.
3. Provide your credentials and access your ExpressVPN dashboard.

4. Navigate to Set Up Other Devices > Manual Configuration.
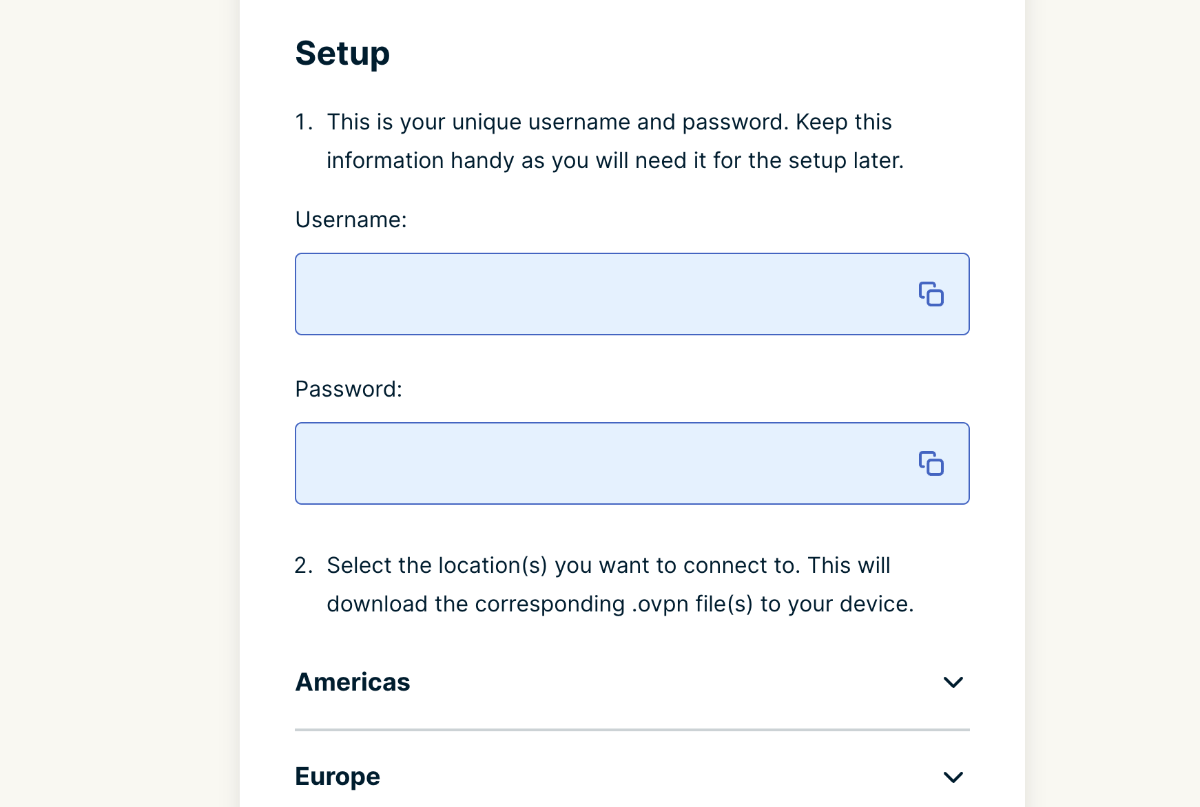
5. Make a note of your OpenVPN username and password.
6. Select a server by scrolling down, and then download that server's OpenVPN (OVPN) files.

7. Now, log in to your pfSense router and navigate to System > Cert. Manager.
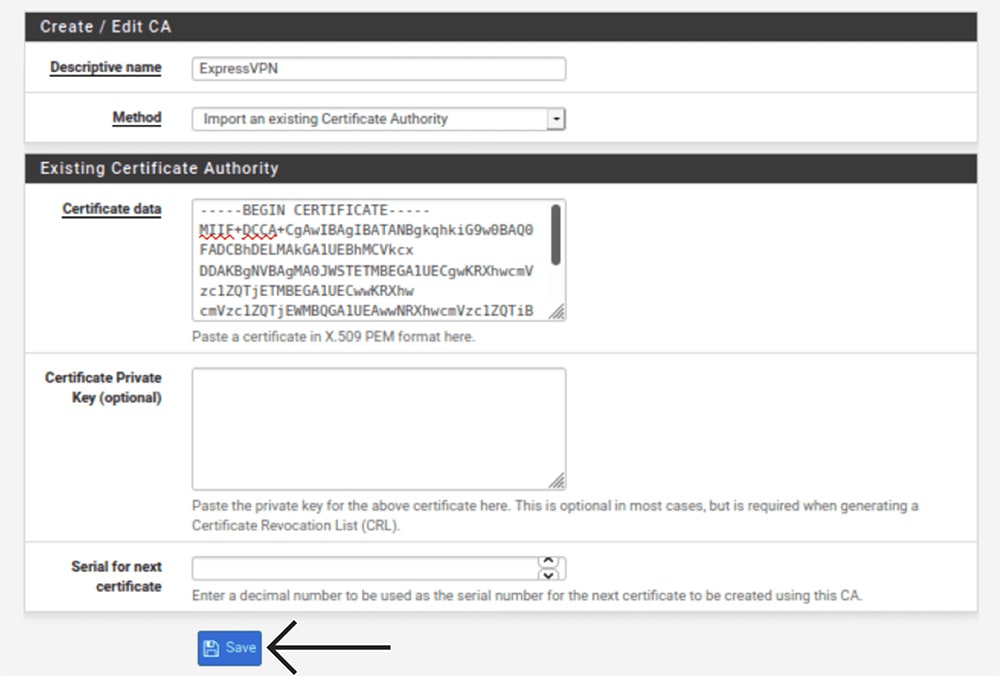
8. Select the 'CA' tab, click on '+Add,' and enter the following information:
- Descriptive Name: Come up with an easy-to-remember name.
- Method: Select 'Import an Existing Certificate Authority.'
- Certificate Data: Launch the recently downloaded OVPN file in a text editor (right-click on it, select 'Open With,' and then choose a text editor). Then, copy the text between the <ca> and </ca> tags and paste it into this field.
- Certificate Private Key (Optional): Feel free to leave this blank.
- Serial for Next Certificate: Leave this one blank as well.
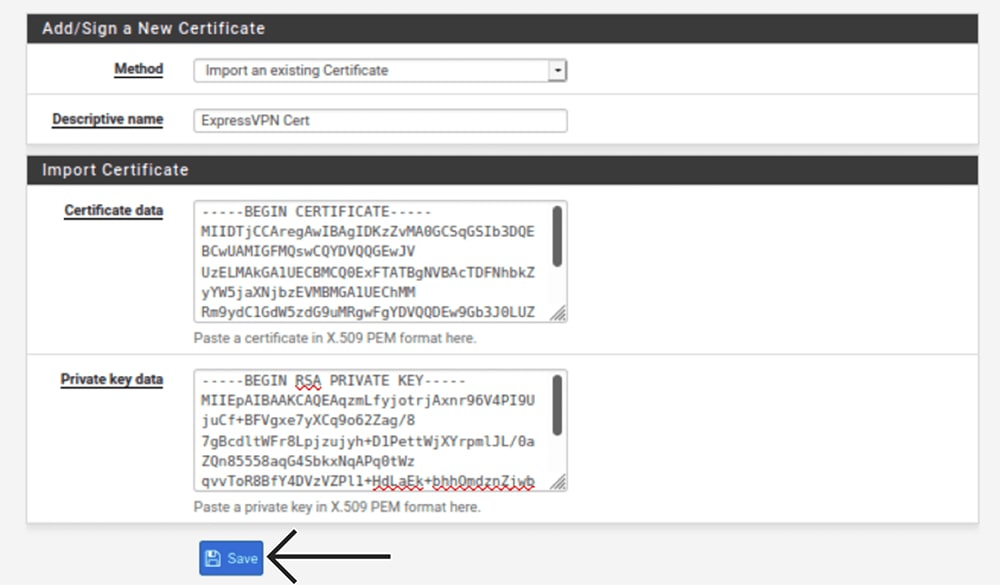
9. Now, select 'Certificates' > '+ Add,' and enter the following information:
- Method: Select 'Import an Existing Certificate.'
- Descriptive Name: Enter any name (like 'ExpressVPN Certificate').
- Certificate Data: Once again, open the OVPN file in a text editor. Then, copy everything between the <cert> and </cert> tags.
- Private Key Data: For this field, copy everything between the <key> and </key> tags (from the recently downloaded OVPN file once you open it in a text editor).
10. Using the top navigation bar, go to VPN > OpenVPN.
11. Select 'Clients' and click the '+ Add' button.
12. Fill out the information in the 'General Information' group based on the following:
- Disabled: Leave this unchecked.
- Server Mode: Select 'Peer to Peer (SSL/TLS).'
- Protocol: Select 'UDP on IPv4 Only.'
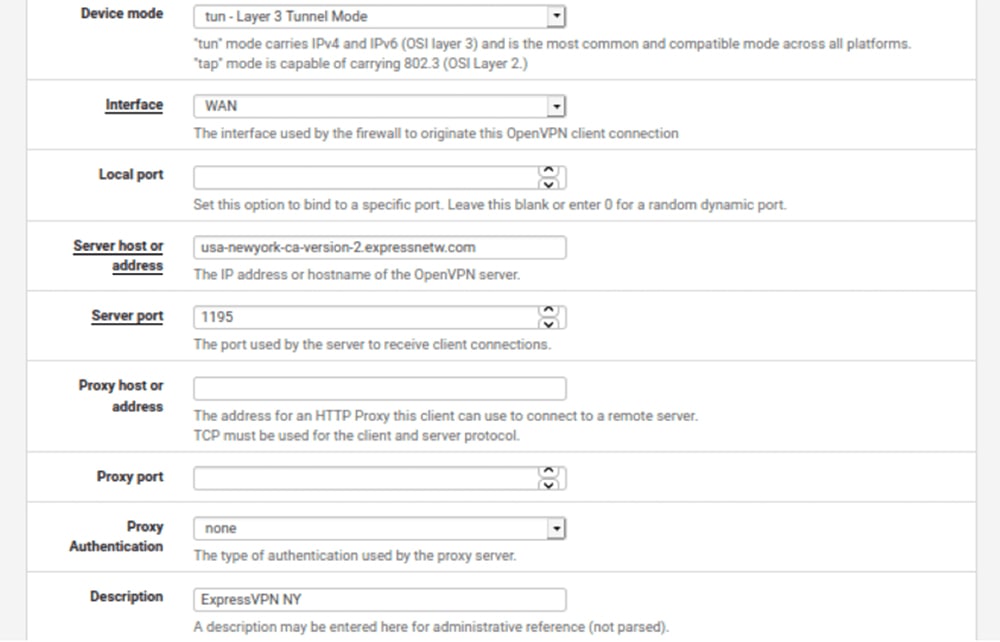
- Device Mode: Select 'tun – Layer 3 Tunnel Mode.'
- Interface: Feel free to pick 'WAN' here.
- Local Port: Don’t change anything (leave blank).
- Server Host or Address: Once again, open the OVPN file in a text editor. Then, copy the server address found between the word 'remote' and the 4-digit port number.
- Server Port: Your 4-digit port number is found in the OVPN file.
- Proxy Host or Address: Leave this field blank.
- Proxy Port: Leave blank.
- Proxy Authentication: Select 'None' here.
- Description: Create a name that’ll help you recognize your VPN connection.
13. Take a look at the 'User Authentication Settings' group.
14. Provide your OpenVPN username and password.
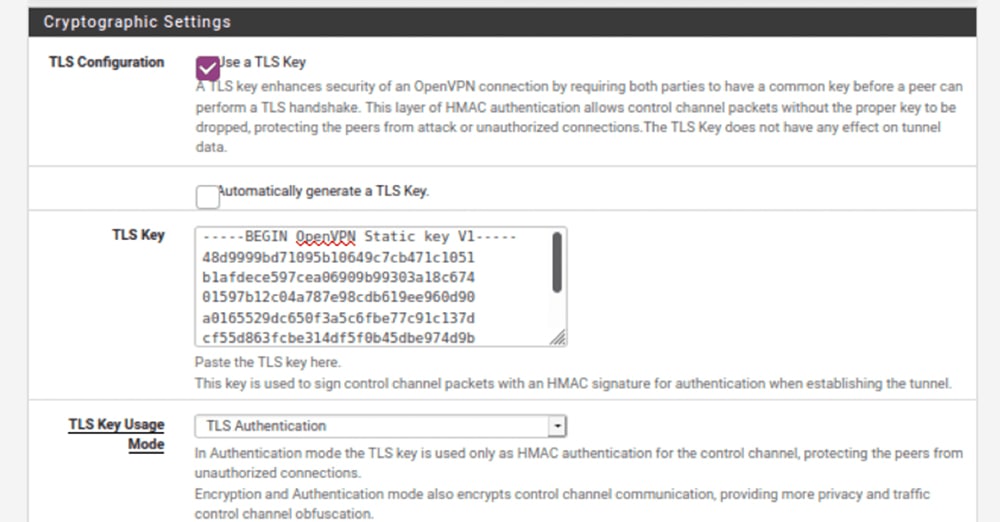
15. Then, fill out the 'Cryptographic Settings' fields based on the following.
- TLS Configuration: Make sure to check this box.
- Automatically Generate a TLS Key: Make sure this box is unchecked.
- TLS: Once again, you need to use your OVPN file. This time, copy everything you see between the <tls-auth> and </tls-auth> tags.
- TLS Key Usage mode: Select 'TLS Authentication' here.
- Peer Certificate Authority: Pick the entry you created earlier.
- Client Certificate: Pick the certificate you created moments ago.
- Encryption Algorithm: Once you open the OVPN file in a text editor, look for the word 'cipher.' Select the algorithm shown after 'cipher' in the dropdown menu. For example, this could be AES-256-CBC.
- Enable NCP: Don't use this option (uncheck this box).
- NCP Algorithms: Feel free to leave blank.
- Auth Digest Algorithm: Open the OVPN file again and look for the word 'auth.' Select the algorithm shown after 'auth' in the dropdown menu. For example, SHA512.
- Hardware Crypto: Select based on the capability of your pfSense hardware. If this option isn’t available on your device, select 'No Hardware Crypto Acceleration.'
16. Then, take a look at the 'Tunnel Settings' group of fields.
17. Fill them out based on the following information.
- IPv4 Tunnel Network: Leave this blank.
- IPv6 Tunnel Network: Leave this one blank as well.
- IPv4 Remote Network: Leave it as it is.
- IPv6 Remote Network: Leave it as it is.
- Limit Outgoing Bandwidth: Leave blank for unlimited.
- Compression: Select 'Adaptive LZO Compression [Legacy].'
- Topology: Don’t change anything for this field.
- Type-of-Service: Make sure this item is unchecked.
- Don’t Pull Routes: Check this box.
- Don’t Add/Remove Routes: Leave this field unchecked.
18. Now, you should look at the 'Advanced Configuration' group of fields.
19. Make sure to take a look at the 'Custom Options' field and copy the following code:
fast-io;persist-key;persist-tun;remote-random;pull;comp-lzo;tls-client;verify-x509-name Server name-prefix;remote-cert-tls server;key-direction 1;route-method exe;route-delay 2;tun-mtu 1500;fragment 1300;mssfix 1450;verb 3;sndbuf 524288;rcvbuf 52428820. Now, fill out the rest of the fields based on the following instructions.
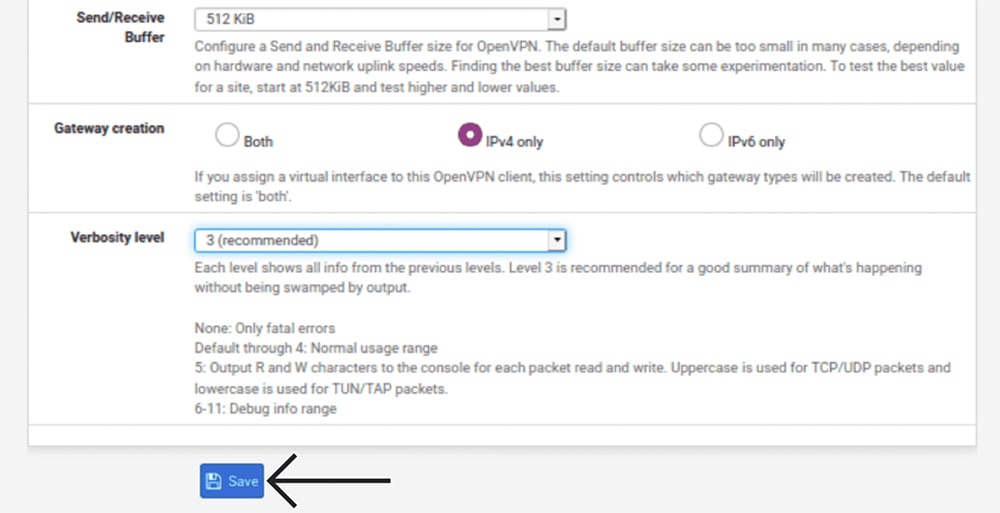
- UDP Fast I/O: Feel free to check this box.
- Send/Receive Buffer: Pick '512 KiB' here.
- Gateway Creation: Make sure to select 'IPv4 Only.'
- Verbosity Level: Go with '3 (Recommended).'
21. You now need to route your WAN traffic through your VPN tunnel.
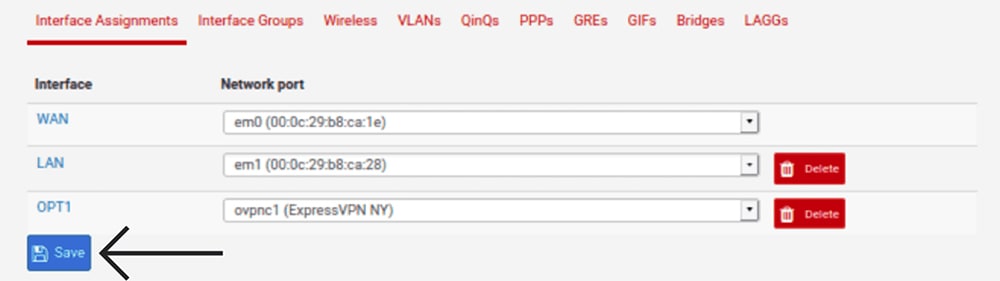
22. Go to Interfaces > Interface Assignments. Click on '+ Add,' and a new interface will be created.
23. For 'OPT 1,' make sure to select 'ovpnc1' and then go ahead with 'Save.'
24. Using the top navigation bar, go to Interfaces > OPT1.
25. Then, enter the required information based on the following.
- Enable: Check this box.
- Description: Enter any name (something like 'ExpressVPN').
- MAC Address, MTU & MSS: Leave all three of those blank.
- Block Private Networks and Loopback Addresses: Leave unchecked.
- Block Bogon Networks: Leave unchecked as well.
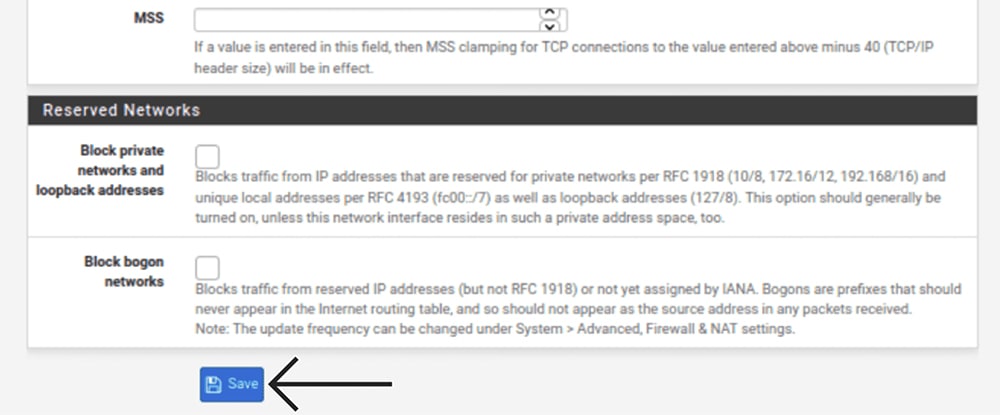
26. Now, use the 'Save' button and then click 'Apply Changes.'
27. Using the top navigation bar, go to 'Firewall' > 'Aliases.'
28. Once again, click '+ Add,' and come up with a name for your network alias.
29. Then, enter the following information.
- Name: Enter a meaningful name (easy to recognize).
- Description: Come up with a meaningful description.
- Type: Go with "Network(s)."
- Network or FQDN: Enter "192.168.1.0." Then, select "24."

30. Save your changes and then go to 'Firewall' > 'NAT' > 'Outbound.'
31. For 'Mode,' select 'Manual Outbound NAT Rule Generation.'
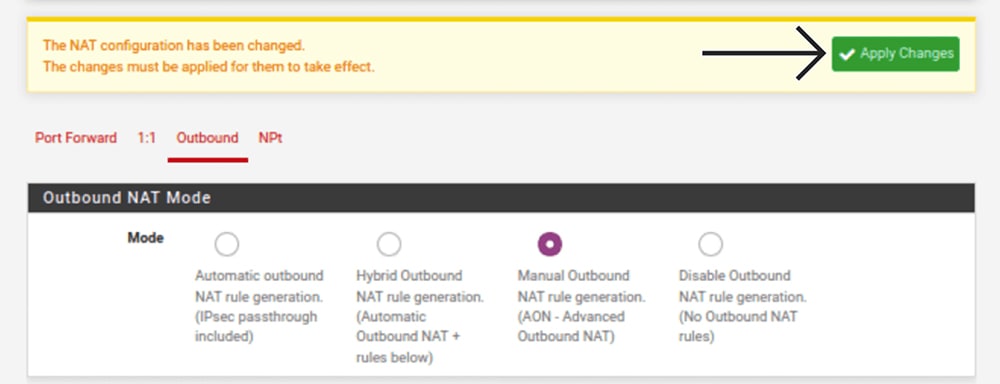
32. Once again, save your changes by using the 'Save' > 'Apply Changes' route.
33. Scroll down to 'Mappings,' where you should see your existing WAN connections.
34. For the first WAN connection entry, click on the Copy icon (below 'Actions').

35. For 'Interface,' make sure to select 'EXPRESSVPN.'

36. Save your changes, and repeat that same process for any other WAN entries.
37. Go to 'Firewall' > 'Rules' > 'LAN,' and then click 'Add' on the far left.
38. Fill out the required information based on the following.
Edit Firewall Rule
- Action: Select 'Pass.'
- Disabled: Leave this unchecked.
- Interface: Make sure to select 'LAN' here.
- Address: Go with 'IPv4'
- Protocol: Go with 'Any.'
Source & Destination
- Source: Select 'Single Host or Alias.' Then, enter the name of the alias you created earlier (you’ve done this in Firewall > Aliases).
- Destination: Feel free to pick 'Any.'
Extra Options
- Log: Feel free to leave this unchecked.
- Description: Enter a meaningful description. Something like 'LAN to ExpressVPN.'
- Then, make sure to click on 'Display Advanced.'
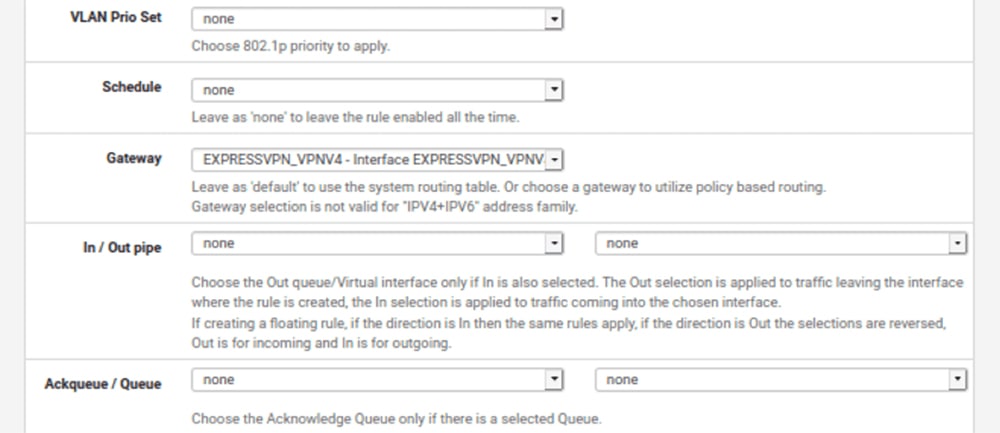
Advanced Options
- Gateway: Select 'EXPRESSVPN' here.
39. Finally, save and apply all your changes by going to 'Save' > 'Apply Changes.'
40. One more thing. You need to check whether your VPN connection works.
41. Go to 'Status' > 'OpenVPN.'
42. Then, check for 'Up' in the 'Status' column.

Final Thoughts
Setting up ExpressVPN on pfSense involves a series of steps, but that's the nature of pfSense, after all. This is the only router firmware that gives you an unparalleled level of customization, which goes hand-in-hand with ExpressVPN's high-end security features. That said, we hope you found the steps above clearly explained and that you now have a VPN connection live.
We'll also remind you that setting up ExpressVPN on a router, including pfSense, allows you to connect unlimited devices, protecting your entire household in one go. Each device connected to your router will receive the same level of digital protection, powered by OpenVPN and AES-256 in the case of pfSense.
Of course, don't forget that ExpressVPN offers individual apps for computers, phones, tablets, streaming devices, and more, with up to 10-14 simultaneous connections. To learn how to get started with those, visit our central guide on how to download and install ExpressVPN, covering 60+ devices.
That would be all we have prepared for this installation guide. If you have any questions, make sure to let us know via the comments section below. Lastly, thank you for reading!
Related