
When you purchase through links on our site, we may earn an affiliate commission. Here’s how it works.
How to Download, Set Up, and Use ExpressVPN on Linux
Last updated March 11, 2025

You can set up ExpressVPN on Linux by downloading and installing its recently updated native app. This application now offers a graphical user interface, making ExpressVPN one of the rare VPNs with that benefit. If you're accustomed to using commands instead, you'll be happy to know that the new app also has a CLI.
In addition, alternative installation methods are also available. You can install ExpressVPN's legacy app, set it up via Ubuntu's Network Manager or Linux's Terminal. That said, always go for the native app for the highest level of privacy protection. We'll also note that ExpressVPN works on Ubuntu (24.04 and above), Debian (10 and above), Fedora (30 and above), Arch (the latest rolling release), Raspberry Pi (10 and above), as well as Linux Mint (20 and above).
In this article, we'll teach you how to set up and use ExpressVPN on Linux using various methods.
How to Set Up ExpressVPN on Linux
To set up ExpressVPN for Linux, you can download it from its website and decide between using its GUI or CLI. Also, you can set up the VPN manually via Ubuntu's Network Manager or Terminal. Let's look at all the methods in detail.
Method #1: Install ExpressVPN's New GUI App for Linux
ExpressVPN now offers an all-new GUI app for Linux, making it one of the rare providers with a fully functional Linux application. You can install it by downloading it from ExpressVPN's website. Here are the steps you need to take:
1. Sign up for ExpressVPN using your computer and a preferred web browser.
2. Navigate to ExpressVPN's downloads page and click 'Download Universal Installer.'
3. Open the Terminal and navigate to the folder with the recently downloaded installation file.
4. Install the application using the following command: sh [installer filename].
5. Provide your Linux device password to complete the installation process.
6. Once ExpressVPN opens, provide your credentials and log in. That's it!
Method #2: Install ExpressVPN's New CLI App for Linux
Even though the new ExpressVPN offers a graphical interface, you can still use it through the command line interface. Let's walk you through the process of setting up ExpressVPN and show you the list of the most useful commands:
1. Get your ExpressVPN subscription using your favorite web browser.
2. Go to ExpressVPN's download page and use the 'Download Universal Installer' button.
3. Navigate your Downloads folder, launch the installer, and complete the installation process.
4. Run the Terminal and use the command found below to activate ExpressVPN.
expressvpnctl login xvtokenfile5. Ensure that ExpressVPN's background mode runs before connecting to a server.
expressvpnctl background enable6. To connect for the first time, use the command found below. Keep in mind that ExpressVPN will use its "Smart Location" feature to connect you to the server nearest your physical location.
expressvpnctl connect7. To find a list of locations, use the following command:
expressvpnctl get region8. Lastly, here's how you can connect to a specific VPN server location:
expressvpnctl connect "[LOCATION]"ExpressVPN now comes with a whole set of new possible commands, letting you switch between VPN protocols, enable various features, and more. Check the table found below for more information:
Method #3: Install ExpressVPN's Legacy CLI Application
Using ExpressVPN's application for Ubuntu (Maui, Kali, Mint, Lubuntu, Peppermint, etc.) and Fedora (Nobara, Ultramarine, RisiOS, etc.) should be your primary route to take, especially if you want the best privacy protection. Here's what you need to do:
1. Subscribe to ExpressVPN using your computer and any Web browser.
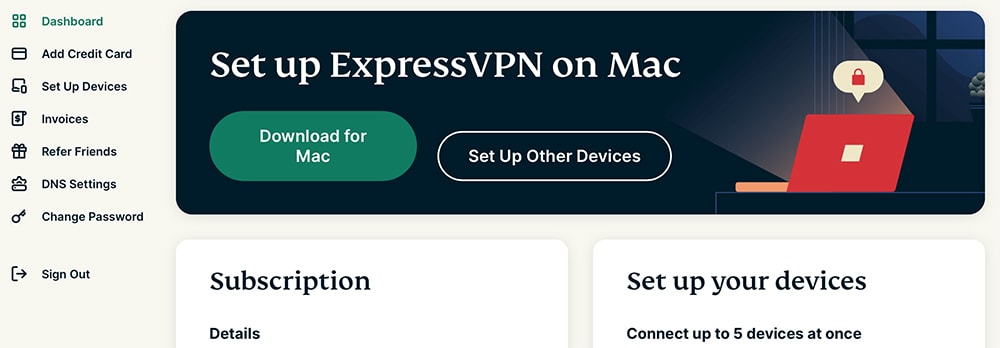
2. After subscribing, click 'My Account' using the top-placed main menu on ExpressVPN's site.
3. Provide your credentials and access your ExpressVPN online dashboard.

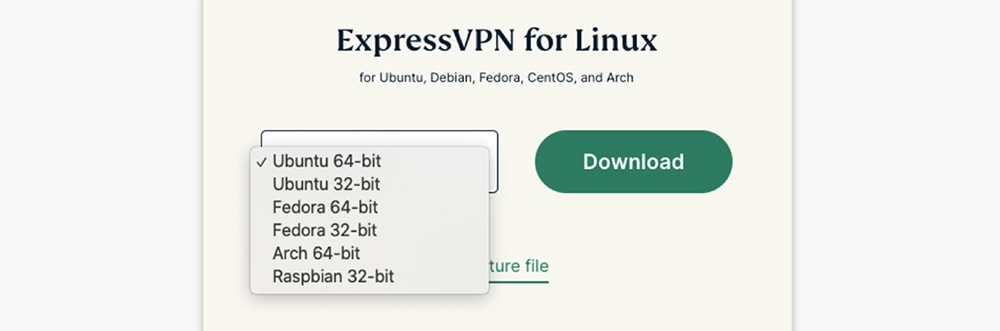
4. Once you access your online dashboard, click the 'Set Up Other Devices' button. Then, pick 'Linux' on the left. On the right, select your version of Linux and click 'Download.'
5. Launch the Terminal and run the 'cd ~/Downloads/' command (if the file is in your Downloads folder).
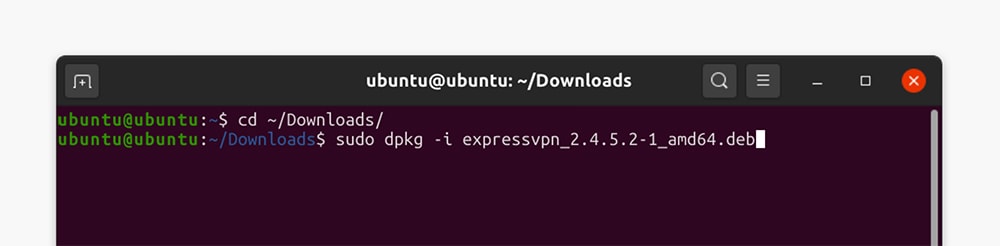
6. To install ExpressVPN on Linux, use an installation command from the table below.
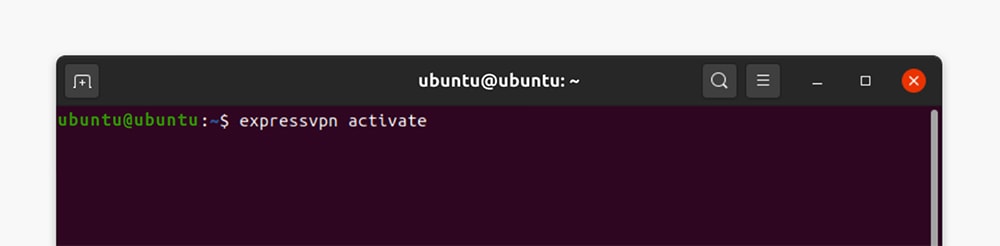
7. Activate the application by using the 'expressvpn activate' command.
8. Enter your ExpressVPN activation code, which you can get your ExpressVPN dashboard.
9. When asked about anonymous data logging, go with 'Y' (yes) or 'N (no).'
10. To connect to the nearest VPN server, use the 'expressvpn connect' command.

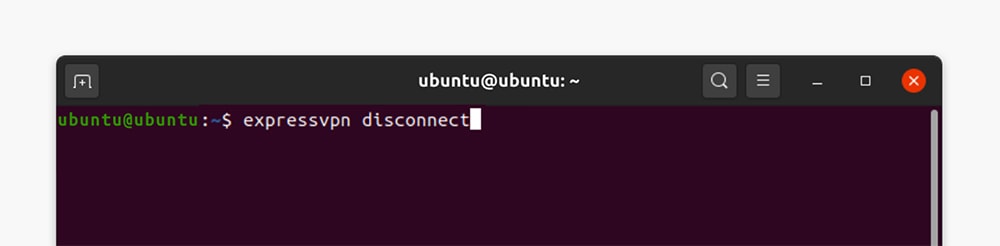
11. To end your VPN session, go with the 'expressvpn disconnect' command.
12. If you’d like to connect to a specific server, input the 'expressvpn list all' command.
13. Then you can connect using a command such as – expressvpn connect 'USA – New York.'
14. To check other commands you can use, enter the 'man expressvpn' command.
Method #4: Set Up ExpressVPN Manually via Ubuntu Network Manager
Using Ubuntu's Network Manager (available on LUbuntu distributions like Mint, Kali, Lubuntu, and more), you can set ExpressVPN on Linux manually and use its OpenVPN protocol. To make that happen, do the following:
1. Get your ExpressVPN subscription using your computer and any Web browser.
2. After subscribing, click 'My Account' on the top-placed main menu on ExpressVPN's site.
3. Enter your username and password, and then access your ExpressVPN online dashboard.
4. Navigate to 'Set Up Other Devices' > 'Manual Configuration.'
5. Note your OpenVPN username and password on the right-hand side.

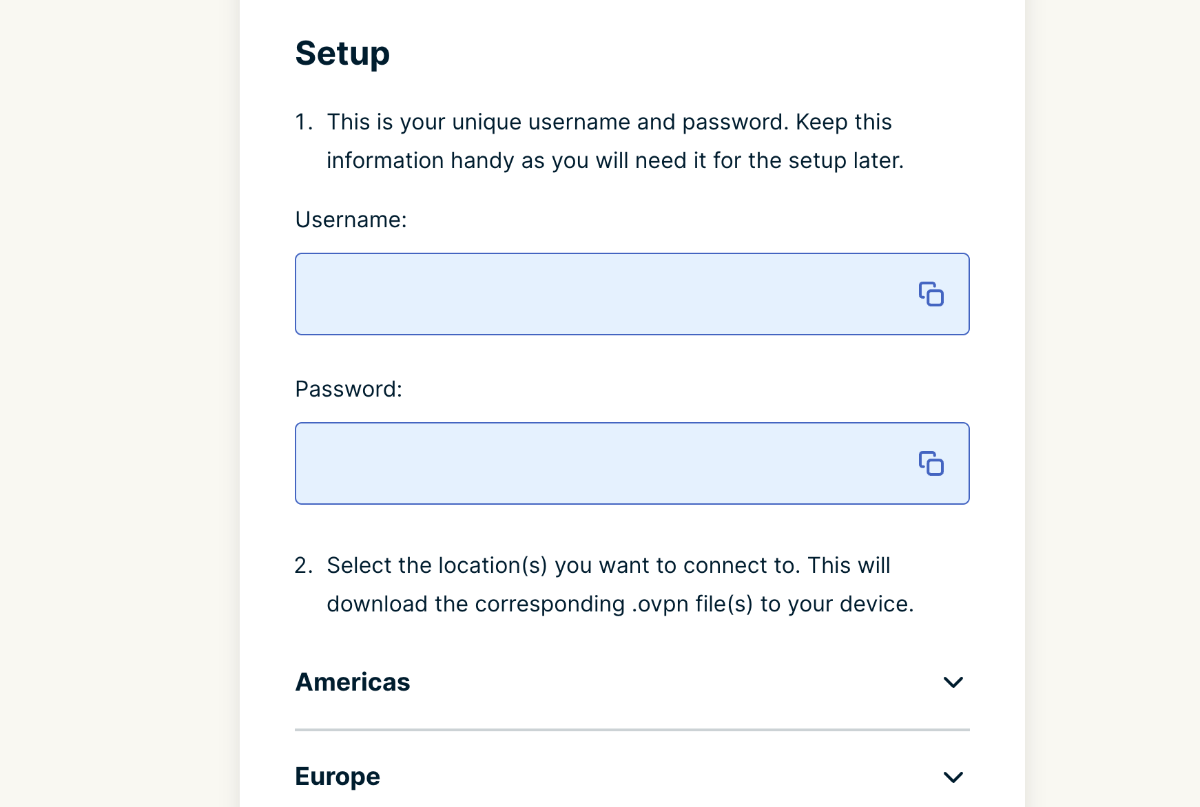
6. Pick a server (under your OpenVPN credentials).
7. Download that server's OpenVPN configuration file to your computer.
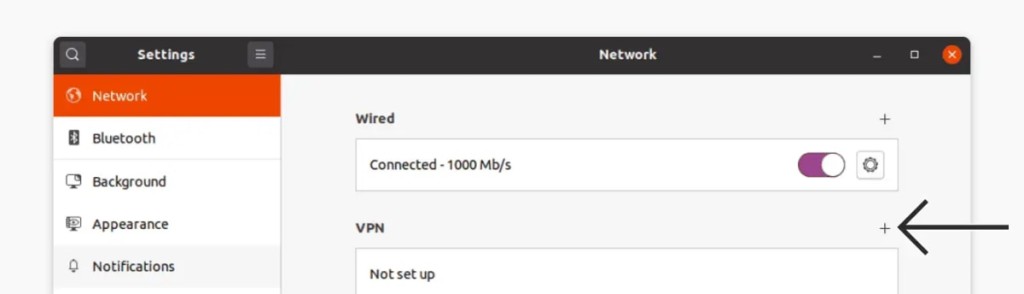
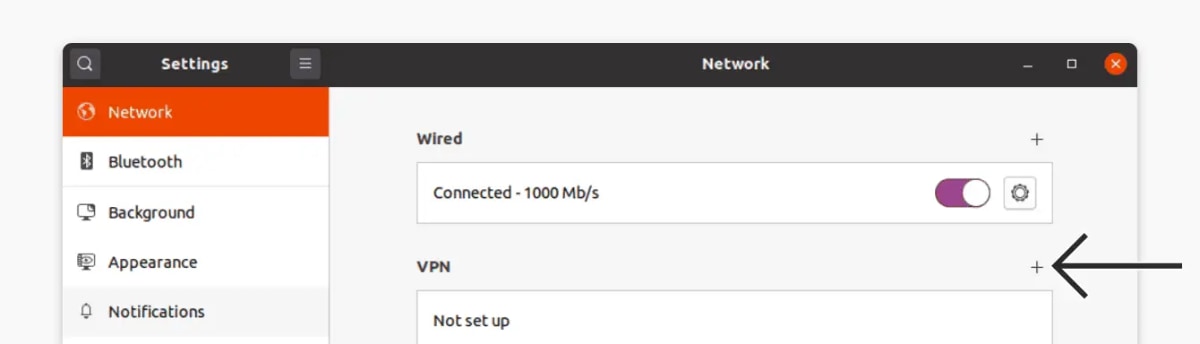
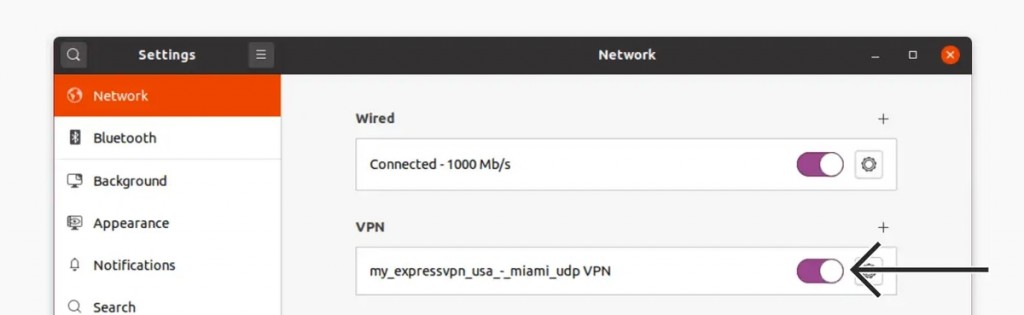
8. Using Linux, navigate to 'Settings' > 'Network.'


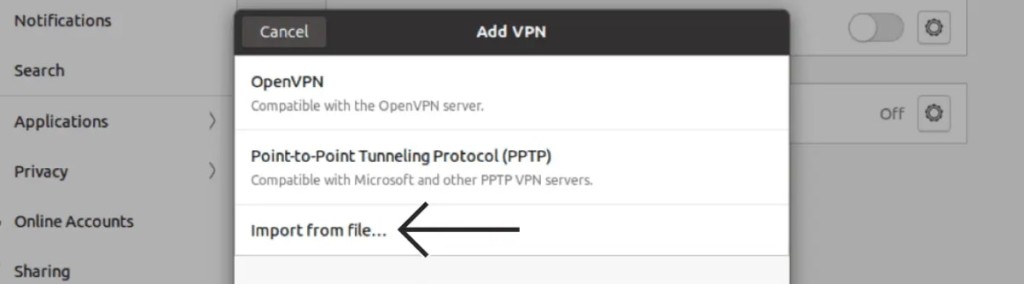
9. Click '+' in the 'VPN' section and pick 'Import From File.'
10. Pick the OVPN file you just downloaded and hit 'Open.'
11. Upload the corresponding OVPN files.
12. Fill out the fields under 'Authentication' in the following way:
- Type: Pick 'Password with Certificates (TLS).'
- Username: Provide your OpenVPN username.
- Password: Provide your OpenVPN password.
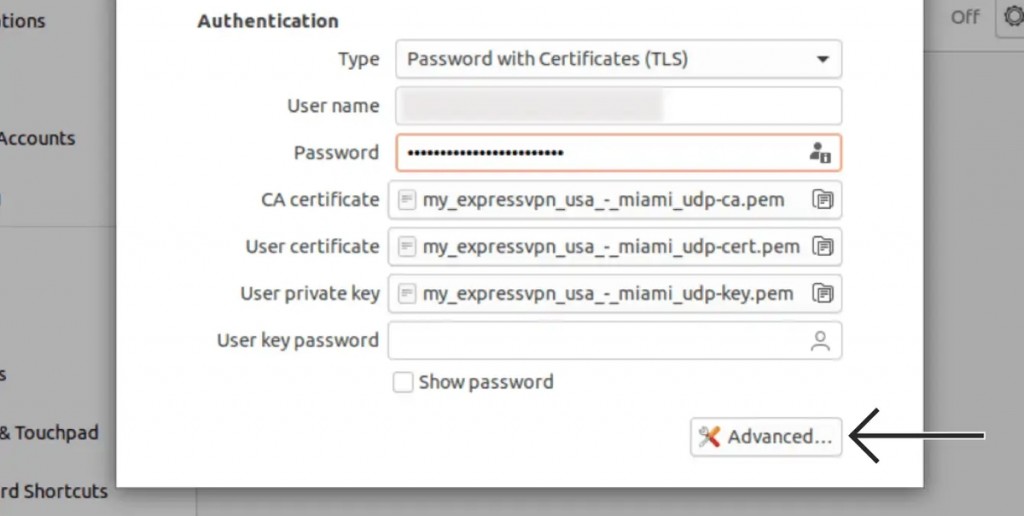
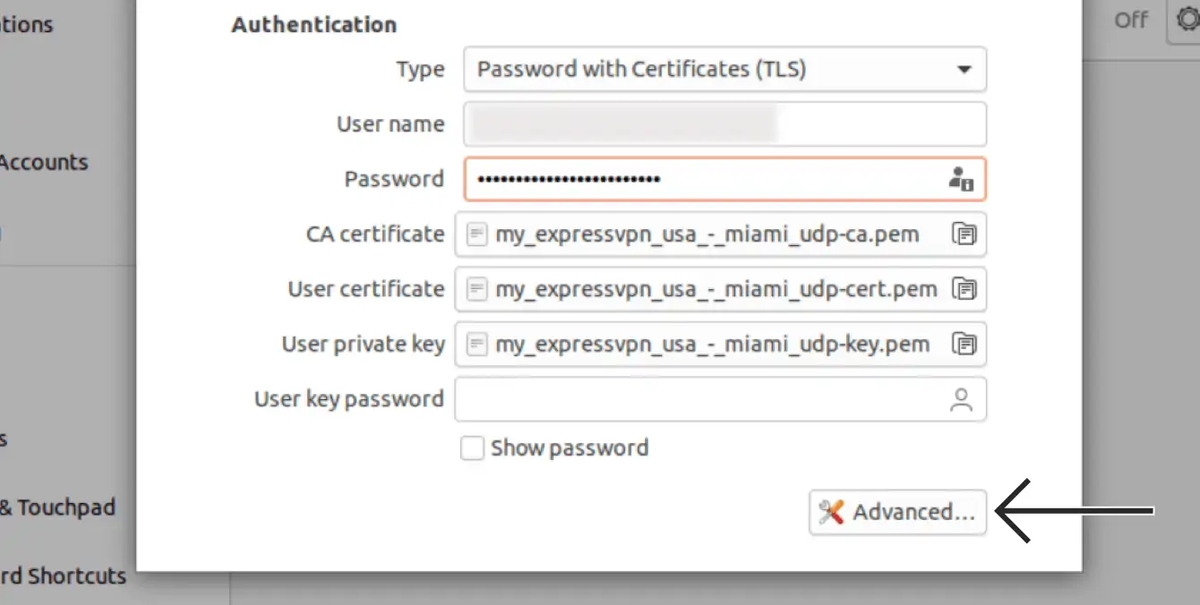
13. Click on 'Advanced' in the bottom-right corner to access additional options.
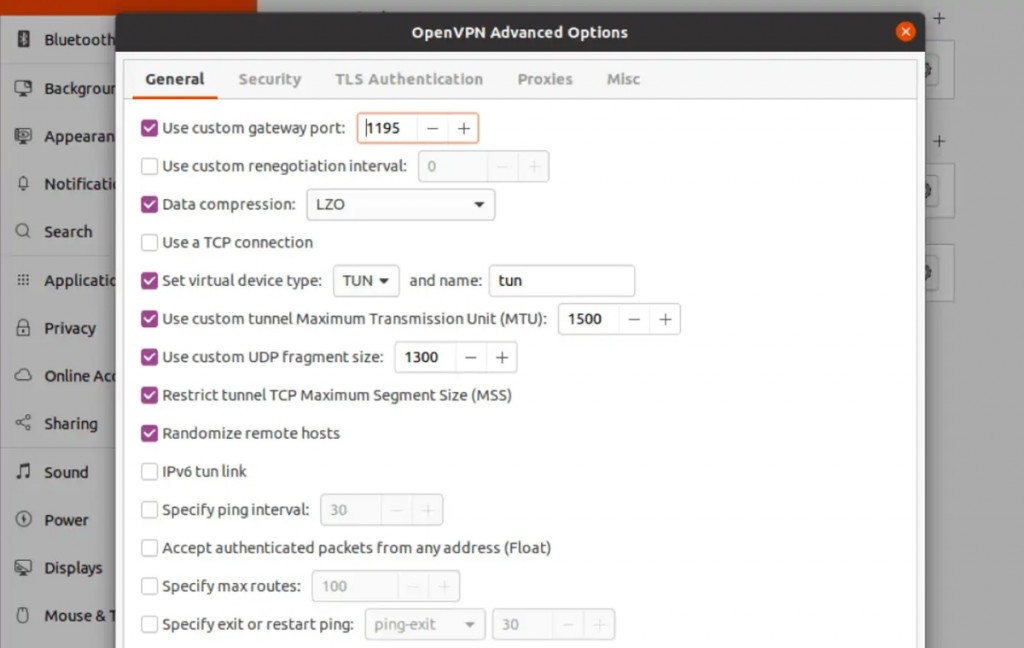
14. Pick the 'General' tab and input the following information:
- Use Custom Gateway Port: Enter '1195.'
- Data Compression: Go with 'LZO.'
- Use Custom Tunnel Maximum Transmission Unit (MTU): Enter '1500.'
- Use Custom UDP Fragment Size: Enter '1300.'
- Restrict Tunnel TCP Maximum Segment Size (MSS): Check this box.
- Randomize Remote Hosts: Check this box.

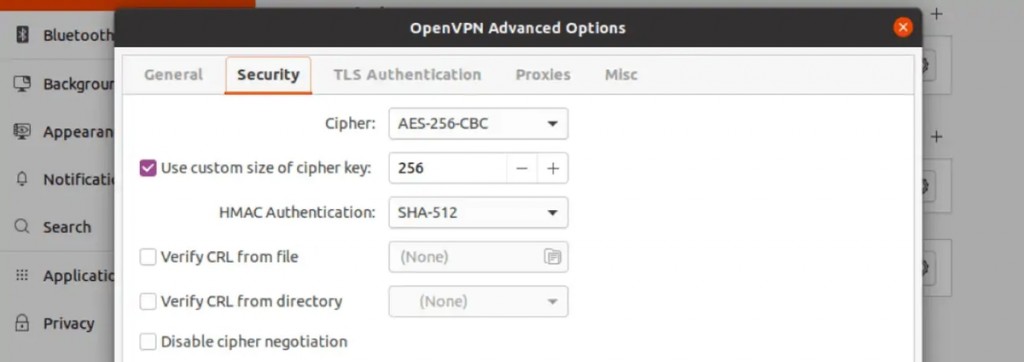
15. Select 'Security' and input the following information:
- Cipher: Pick 'AES-256-CBC.'
- HMAC Authentication: Select 'SHA-512.'

16. Select the 'TLS Authentication' tab and enter the following information:
- Key File: Select the 'ta.key' file you download from ExpressVPN's site.
- Key Direction: Pick '1.'
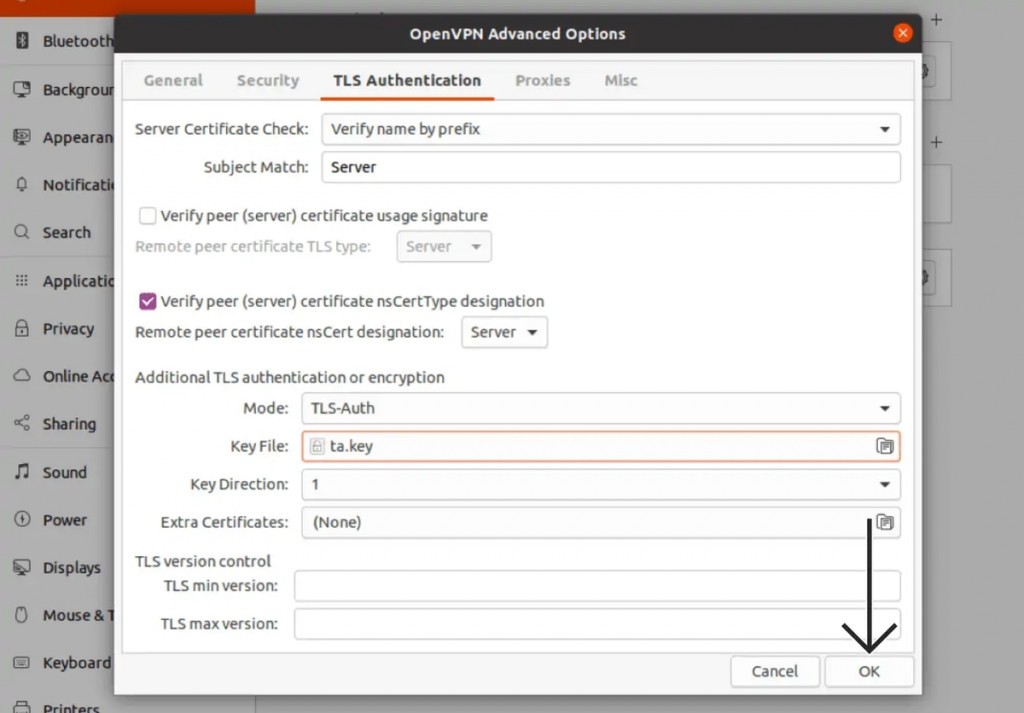

17. Click 'OK' to save the newly added parameters, and you'll return to the 'Network' window.
18. To activate your VPN connection, toggle the switch next to its name.

Method #5: Set Up ExpressVPN Manually via Terminal (OpenVPN)
If you're a more advanced user, you can set up ExpressVPN via Terminal (available for Ubuntu, Debian, and Fedora distributions) using the OpenVPN protocol. These are the steps you need to take:
1. Subscribe to ExpressVPN using your computer and any Web browser.
2. Once you subscribe, select 'My Account' from the top-positioned menu.
3. Enter your credentials and access your ExpressVPN online dashboard.
4. Go to 'Set Up Other Devices' > 'Manual Configuration.'
5. Make a note of your OpenVPN username and password on the right-hand side.
6. Scroll down a bit and pick a VPN server location.
7. Click on the server's name and download its OpenVPN (OVPN) configuration files.
8. Proceed based on if you have a Ubuntu, Debian, or Fedora distribution of Linux.
Installation Steps to Linux Ubuntu
9. Launch Terminal and input this command:
$ sudo apt install openvpn openvpn-systemd-resolved10. Provide your password and hit the Enter key.
11. Initialize OpenVPN with the following command, and make sure to replace the [path to file] section:
$ sudo openvpn --config /[path to file]/my_expressvpn_[server location].ovpn --script-security 2 --up /etc/openvpn/update-systemd-resolved --down /etc/openvpn/update-systemd-resolved --dhcp-option 'DOMAIN-ROUTE .' --down-pre.

12. Provide your OpenVPN username and password.
13. After that, your VPN session will become active, as it should say: 'Initialization Sequence Completed.'
14. Leave the Terminal window active in the background to keep your VPN session active.


Installation Steps for Linux Debian
9. Launch Terminal and input this command: '$ sudo apt install openvpn resolvconf.'
10. Provide your Linux password and press 'Y' to continue.
11. Now, use this command and replace the [path to file] section.
$ sudo openvpn --config /[path to file]/my_expressvpn_[server location].ovpn --script-security 2 --up /etc/openvpn/update-resolv-conf --down /etc/openvpn/update-resolv-conf

12. Once you provide your OpenVPN username and password, your OpenVPN connection will go live.
13. It should say 'Initialization Sequence Completed.' That's it!


Installation Steps for Linux Fedora
9. Launch Terminal and input this command: '$ sudo dnf install OpenVPN.'
10. You'll now need to use a series of commands to configure your DNS. Start with the following:
$ sudo cp /usr/share/doc/openvpn/contrib/pull-resolv-conf/client.{up,down} /etc/openvpn/.11. Now, input this command: '$ sudo chmod +x /etc/openvpn/client.{up,down}.'
12. Then, enter: '$ sudo sed -i -e 's|bresolvconfb|ignore-&|' /etc/openvpn/client.{up,down}.'
13. Launch OpenVPN using the following command and replace the [path to file] section.
$ sudo openvpn --config /[path to file]/my_expressvpn_[server location].ovpn --script-security 2 --up /etc/openvpn/client.up --down /etc/openvpn/client.down.14. Provide your OpenVPN username and password.
15. Your connection will become active once you see the 'Initialization Sequence Completed' message.
Final Thoughts
In this guide, we discussed three methods to set up ExpressVPN on Linux. That said, using the VPN's GUI/CLI app should always be your first choice, as that's how you'll get the most secure VPN tunnel possible. The other methods are more complex, especially the one involving Linux's Terminal, which seems more suited for advanced users.
Also, know that ExpressVPN works on various Linux distributions (Maui, Mint, Kali, Lubuntu, Parrot Security, Peppermint, Ubuntu Studio, Zorin, etc.), but the VPN itself doesn't offer support for those distributions. The app will run just fine, though. Finally, learn how to set up ExpressVPN on even more devices, especially those that you use on the go.
That would be all we have prepared for this guide. If you have any questions on your mind, make sure to post your comment below. Lastly, thank you for reading!
Related