When you purchase through links on our site, we may earn an affiliate commission. Here’s how it works.
How to Configure uTorrent – Learn How to Get The Most Out of uTorrent!
For quite some time, uTorrent has been the most popular torrent client – and it still is. That’s because it’s simple to use and comes with everything you need to download torrents. Furthermore, the majority of users like what uTorrent brings by default. The application comes already optimized, so you don’t have to configure it. However, some small tweaks can go a long way especially if you have a broadband Internet connection. These can help you to download torrents even faster. So, let’s see how to configure uTorrent.
Disclaimer: TechNadu does not condone illegal file sharing or copyright infringement. Even though P2P file sharing technology is legal, many of the files exchanged via P2P are indeed copyrighted. Uploading these copyrighted files can put you at risk of a civil lawsuit. While these lawsuits are often class-action cases, some have been targeted at individual users in an attempt to make an example of them.
Secure Your Torrent Downloads
Many of you will be surprised to know that your Internet browsing is fully visible by ISPs (Internet Service Providers). These companies have the power to collect your personal data and hand it over to third parties. Therefore, it’s imperative to keep your data protected and inaccessible to anyone who tries to collect it. This is especially important if you plan on downloading and sharing torrent files.
TechNadu strongly recommends using ExpressVPN to encrypt your Internet connection, change your IP, and make your device impenetrable to malware. This particular VPN software scored the highest in our tests, which can be seen in our ExpressVPN review. Use the provided link to read all you need to know about this easy to use and highly powerful application.
Make sure to sign-up for ExpressVPN and enjoy the Internet as it should be – open and without any privacy concerns.
How to Configure uTorrent – Tips & Tricks
There’s a lot that can be said about uTorrent optimization and how to configure uTorrent. We’ll take you through the entire guide one step at the time. In addition, we’ll start with the basics. That’s because we want to make sure that your favorite torrent client works in the best way possible. Therefore, let’s get started, shall we?
Step #1: Install uTorrent
We want to start with a clean slate. In case you’ve done some optimizations and tweaking in the past, it’s a good idea to uninstall uTorrent and start from scratch. When uninstalling, make sure to delete all user-created files, because we want to start with default values.
In our article on how to use uTorrent, you will find a detailed installation guide. Make sure to closely follow it, to make sure you don’t end up with bundled software. Then, it would be a good idea to read our article on what is torrenting, so you know the roles of seeders and leechers. This will help you to pick healthy torrents that can be downloaded as fast as your Internet connection allows for that. In other words, we’ll assume that you’ve installed uTorrent from scratch and that you know a thing or two about torrenting. You can always check the supplied links for detailed guides.
Step #2: Configure General Settings
Next, we will deal with general settings to make sure that uTorrent fits your needs and habits. We’ll talk about changing a language, startup options, and more. Keep on reading.
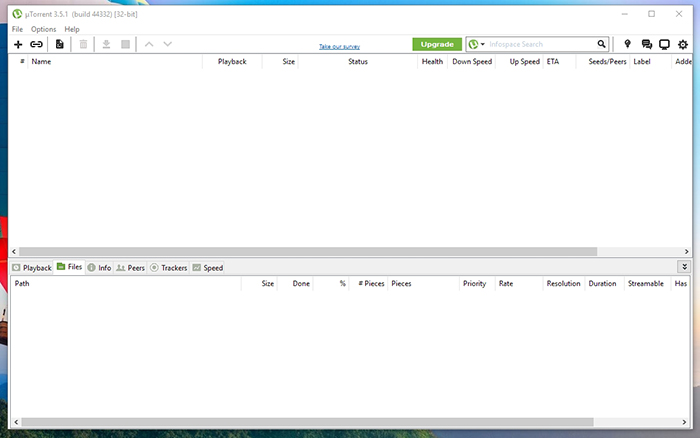
- Open uTorrent by double-clicking on its icon;
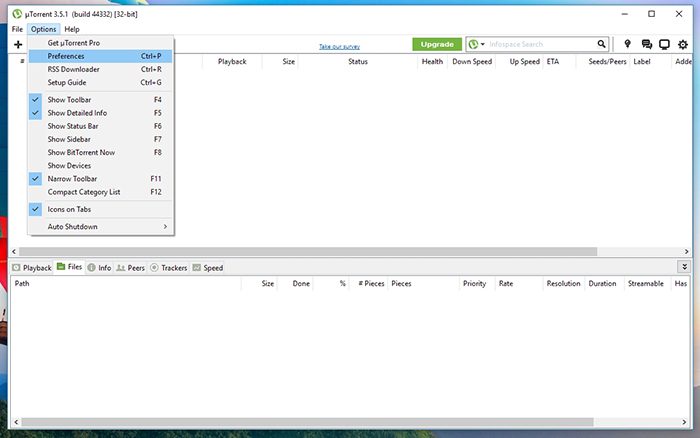
- Now go to Options > Preferences using the menu at the top of uTorrent’s window;
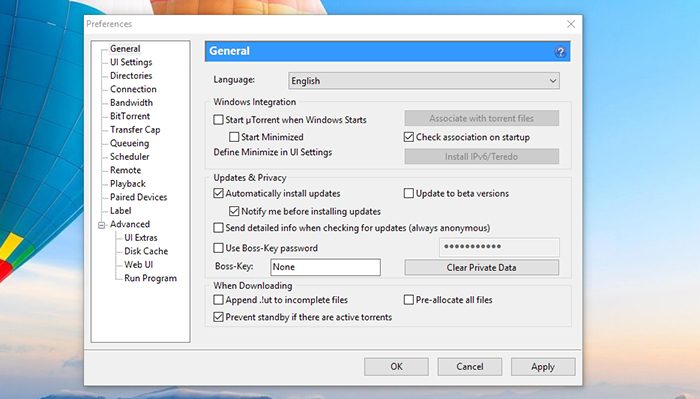
- Make sure that you select ‘General’ from the left-placed sidebar;
- First, pick a language you’d like to use. By default, uTorrent will use your system’s default language. You can change it to English, or you can switch to your local language;
- Next, you can decide if you’d like uTorrent to open when Windows starts. In addition to that, it can start minimized. This isn’t overly important since uTorrent is a lightweight software. In other words, you won’t have to wait for it to open even if you have an older computer;
- There’s also the option of installing updates automatically. We recommend leaving this enabled. After all, this application receives updates only occasionally;
- Last but not the least, you can disable your information from being uploaded when checking for updates. Even though this should be anonymous, it’s always better to be safe than sorry.
Step #3: Configure Download Locations
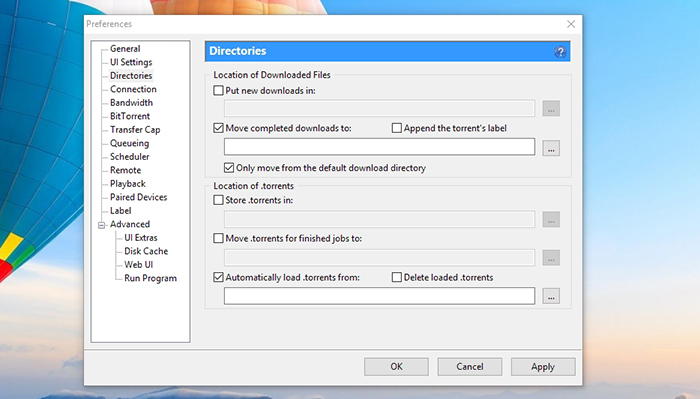
By default, uTorrent stores torrent downloads in your Downloads folder. Even though this is perfectly acceptable, many users will find it easier to change this to their Desktop. We’re not only talking about how to configure uTorrent but also how to make it work for you. That’s why this option is important.
- This time, select ‘Directories’ from the sidebar;
- The most important option here is called ‘Move completed downloads to’. Once the torrent is fully downloaded, uTorrent will keep it in the Downloads folder. You can go ahead and click on the button with three dots. Then, select your Desktop – if you’d like to store completed torrents on your desktop;
- If you have a specific folder with torrent files, you can make uTorrent load them automatically. This option is called ‘Automatically load torrents from’. Once again, click on the three dots button and find that folder;
- Even though there are other options present here as well, we don’t think they’re important. For example, the first option – ‘Put new downloads in’. This is a folder that contains incomplete data of torrents that are in the process of downloading. You can keep this unchecked, which will use uTorrent’s default value. After all, there’s no reason to populate your Desktop with unfinished downloads, right?
Step #4: Configure Your Connection Settings
You want to make sure that uTorrent uses all of the available technologies to easily connect to seeders. This is how you can make sure that the application is properly configured.
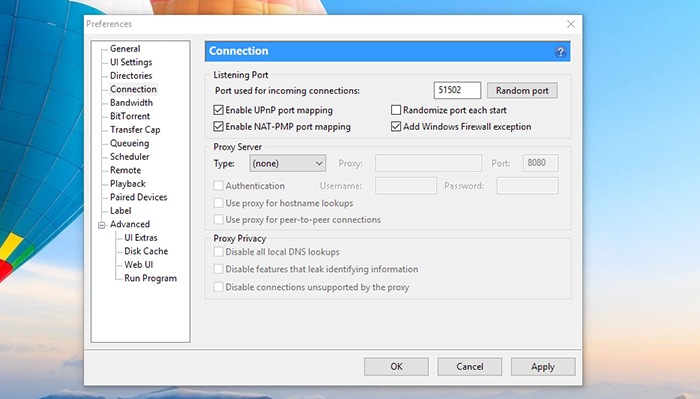
- Click on ‘Connection’ in uTorrent preferences. You can go to Options > Preferences if you’ve closed the window;
- First, you will see an option that says ‘Port used for incoming connections’. Back in the day, this was a hugely important thing for torrenting. However, today’s routers come with already open ports, which makes this kind of file transfer easier. Still, you should change the default value. So, you can go with any number that’s not between 10000 to 12000. You can use any random number or even better, click on the ‘Random port’ button;
- Next, make sure that port mapping is enabled. This includes checking the boxes next to ‘Enable UPnP port mapping’ and ‘Enable NAT-PMP port mapping’;
- Finally, make sure that uTorrent is allowed through Windows Firewall. If not, your Window can block this application, making it very hard to download torrents. Go ahead and check the box next to ‘Add Windows Firewall exception’;
Step #5: Configure Bandwidth Options
When talking about optimizing your Internet connection, there’s another useful set of options. Those of you who have a broadband connection will find this segment especially helpful.
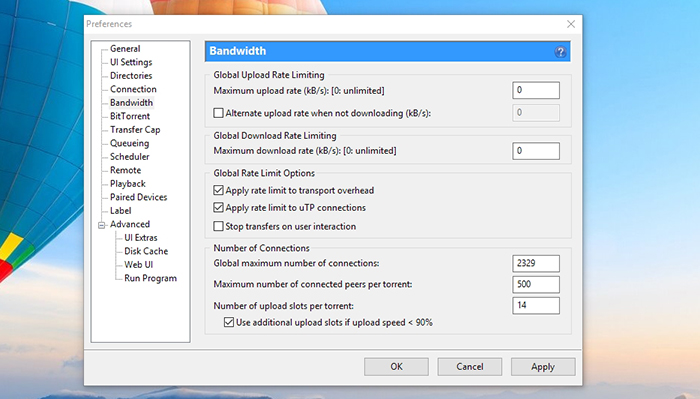
- In uTorrent’s Preferences, click on ‘Bandwidth’;
- Generally speaking, you don’t have to do anything when it comes to these two options: Global upload rate limiting and Global download rate limiting. If you leave their values to zero, both of these won’t have any limitations. In other words, uTorrent will be able to take advantage of your Web connection to its full extent;
- What you need to pay attention to can be found at the bottom of this window and that’s a section called ‘Number of Connections’. For the global maximum number of connections, you can go with ‘2329’ if you have a fast connection (10Mbps and up). Then, set the number of maximum connection peers per torrent to 500. Also, set the number of upload slots per torrent to 14;
- Finally, you can tick the box next to ‘Use additional upload slots’;
Step #6: Configure BitTorrent Settings
Next, we will make sure that that you’re using the most of the BitTorrent protocol. In general, you need to enable almost all of the options found here. However, let’s take a moment to get to know some of them.
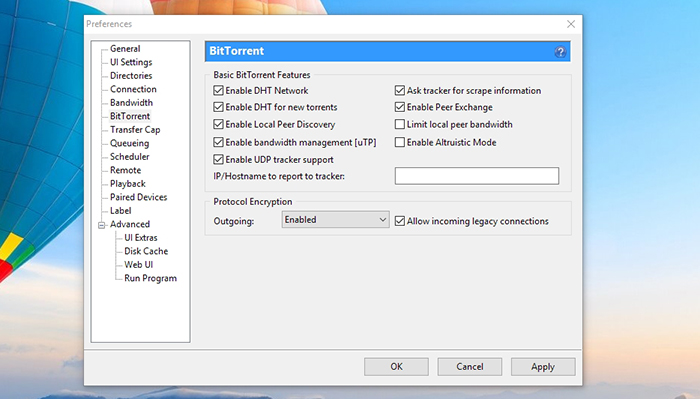
- Make sure to select ‘BitTorrent’ from the left-placed sidebar (Options > Preferences);
- Then, enable these two options: Enable DHT network and Enable DHT for new torrents. These two options are using Distributed Hash Tables which is one of those technologies that allow easy torrent discovery and uninterrupted downloading;
- Also, check the box next to ‘Enable bandwidth management’ which will allow uTorrent to better understand how much bandwidth it should be using. After all, you might want to continue browsing the Web while you’re downloading torrents;
- Finally, you should also check the box next to ‘Ask tracker for scrape information’ which instructs uTorrent to download information from the tracker such as peer and seed counts.
- The only two options that you don’t need are these: Limit local peer bandwidth and Enable Altruistic Mode. The final option can be useful for those who create and seed a lot of torrents but doesn’t have much use for average torrent users.
Step #7: Limit uTorrent Activity
While the majority of Internet connection doesn’t have any restrictions, some of them still do. For example, your current Internet plan might come with limited bandwidth. For example, you can only download 20GB of data. If that’s the case, there’s a handy option that limits the activity of uTorrent.
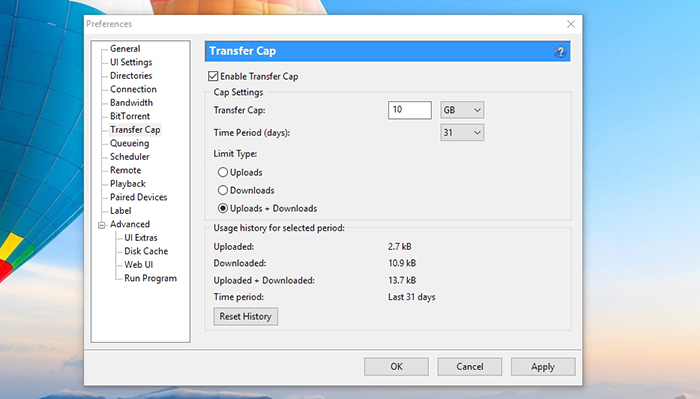
- Go to uTorrent Preferences and select ‘Transfer Cap’;
- First, make sure to check the box next to ‘Enable Transfer Cap’. This will let you limit uTorrent and how much data it can download during a certain time period;
- First, enter how many gigabytes (GB) you want to dedicate to uTorrent. Let’s say that your Internet connection is limited to 20GB of data per month. Therefore, you can instruct uTorrent to block all torrents after you download 10GB. Then, set the time period in days.
Step #8: Configure Queuing
In many cases, you will be downloading more than one torrent. When that happens, you’ll be glad that you’ve visited this set of options. Keep on reading to learn how to configure uTorrent and its queuing of torrents.
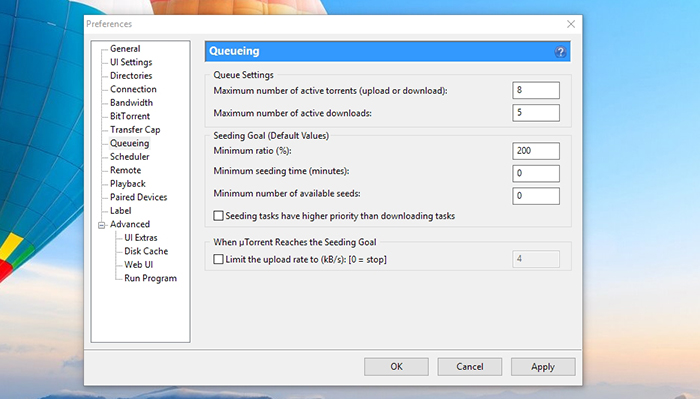
- Go to ‘Queuing’ in uTorrent’s Preferences;
- First, we have two options under the ‘Queue Setting’ section. When it comes to the maximum number of active torrents, you can go with 8. If you don’t have a broadband Internet connection, you can set the limit to 4 or even to 2. When it comes to the maximum number of active downloads, you can go with 5. This will allow uTorrent to actively download 5 torrents at the same time;
- Next, we have a few options related to torrent seeding. When you download a torrent, it’s a good idea to keep sharing it for a while. So, we recommend setting the minimum ratio (in percentages) to 200. When it comes to the minimum seeding time and the number of available seeds, you can go with 0 for both values;
Step #9: Configure Cache Settings
Finally, all there’s left is to configure cache settings. This is where we can optimize the number of reads and writes to the hard drive, which is especially important for SSD drives. Keep on reading.
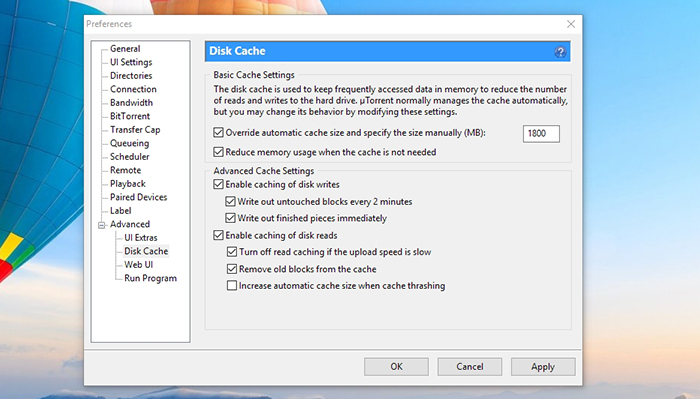
- Open uTorrent’s Preferences, click on the ‘+’ sign next to ‘Advanced’ in the sidebar. This will open a few more options. You need to select ‘Disk Cache’;
- First, feel free to change the cache size. This is useful for both newer and older computers since this is how we can improve uTorrent’s handling of cache. So, tick the box next to ‘Override automatic cache size and specify the size manually’ and then set the value to 1800;
- Next, look at the bottom of the page. Make sure that the box next to ‘Increase automatic cache size when cache thrashing’ is disabled.
- The rest of the options found here should be enabled.
Step #10: Apply the Settings
Don’t let all that hard work to go to waste. To save the new settings, make sure to click on the ‘Apply’ button in the bottom-right corner. Then, click on ‘OK’ to dismiss the window. That’s all when it comes to how to configure uTorrent, which means that you can now go ahead and download files from the Web.
Additional Resources: What’s Next?
Even though we told you all about how to configure uTorrent, that’s not where you should stop. Here are some additional resources on TechNadu that we hope you’ll find useful.
- When it comes to uTorrent, you’ve probably noticed that there are ads. Did you know that you can remove them without paying a single dollar? Here’s how to disable ads in uTorrent;
- If you’d like to dig deeper and make sure you’re download torrents as fast as possible, make sure to read our guide on how to make uTorrent faster;
- Finally, you should know how to safely download torrents and avoid malware.
Final Thoughts
This is where we conclude our article about how to configure uTorrent. In case you know any other tips and tricks, we’d like to ask you to share them. Feel free to post a comment down below.
If you want to spread the word about uTorrent, why not share this article online? Thanks!

