When you purchase through links on our site, we may earn an affiliate commission. Here’s how it works.
How to Set Up a VPN on iOS in 2025
Apple has done plenty to embrace VPNs on iOS in a surprisingly open way. That means there are several methods to set up a VPN on an iPhone or iPad, which means you have plenty to choose from based on your level of knowledge, skills, and needs.
More precisely, you can set up a VPN on iOS using the iOS App Store or OpenVPN Connect (if OpenVPN isn't available natively via your chosen VPN app). You can also avoid using VPN apps by configuring your VPN manually on iOS.
Even though using the iOS App Store seems to be the most intuitive method, others come with their benefits as well - which we've made sure to clarify below.
So, let's jump right in!
How to Set Up a VPN on iOS
Without further ado, here are the 3 best methods to set up a VPN on any iOS device:
- Method #1: Download a VPN on iOS via the iOS App Store
- Method #2: Set Up a VPN on iOS via OpenVPN Connect
- Method #3: Configure a VPN on iOS Manually
Method #1: Download a VPN on iOS via the iOS App Store
By far, the easiest way to set up a VPN on your iOS device is by using the app created by your chosen VPN provider. Keep reading to learn how that's done.
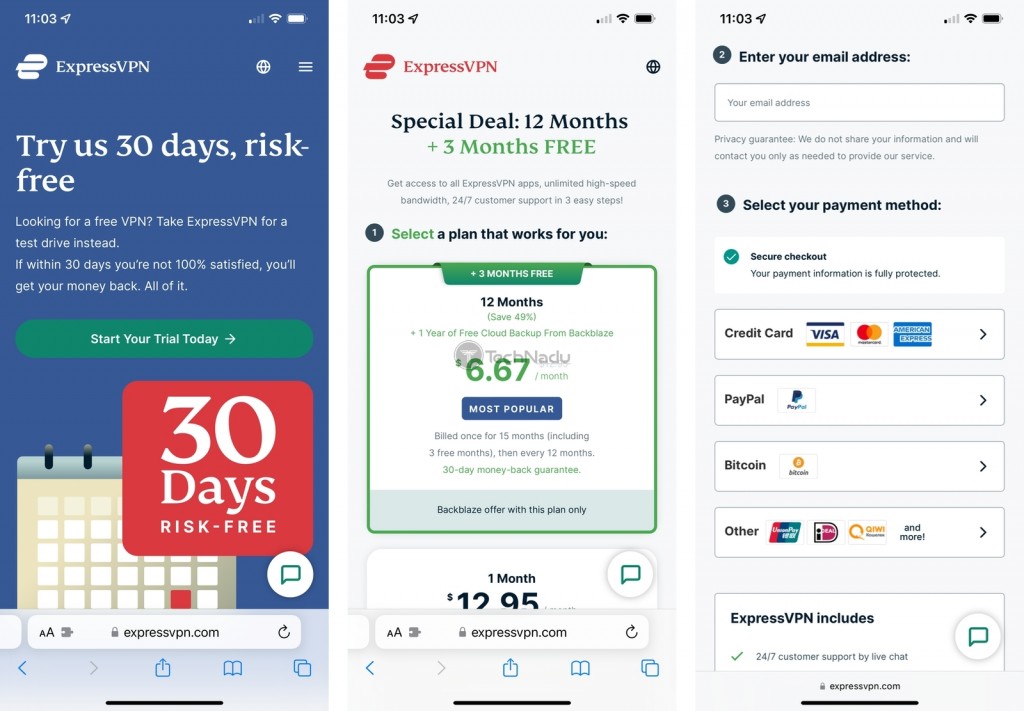
1. Subscribe to a VPN that offers a native iOS VPN app. We recommend picking ExpressVPN. (You can also try it risk-free for 30 days.)
2. Make sure to subscribe using the link provided above via Safari or any other mobile browser.
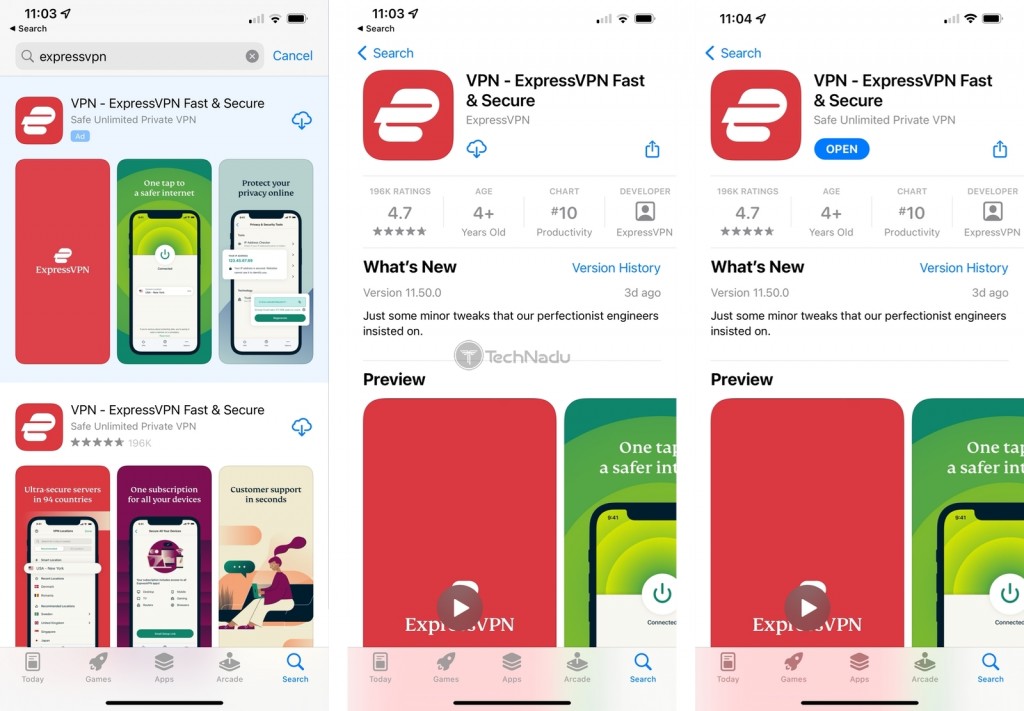
3. Navigate to your iPhone's App Store and search for 'ExpressVPN.'
4. Download the VPN app to your iPhone. Then, tap 'Open' to open the app.
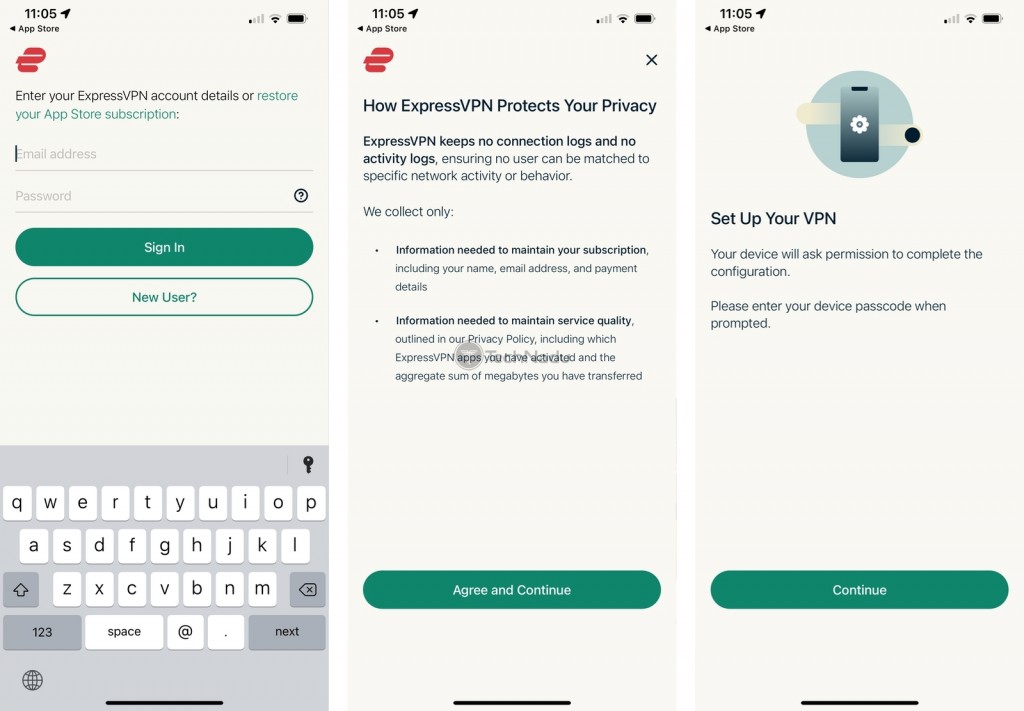
5. Sign in to the VPN app using your ExpressVPN credentials (email address and password).
6. You'll now need to set up the VPN. To begin, tap 'Agree and Continue.'
7. Then, tap 'Continue' to initialize ExpressVPN's one-time setup.
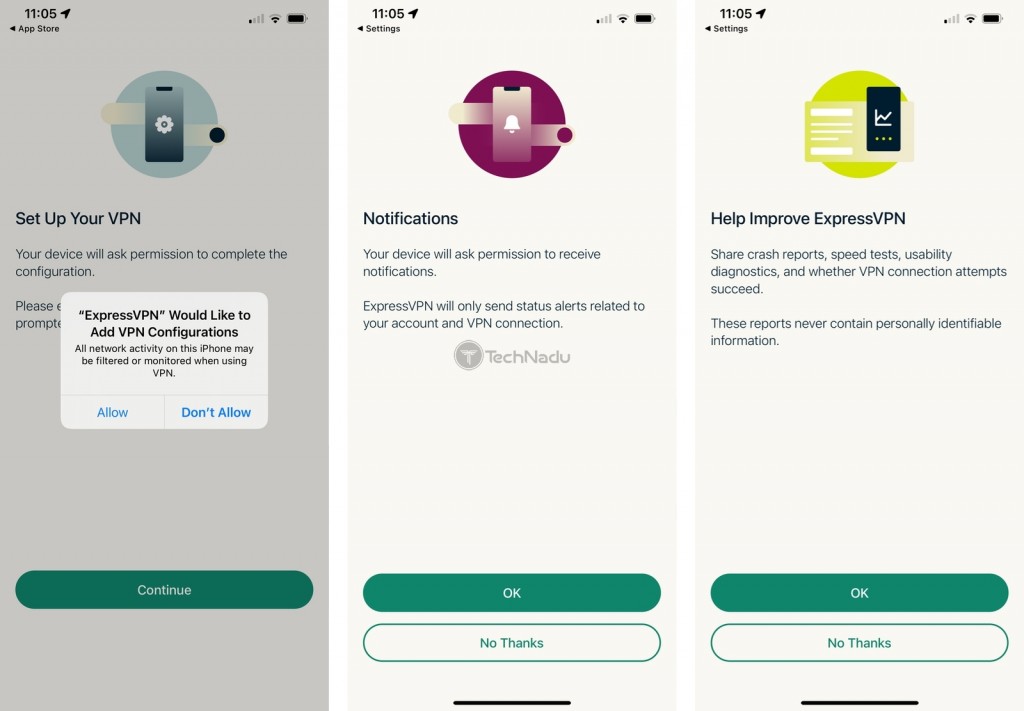
8. Select 'Allow' to let ExpressVPN install a VPN profile on your device.
9. Decide whether you'd like to receive notifications from ExpressVPN.
10. Choose whether to send anonymous logs to ExpressVPN.
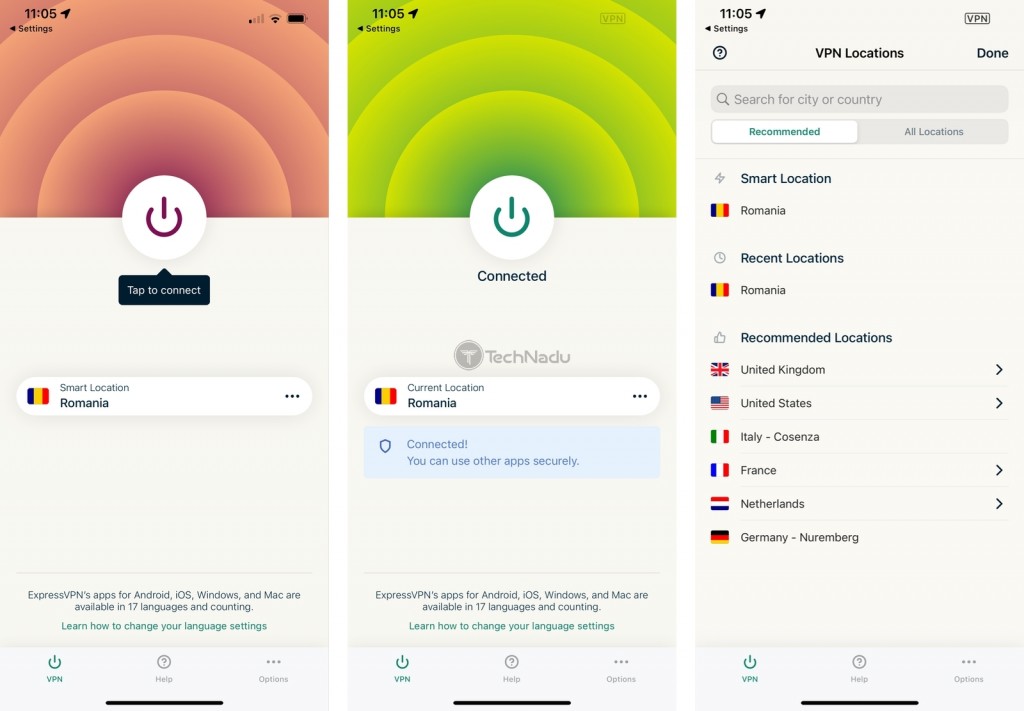
11. At this moment, you should be looking at the VPN's home screen.
12. To connect to the nearest server, tap the prominent ON/OFF switch.
13. To select a server manually, tap on the 'three dots' icon below the ON/OFF switch.
14. To disconnect and end your session, tap the ON/OFF switch again. That's it!
Keep in mind that iOS will let you know if you have a VPN session active in the background. This will be visible in the top-right corner of your screen. Once you no longer need your VPN, simply go back to ExpressVPN and disconnect, but keep in mind that ExpressVPN comes with unlimited bandwidth.
Method #2: Set Up a VPN on iOS via OpenVPN Connect
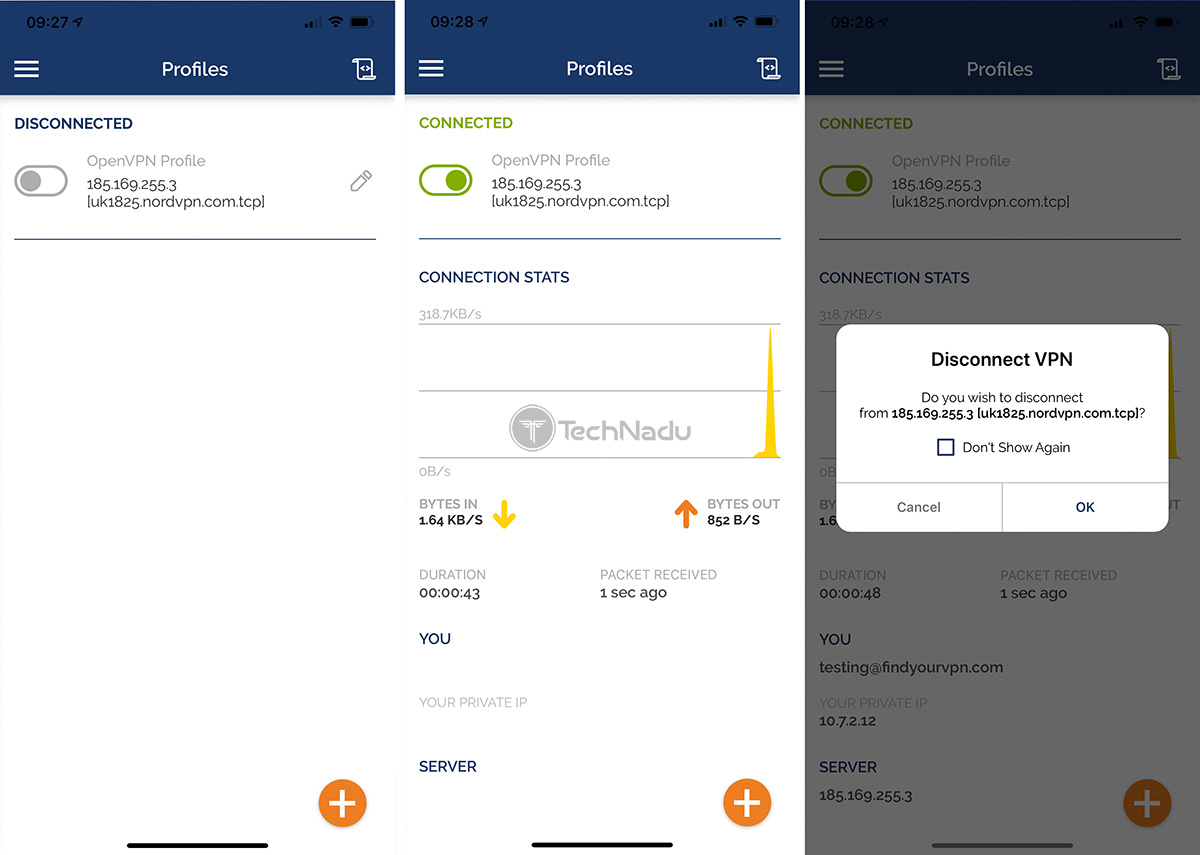
You can also use the OpenVPN Connect app to install a VPN. For this purpose, you need to pick a VPN that comes with OpenVPN built-in. So, let's explain what this procedure entails.
1. Once you subscribe to NordVPN, return to its home page.
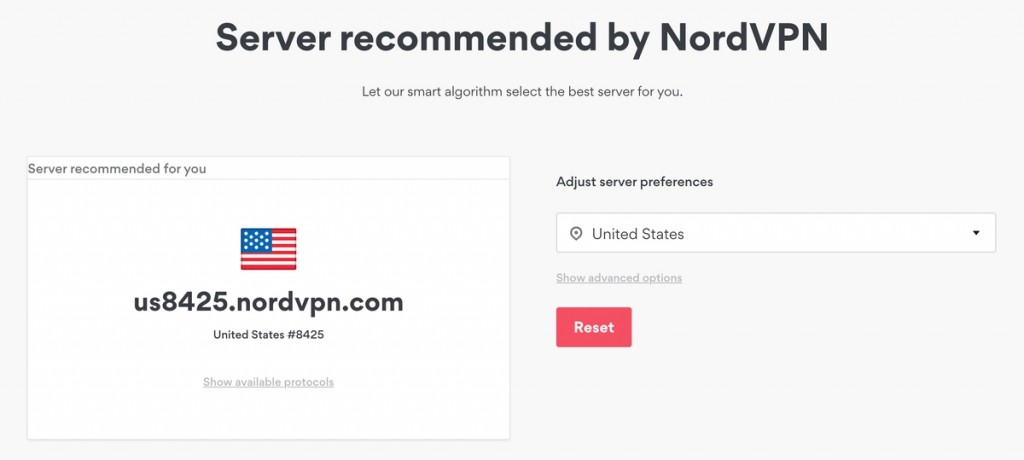
2. Pick 'Servers' using NordVPN's home page. Then, select 'Recommended Server.'
3. On the right, pick a country. You can click 'Show Advanced Options' for extra filtering options.
4. On the left, select 'Show Available Protocols.'
5. Make sure to download your chosen server's OpenVPN config file to your iPhone.
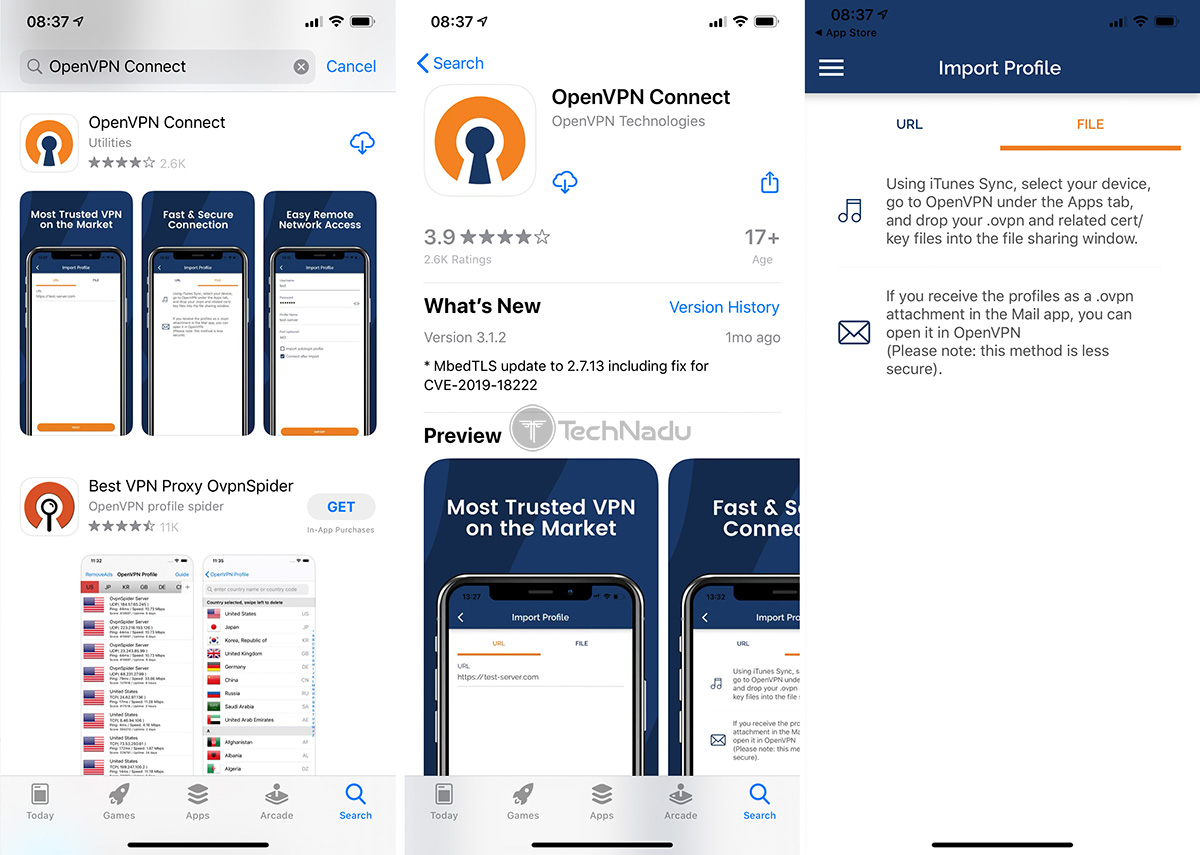
6. Open the iOS App Store and download the 'OpenVPN Connect' app.
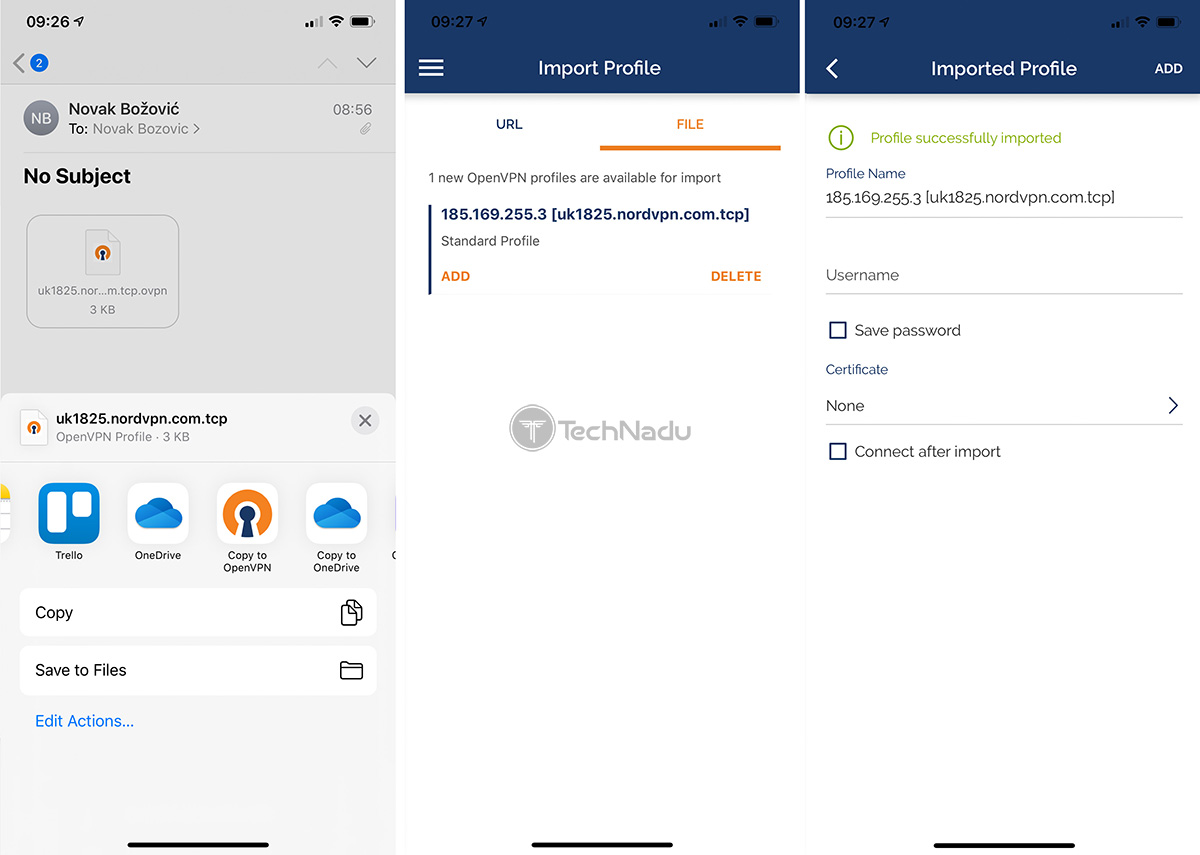
7. Locate the recently downloaded OpenVPN config file.
8. Open the OpenVPN file using the OpenVPN Connect app.
9. Don't forget to input your NordVPN credentials. Then, tap 'Add.'
10. You can now connect to your newly added VPN server. That's it!
It's interesting to note that some VPN services support the OpenVPN protocol - but they don't offer this protocol via their official iOS app. The only way to take advantage of OpenVPN is by going through the procedure mentioned above.
Method #3: Configure a VPN on iOS Manually
Finally, there's also a third method of setting up and configuring a VPN on your iPhone or iPad. For this purpose, your VPN needs to provide you with certain information, including its server addresses. Just go through the following steps.
1. Subscribe to a VPN that supports manual configuration. We recommend ExpressVPN.
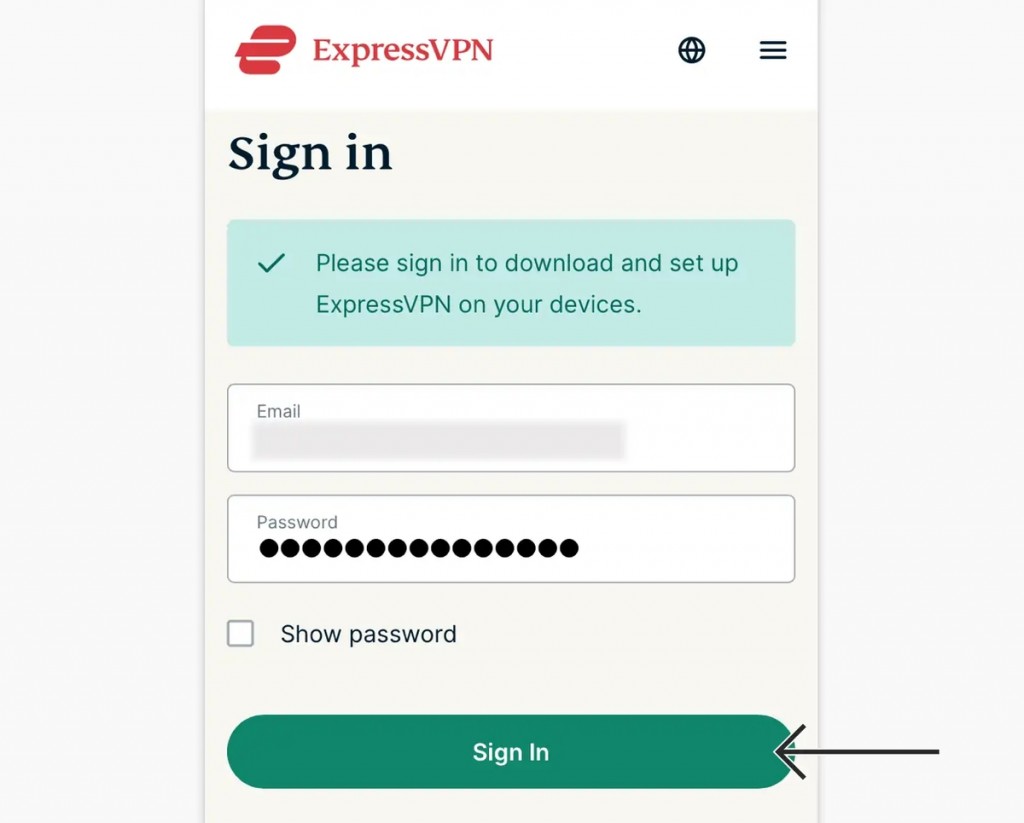
2. Return to ExpressVPN's site and tap 'My Account.' Then, log in to your account.
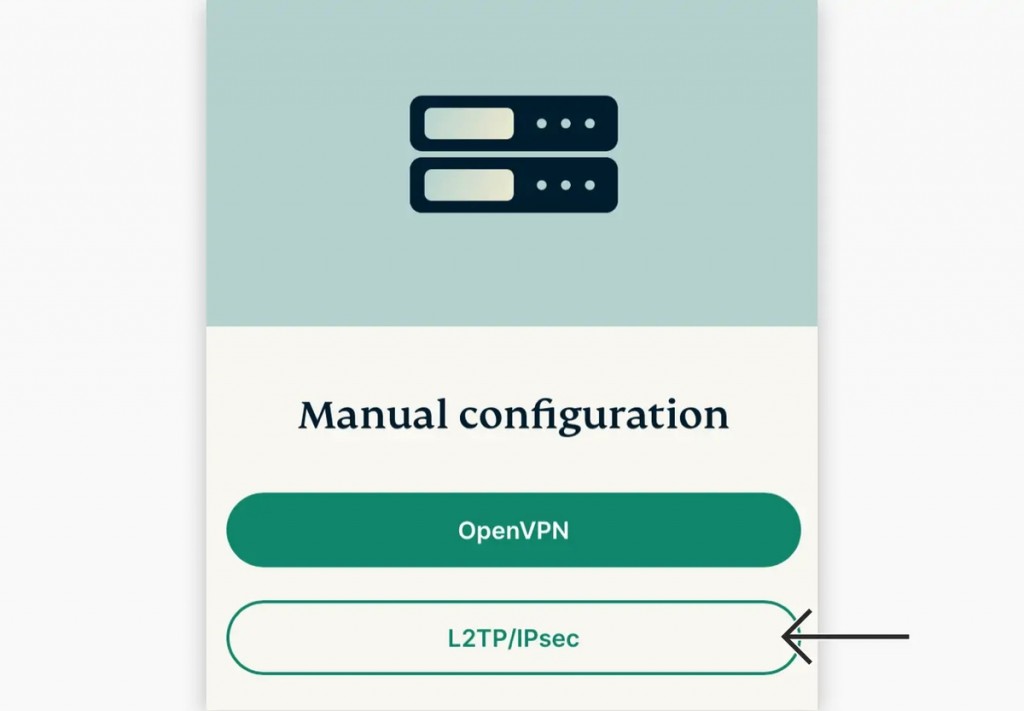
3. Tap 'Set Up Other Devices,' and then pick 'Manual Configuration.'
4. Make sure to pick the 'L2TP/IPsec' tab. Note your username, password, and server address.
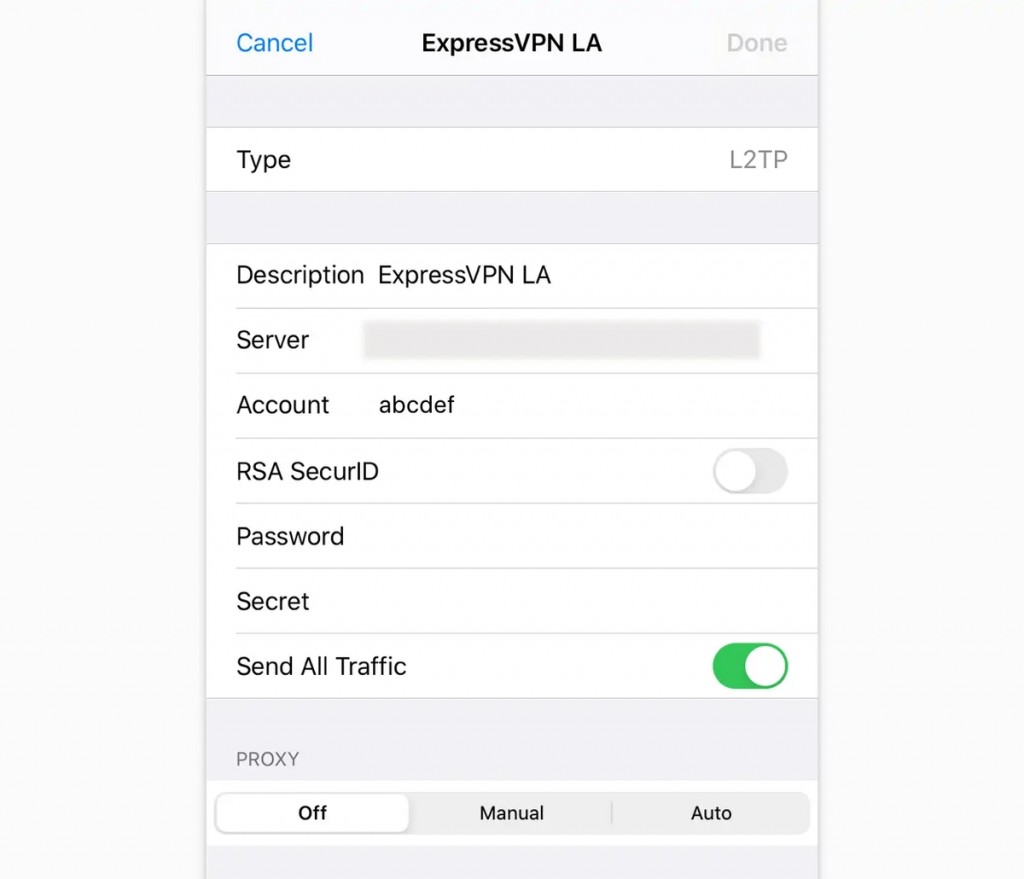
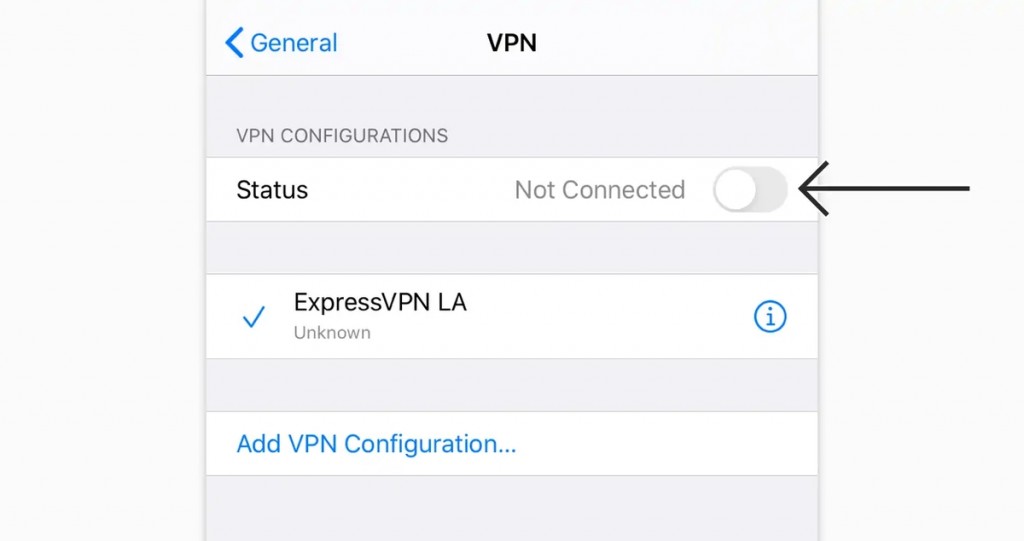
5. On your iOS device, go to Settings > VPN > Add VPN Configuration.
6. Input the required information on your iPhone's screen based on what you'll find below.
- Type: L2TP
- Description: Provide a name for your new VPN connection (any name will do).
- Server: Enter a server address found on your ExpressVPN dashboard.
- Account: Enter your L2TP username (from your ExpressVPN dashboard).
- RSA SecurID: Turn off this option.
- Password: Enter your L2TP password (from your ExpressVPN dashboard).
- Secret: Type in '12345678.'
- Send All Trafic: Enable this option.
7. Tap 'Done' to add your new VPN connection to your iPhone.
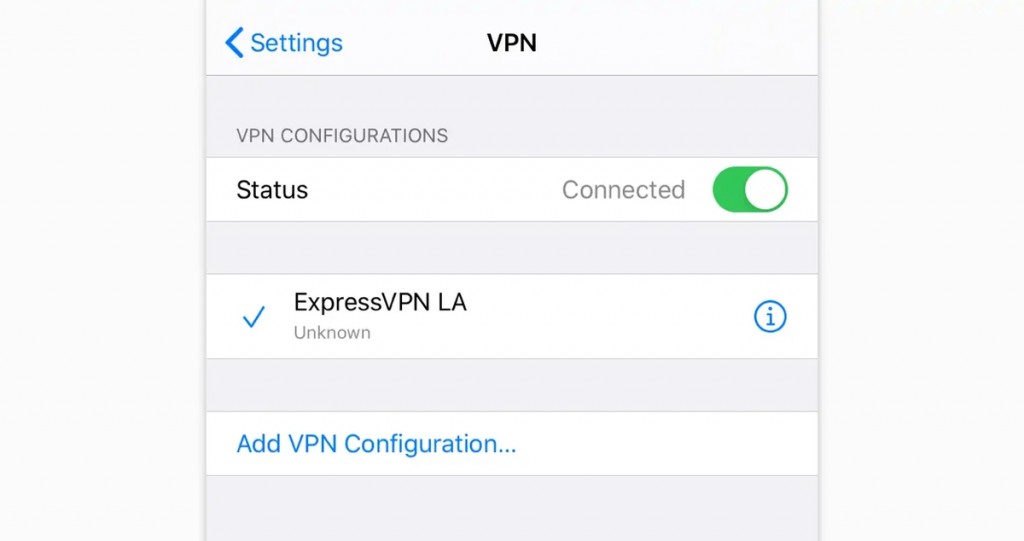
8. To connect, tap the switch you'll see on the right-hand side.
9. The switch will become green to indicate that your VPN session is now active.
10. To disconnect, tap the switch again. It should deactivate and turn gray.
You can add multiple VPN connections following the instructions found above. That would make it easy to switch from one ExpressVPN server to another in an instant. There's no limit regarding how many connections you can store - but you can have only a single VPN session active at any given moment.
Final Thoughts
The easiest way to set up a VPN on iOS is via a native app. That way, you get everything your VPN offers for your iPhone, iPad, or iPod Touch. However, if you wish to create an OpenVPN or L2TP connection, you can rely on manual configuration (suitable for more advanced users).
We'll also remind you that our #1 recommendation is ExpressVPN, especially if you plan on using a native iOS app. There is no better VPN at the moment. You can even try ExpressVPN risk-free for 30 days, letting you see why it's the best VPN for your iPhone.
In the end, we'll recommend checking our central guide on setting up a VPN - especially if you wish to extend your VPN protection to other devices and platforms.
That's it - you've reached the end of our guide on how to set up a VPN on iOS. If you have any questions, let us know via the comments section below. Thank you for reading!

